
Table of Contents
What is Swarm Mode and the Swarm?
Note: Credit goes to Grey_Kn1ght
This guide is intended to teach players about Swarm Mode in Back 4 Blood. Therefore some parts about the campaign, card system, and Cleaners may be omitted as it’s assumed to be already known from playing the non-Swarm elements of this game. Swarm Mode and the Swarm are referring to two distinct things. Swarm Mode is the PvP game type that is available to play in Back 4 Blood. The Swarm is both a “Ridden” and game mechanic that are present in Swarm Mode game type.
Swarm Mode in a nutshell
Unlike Left 4 Dead which had a campaign versus mode there is no campaign versus here. Instead the developers wanted to focus on Swarm game mode which is most similar to Versus Survival from the Left 4 Dead series (and personally more balanced/entertaining). There will two teams each taking turns as both Cleaners and Ridden in each round. The Cleaners try to survive in an ever-shrinking arena while the ridden do everything they can to down or kill the entire team. When the Cleaners are all defeated then the teams switch and the other teams tries to survive for longer. The team that lasts the longest wins that round. Whichever team wins 2 out of 3 rounds wins the entire match.
At the start of each round Cleaners will have a safe time to first pick their cards and then scavenge for supplies and prepare before round truly start. Once the round starts Common/Mutation Ridden can spawn and the Swarm starts closing in after defeating a wave of Common Ridden. Ridden on the other hand will buy upgrades to gain an advantage against Cleaners using mutation points. Mutation points as the round progresses and from damaging cleaners. The points can then be used to buy upgrades at anytime before and during the round starts.
The Swarm
Lore-wise, the Swarm are the plague of Ridden insects that will attack you if get close to them. Their massive numbers, small size, and ability of flight makes them virtually unstoppable at this point in time. This has lead to an evacuation with the cleaners holding out for as long as they can for the evacuation of others.
Gameplay-wise, the Swarm is a mechanic in the game to shrink the area of play as a round goes on to make it harder for Cleaners to survive ultimately drawing a half-round to a close usually no more than 5 minutes (with that being a really good time).
How to Play a Private Swarm Match
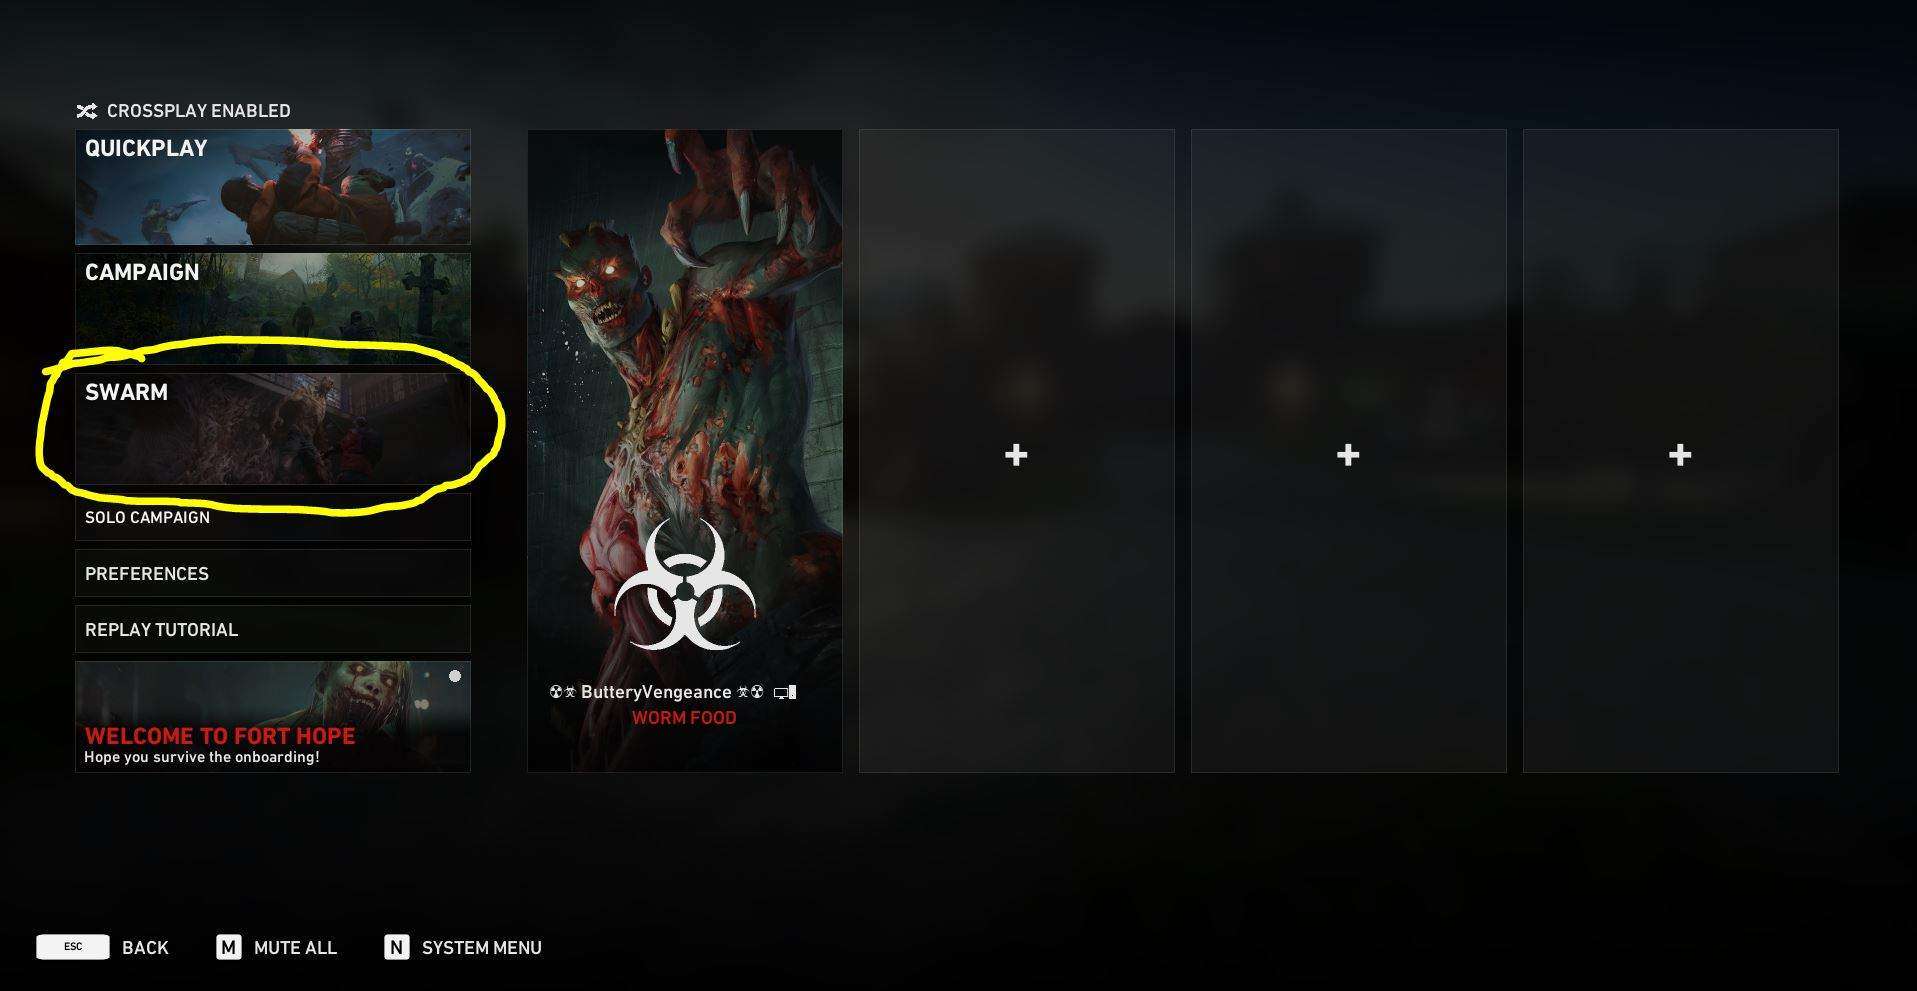
Joining a public match is as easy as making a party in Fort Hope and clicking on “Start Public Matchmaking” however making a private server may be a little for confusing but this section should clarify things for you.
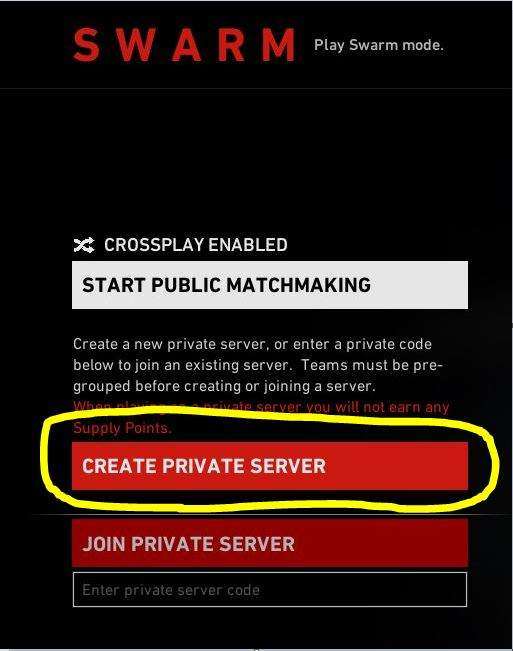
- First, make a party in Fort Hope with the people that you want to be on your team/side for the Swarm make. The other team/side will do the same in their own fort. Only one of the teams now needs to click on “Create Private Server” button.
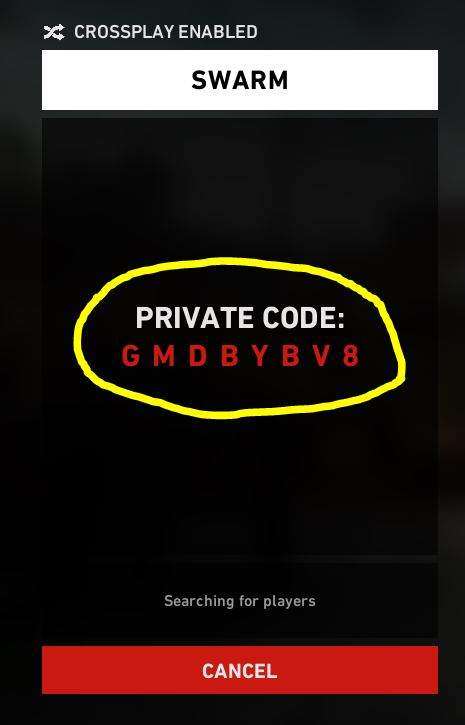
- After the private server is created, a join code will be generated. This code needs to be sent to the party leader of the other team through whatever messaging system your gaming platform allows.
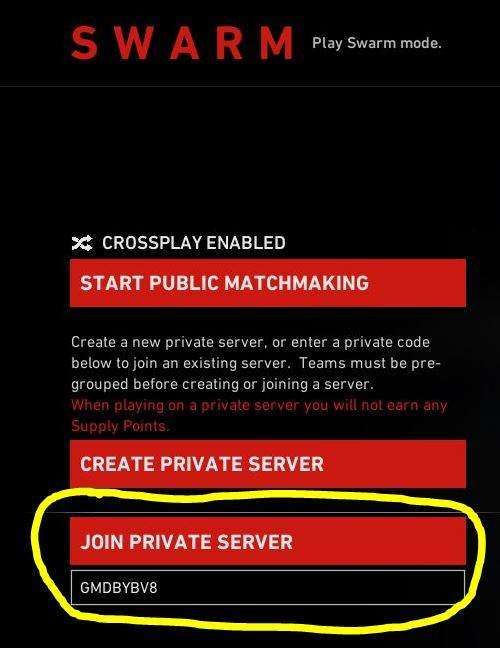
- Finally, the other team will put the code in the textbox below the “Join Private Server” button. Once entered, the party leader can now click the button above the textbox. This will connect the two team together and prompt a server to be reserved for the game. Now both parties will become opposing teams in this Swarm server.
Note:
- All you need to start a private match at least 1 player on each side. So a party of any size (up to 4) can make a private lobby and send that code to another party of any size (up to 4) to play in a private match.
- You will not gain any supply points or achievement progress while in a private server.
Cards & Mutation Points
Cards
Cards are basically a perk system for cleaners to enhance their gameplay as the rounds progress. The card system is present through the entire game and it’s not much different here. Players have the choice from using a premade decks themed after certain playstyles like “medic” however it’s recommended you make a custom deck picking the card combination you would like. Remember when crafting your deck that the cards are drawn in the order you placed in them in your deck so make sure you put that cards you want right away on top. Keep in mind that not all cards from the campaign are available in Swarm, this is done on purpose to balance the game and not make the Cleaners too overpowered.

Mutation Points
Mutation Points are the upgrade system that the ridden have to balance things against the Cleaner’s cards. Mutation points are basically a currency used to buy upgrades for specific Mutation or Common Ridden Families. Mutation points are earned as the round goes on and for damaging Cleaners.
Players can buy any upgrades they want even if they’re not playing that mutation. In fact, coordinated teams will help buy their teammates and upgrade if they only need a few more points. Upgrades are a key factor in playing as the Ridden. Ridden have the ability to constantly buy more and more upgrades as the round goes on and doing so will drastically alter the tides in the Ridden’s favor. It’s recommended to buy upgrades anytime you just died and are waiting for the respawn timer. Alternatively, if you’ve been alive for so long and want to buy points wait until there’s a time you need to regenerate your health or wait for teammates to spawn then hide/buy upgrades. This increases your efficiency as a Ridden player.
The Cleaners (Tips and Useful Cleaners)
The Cleaners operate very similar as they do in campaign. However unlike campaign where they must complete an objective or get to another saferoom, the premise here is simply to survive as long as you can. You’re attempting to get a longer time in the round than the other team granting you a point (first to two wins). Another difference is what happens after you pick your cards; Cleaners are still given a safe time window to pick their cards. However, once all players are finalize their card picks or the card timer runs out the Cleaners are given another safe (albeit shorter) time window to now scavenge for equipment to help them survive longer. After that, it’s is time for the round to start. All items will still be there but mutations can spawn at will (if their respawn cooldown has worn off) and common infected will spawn in waves to harass you. Be wary that the swarm will grow in size meaning you will have less room to fight and any items or downed teammates in the swarm means the cost of taking damage to go out there to them.
General Tips
Melee Hocker Pins: For most pins, all you need to do is kill whomever is pinning the Cleaner. However Hocker pins are different as the Hocker encases them in a cocoon-like shell from a distance. If you see a teammate stuck in this cocoon melee them to free them. However, that being said Hocker pins are the only pins that break over time so other pins should be prioritized unless the Hocker pin is so close to you it can’t be helped to save them right away.
Breakout, Stunguns, and EvANGELo: All of these things are extremely useful in Swarm. Granted these are only useful against ridden that can pin you but a majority of matches utilize at least of these pinning ridden variant. First and foremost, every Cleaner can take the Breakout card which enables them a free breakout of a pin with a cooldown. This does take some time to activate while you are pinned but it’s a great breakout that constantly comes back overtime. If you don’t want to use the Breakout card than you can use Evangelo who has his own ability to breakout that also comes back after a cooldown (Evangelo will be discussed in further detail down below). Now if neither of those options interest you then get ready to use a lot of stun guns. Even if you find a bunch of stunguns it’s advised to use them in situations that call for it. For example, Hocker pins are temporary so even if nobody can save you and you’re safe for the time being then don’t use the stungun. However, if you get pinned in the swarm or are going to get surrounded by Ridden then it might be wise to use the stungun to get out of there.
Knockback, Pins, and the Swarm: As the round goes on the Swarm will grow in size meaning that the Ridden will have more opportunities to use it to their advantage. The Ridden may try their best to knock you or even drag you into the swarm areas to take extra damage and subsequently getting down in the swarm making it exponentially harder to revive those teammates. When the swarm in closing in and you are dealing with Ridden who are trying to take advantage of that then just like before angle yourself so that knockbacks try to keep you inside the safe-zone. Beware that Reekers can have massive knockback and Stalkers can drag you behind cover. So make sure you angle yourself in a way that means you can get rescued easily and can escape the swarm ASAP.
Beware of insta-kill spots: There are some maps that have instant kill areas. They are few and far between but they are typically deep water areas. If it looks like deep water that you can land in, then it’ll kill you. Good Ridden players will try to use enemies with knockback to launch you into the water and get an easy instant kill. Avoid those areas if possible and if you are there then position yourself in an angle that a ridden’s knockback is hard to knock you into one of those spots.
Useful Cleaners
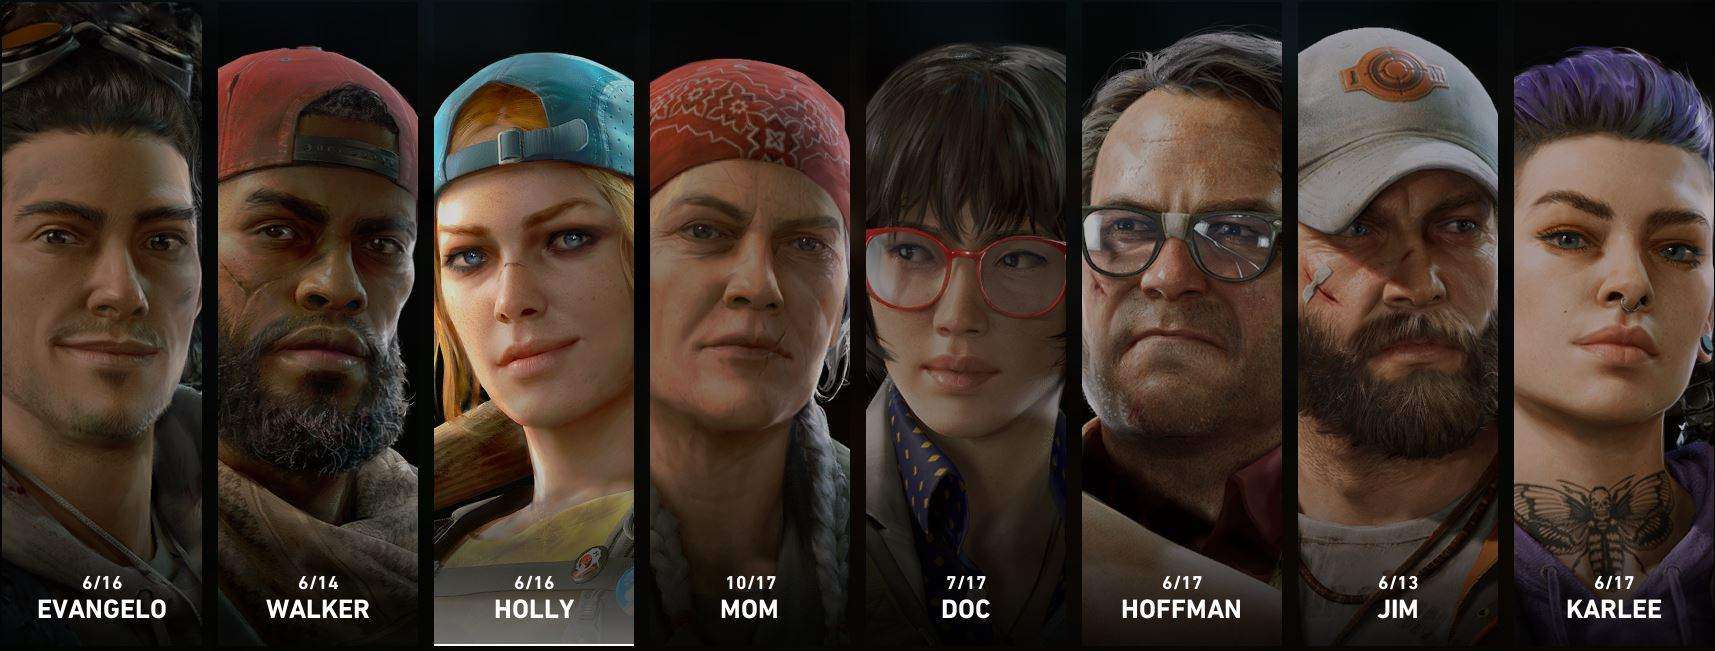
Listing out useful Cleaners isn’t to say that the other cleaners are bad. In fact, making specific card decks for Cleaners and their buffs can be valuable. For example, Hoffman can use a deck focusing offensive item support cards and can skip on ammo capacity (and even get strong perks that have ammo capacity debuffs) since he has a built-in ability for extra offensive item and ammo storage. That being said, these Cleaners offer something unique to the table that provide a little more utility most other Cleaners don’t have especially here in Swarm Mode.
Mom: An extra life and one free quick revive is not just valuable in campaign, it’s a God send here. Mom’s extra life for the team means that the team can either skip on using second chance or use it if they plan to be revived multiple times in a round. Either way more revives or a freed up card slot are great buffs for the team.
As for her quick revive, just like in the campaign it’s useful for saving a teammate out of bad situation quickly. The best time to use Mom’s revive is when a Cleaner is downed out in the Swarm. Her quick revive will mean she has to spend less time in the swarm taking damage to revive someone who could otherwise not be rescued. However don’t wait for that specific instance to always happen there may be another time that will demand her single-use quick revive to be used. The only time you don’t want to use Mom’s quick revive is during a lull in the combat but at that point another teammate can revive while Mom covers them or even use a defibrillator since that is slower than mom’s quick revive and it will free up your support slot.
Jim: For the tryhard team that wants that weakspot damage buff. Land your shots and the enemy team will always be raging.
Doc: More trauma resistance is incredibly useful here since there is few trauma recovery items here. Additionally, the single free heal for each teammate is so useful for your team and allows you to use your support items for yourself (for the time being). The single free heals also gain the benefit of healing buff cards so it’s natural for Doc players to use a deck that orients around healing. If possible have the team hoard and drop medical supplies in a certain area and then have doc focus on healing and making the use of healing supplies.
EvANGELo: As his name implies his free breakout that he has makes him an angel at countering pinning ridden variants and this also stacks with the breakout card so Evangelo is usually able to break free of any situation. Additionally, he will have no major need for stun guns and allow his teammates to use those instead making that incredibly valuable.
Holly: Her built-in damage resistance and stamina regain means if used in the right hands she can squeeze out some extra time as the final survivor as she scrambles to stay alive.
The Ridden
This guide will use specific terms when referring to specific parts of the game and this mini glossary will clarify what these terms mean. However a more in-depth description of Ridden and Ridden tactics will be listed farther down the guide.
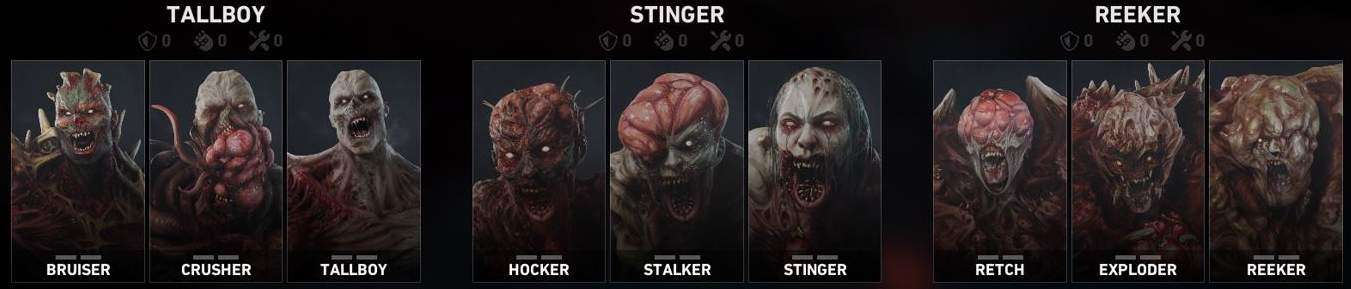
Mutation: These are the 9 playable Ridden that players can choose from in Swarm. They are categorized into Families and further individualized as Variants. It is important to differentiate between Families and Variants because there is a Tallboy, Stinger, and Reeker Variant within each of their respective Families and it’s important to know whether you are talking about the family or variant in both this guide and when communicating as a team in Swarm. Hopefully, it isn’t confusing and if it is hopefully the later in-depth Ridden section will help.
Family/Families: These refer to the grouping of similar Ridden. All Ridden Families can be upgraded through mutation points. There are 3 Mutation Families:Tallboys, Stingers, and Reekers. There is also a NPC Ridden Family: Common. Which like in campaign will spawn in waves to harass the Cleaners.
Variants: These refer to the individual Ridden within a family to avoid confusion when talking about the entire group of variants or just single/type of Ridden.
Pinning: Pinning is a term constantly referred to in this guide and game mode. Pinning is when a Cleaner is unable to move, shoot, or do any action besides breaking out via an ability or item. If the Cleaner does not have any means to break out then or chooses not to then they are stuck until they are freed by a number of means but typically from the assistance of Cleaner teammates. The Ridden that can pin as of right now are the Crusher, Hocker, and Stalker.
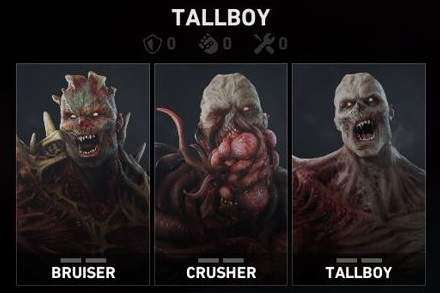
Tallboy Family
In general/Sprint
Tallboys are seen as the up-close and personal type. All of which have the sprint ability which allows them to close the distance. They have high health and deal significant damage. 1v1ing a Tallboy without the proper weaponry can spell disaster so typically cleaners will either resort to using explosives or focus-firing. The former will deplete their resources so making them waste multiple explosives during a single life should be considered a win for anybody playing a tallboy. The latter is expected from most competent teams so tallboys make for great distractions as the more squishier ridden to implement their abilities which can be quite devastating when they are distracted by a Tallboy.

Crusher
The Crusher is one of the few variants that can “pin” a cleaner and the only one to do so in the Tallboy family. The Crusher has the ability to grab a cleaner and start squeezing them for damage. During this time the Cleaner is helpless unless they have means of breaking out of grab through a variety of ways. The Crusher’s weakspot in the front makes him and easy target when approach a fully aware team of cleaners which means they don’t make a good ridden to initiate team-coordinated attacks. However their rare ability to pin means they are great for teams that are short a pinning ridden variant or if the team is running an all pin strategy(to be discussed later).

Bruisers
The Bruiser is the tankiest of all the tallboys with a higher than average health but this is balanced by the fact that the bruiser has a considerably less sprint distance than a tallboy. It is recommended for bruisers to spawn close to the cleaners so they will not need to cover as much distance. Considering that they slower bruiser mains should also be savvy in understanding Cleaner movements and how they will try to parkour their way from bruisers. At that points bruisers can give chase and try to intercept them, coordinate with another teammate for a quick punishment, or zone them out while the rest of the Cleaners fight with one less person.

Tallboys
Tallboys are very similar to Bruisers but they sacrifice the extra health for extra sprint distance and damage. There’s not much else to add except that this makes them an excellent choice for hit & run fighting tactics that will be later discussed.

Both Bruisers/Tallboys
Primary and Secondary Attacks
Bruisers and Tallboys have the same primary and secondary attacks. The primary attack is an aimed AoE attack that damages and knocks back anybody in range. The secondary attack is a frenzy attacks at an increased speed that can land any where around the Tallboy/Bruiser at the cost of the Ridden not being control-able until the attack is ended by the player or enemy Cleaners.
Weakpoints
The weakpoint of these two variants technically facing away from where they are looking is both a blessing and curse. It makes them a great variant to initiate engagements and charge into battle. However it should be warned turning your back towards Cleaners (especially if you turn your back to chase after one Cleaner) can be incredibly punishing.
Stinger Family

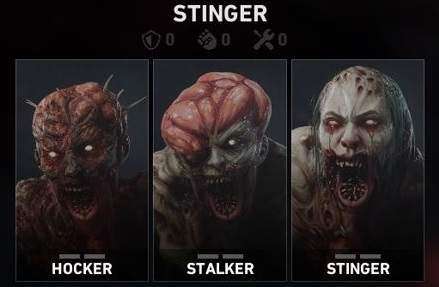
In General/Leap Ability All Variants in this family have the leap ability. This ability is all about repositioning to a safer location or closing in for an attack. No matter what, it is an ability that is essential to use for all variants and from now on will not be mentioned in variant descriptions. As a general rule, the role of all Stinger Variants is to pester, annoy, and harass the enemy team. Since Stingers are low health they are advised to not initiate any engagements except from afar and when you know it’s safe. Stingers should only expose themselves when the Cleaner team is sufficiently distracted and they can get in for some quick hits without getting punished.

Hocker: The Hocker is the first of the two pinning variants Ridden in the Stinger family. The Hocker shoots a projectile that will knockback and pin a Cleaner at a distance in a temporary lasting cocoon. This allows for the Hocker to move about freely to reposition or close-in for an attack against the pinned target or another Cleaner. This is the only pinning variant that can move freely while their victim is pinned at the cost of the pin wearing off naturally without rescue and only being able to pin one at a time with a longer cooldown on successful pins being removed than on missed shots. The cool thing about Hockers is that you can buy an upgrade for them where pinned victims take more damage from other attacks making them a great at pinning them for another teammate or commons to harass.

Stalker: The Stalker is the second the two pinning variants. Unlike the Hocker, the Stalker has to physically grab the Cleaner themselves. Once grabbed the Stalker is able to move the Cleaner wherever they please while slightly damaging the Cleaner. It is advised to drag Cleaners behind cover as to prevent easy rescues and into the swarm to do extra damage.

Stinger: The Stinger is the only variant that doesn’t pin Cleaners. Instead what the Stinger does is shoot a fast moving projectile that damages the Cleaners at range. This projectile has a quick cooldown which means the Stinger can possibly fire multiple shots before having to reposition. This makes them especially useful at harassing Cleaners from afar and damage them. The Stinger compliments many other variants if played correctly.
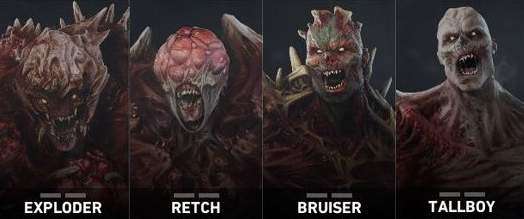
Reeker Family

In General/Charge Ability:
Reekers can be easily dismissed because they have quite a diverse variant pool and odd upgrade mechanics. However the diversity in their variants allows them to fill the gap that any Ridden team might have. Good Reeker players should be willing to switch to a Variant that will help the team (e.g. you should be a Retch or Exploder instead of Reeker if you have Hockers on your team)
The charge ability can be easily dismissed as a sprint ability for Reekers to close distances and avoid dying however this is a bit more to that. Reekers who use the ability can deal significant damage and knockback. In addition if the regenerating charge upgrade is purchased, the charge now triggers health regeneration which is great for getting back into the fight quickly or allowing for much more riskier/rewarding plays.

Retch: The Retch is the combination of the Boomer and Spitter from the Left 4 Dead series. Their primary mode of attack is that will vomit and leave a residue that lingers on the ground damaging and potentially debuffing anybody who walks on it. It’s best to use these Ridden Variants at a range using their charge ability to run out of danger.

Exploder: The Exploder is an absolute punisher for teams who decide to stay indoors. Their whole premise is to charge into a group and deal massive damage. It’s advised for Cleaners to focus fire them so they explode out of range while Exploders should use flanks and sneak onto distracted teams to punish and knockback the team in disarray. If you get the damage resistance upgrade , Exploders make a great initiator as they have the damage resistance to get into an alert group and blast them into a panic.

Reeker: The Reeker is the melee Variant of the Reeker family. They have no weakpoint which means that weakspot damage buffs from Cleaners wont apply here making Reekers a great counter to Jim players. The Reeker’s charge ability should be used to rush into the Cleaner team. Any person hit while charging takes damage, once you are in the fight you can smack a few players until death or charge away hitting a few more Cleaners on the way out. This makes them a good tank if you’re team is lacking one.
Ridden Strategies
Mutation Point Investment Strategy
Now you and your team may think that having at least one of each Family is necessary and while it does allow for a lot of variety it greatly diminishes your Mutation Point spending pool. Therefore, it’s recommended that teams focus on only on 2 Mutation Families (meaning more upgrades for them) and allowing for more points to be spent on the Common Family which helps the Ridden team overall and shouldn’t be ignored. That is why most of the Ridden strategies mentioned below are emphasizing the 2 Mutation Family Investment Strategy.
x2 Reeker & x2 Bruiser, Tallboy
All Melee
This one is an easy team comp. You simply go with 2 Reekers and 2 Tallboys or Bruisers (whichever you prefer). This build is the easiest comp for new players who don’t know the various abilities of the Ridden or how the game plays. This comp also means that staggered spawns won’t punish you as much as other tactics and further cementing why this strategy is great for new players.
x2 Crusher & x2 Stalker, Hocker
All Pin
For the team that wants to elevate from melee to something a bit more nuanced then we have the All Pin tactic. This team is compromised of 2 Crushers and 2 Stalkers or Hockers (preferably stalkers). The premise of this comp is to simply pin all the Cleaners at the same time making them unable to help each other and securing an easy win (like less than 1 minute). This strategy is the sole reason why Breakout, Stunguns, and Evangelo are so important because if a good can survive an all pin team comp with those things.
x2 Hocker & x2 Retch
Birthday Candles
This is a great long distance teamcomp which contains 2 Hockers and 2 Retches. The Hockers will pin the Cleaners (i.e. making them into birthday candles) while the Retch puke on and all around the pinned victims (i.e. blowing the candles out). This means that both the pinned victim and their rescuer will suffer the puke damage meaning easy damage. The downside to this is that these variants are very low health and with no high health tank variants you must move quickly to avoid dying from Cleaner attacks who will only be distracted by the Common Ridden.
x2 Hocker & x2 Bruiser, Tallboy
Hammers and Nails
This is a variation of the Birthday Candle tactic. You still have 2 Hockers but now you have 2 Tallboys/Bruisers. The Hockers will now be pinning the Cleaners (i.e. holding them as nails) while the Tallboys/Bruisers literally hammer them down with their primary attack. If their teammates rush on you to save them then switch to your secondary frenzy attack which will increase the attack speed, potentially hit rescuers, and make it harder to hit your weakspot.
Home Wrecker
This build is designed to counter Cleaner teams that hunker indoors for protection. This tactic has the widest amount of variety as it’s supposed to be used only when the Cleaners hunker down and the Ridden need to punish or flush them out. Basically, the viable variants in a Home Wrecker comp are the: Exploder, Retch, Tallboy, Bruiser, or any Stinger Variant. The stingers job as usual is to harass the Cleaners either by slowly depleting health or pinning them. Retchs and Exploders want to make the interior of the place a living nightmare by puking inside or exploding over and over under the cover of Tallboy (Family) attacks or Stinger(Family) pins. Tallboys should rush in and use their secondary frenzy ability to deal massive damage in a small area quickly and to make it harder for your weakspot to get it. Alternatively, they should be wary of escape points and prevent people from running out from the safehouse turned killzone however if they are teamed up with Stingers then it should be the stingers job to deal with stragglers that slip through to the outside.


Be the first to comment