
This walkthrough guide will describe how to get a perfect inspection score on all vehicles in all days of the campaign.
Intro
Note: Credit goes to Devistater
This guide has spoilers! It’s going to be a walkthrough of all days how to get perfect inspection.
Note that the game probably won’t be as fun if you just follow this guide from the start, part of the fun is learning how things work (even if you restart some days) and trying to be a good inspector. Ideally look up a particular day you are having trouble with and use the info here to assist.
Note: Except for certain fixed vehicles (like a couple in tutorial) most of the time there’s randomness in each vehicle.
Each particular vehicle is always an approve or deny, or arrest, etc, that does NOT vary during a single campaign, if you hit repeat the day.
On new campaigns, the number of smuggler cars per day will stay the same.
Things that vary for instance a certain deny vehicle might have papers name and expiration date wrong, and if you retry the day now it will be different errors in the papers like name and photo. Things that are smuggled, usually the locations vary, and even the total number of contraband, but the number of locations in a particular vehicle usually stays the same on retries of a day (for instance 6 items in 4 locations one try and 7 items in 4 locations the next). Different campaign runs can vary the number of locations. The things that are randomized I’ll be putting into brackets in the guide []
Note: If there is a ? after an item (like papers?) then that means it doesn’t always seem to happen.
Training Chapter
The training chapter is days 1-5
Day 1
- 1st day you will be looking at the following factors:
- Name match (can use comparator tool)
- Expiration dates (can use comparator tool)
- Passport number (can use comparator tool)
- Photo
“Papers” in first day means to look at things like expiration date, name, passport number, and photo.
- 1st vehicle: Approve, no marks
- 2nd vehicle: Deny, Papers
- 3rd vehicle: Approve, no marks
- 4th vehicle: Deny, Papers
Day 2
2nd day adds the possibility of smugglers
- 1st vehicle: Arrest, smuggler. 2 locations (back seat bottom, engine compartment)
- 2nd vehicle: Deny, Papers
- 3rd vehicle: approve, no marks
- 4th vehicle: Arrest, smuggler. 5 locations
Day 3
No vehicles, training day to drive to the 3 basic map locations and learn about them.
Note: There’s a huge cheese opportunity here, if you find all the treasures and KGP notes right after visiting Vlad tools, since timer stops at like 10pm regardless of how much time you take on this day. I don’t recommend this for your first campaign, because getting an extra $3800 extra cash during the training chapter can be a pretty significant swing. There’s other guides with more information on the locations of the hidden items.
Day 4
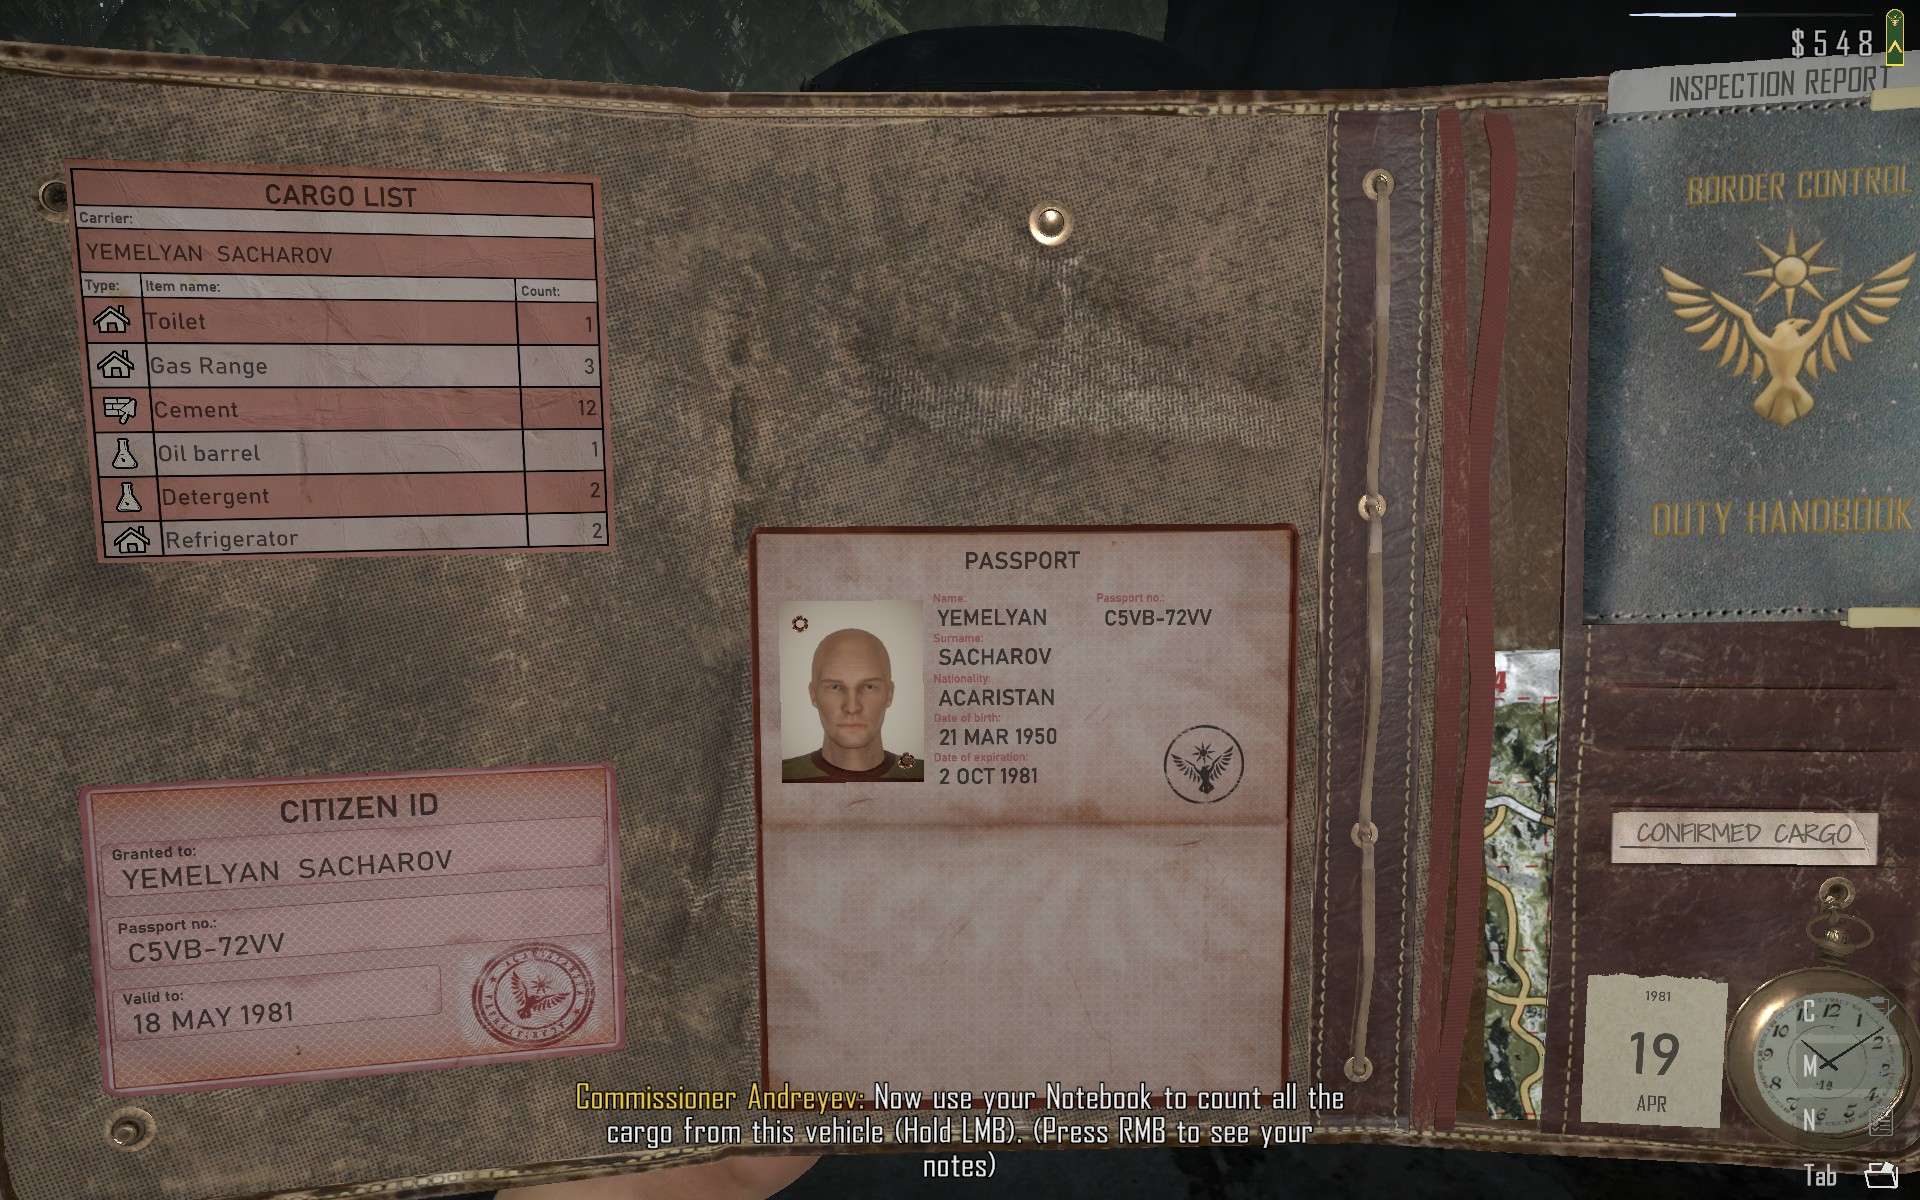
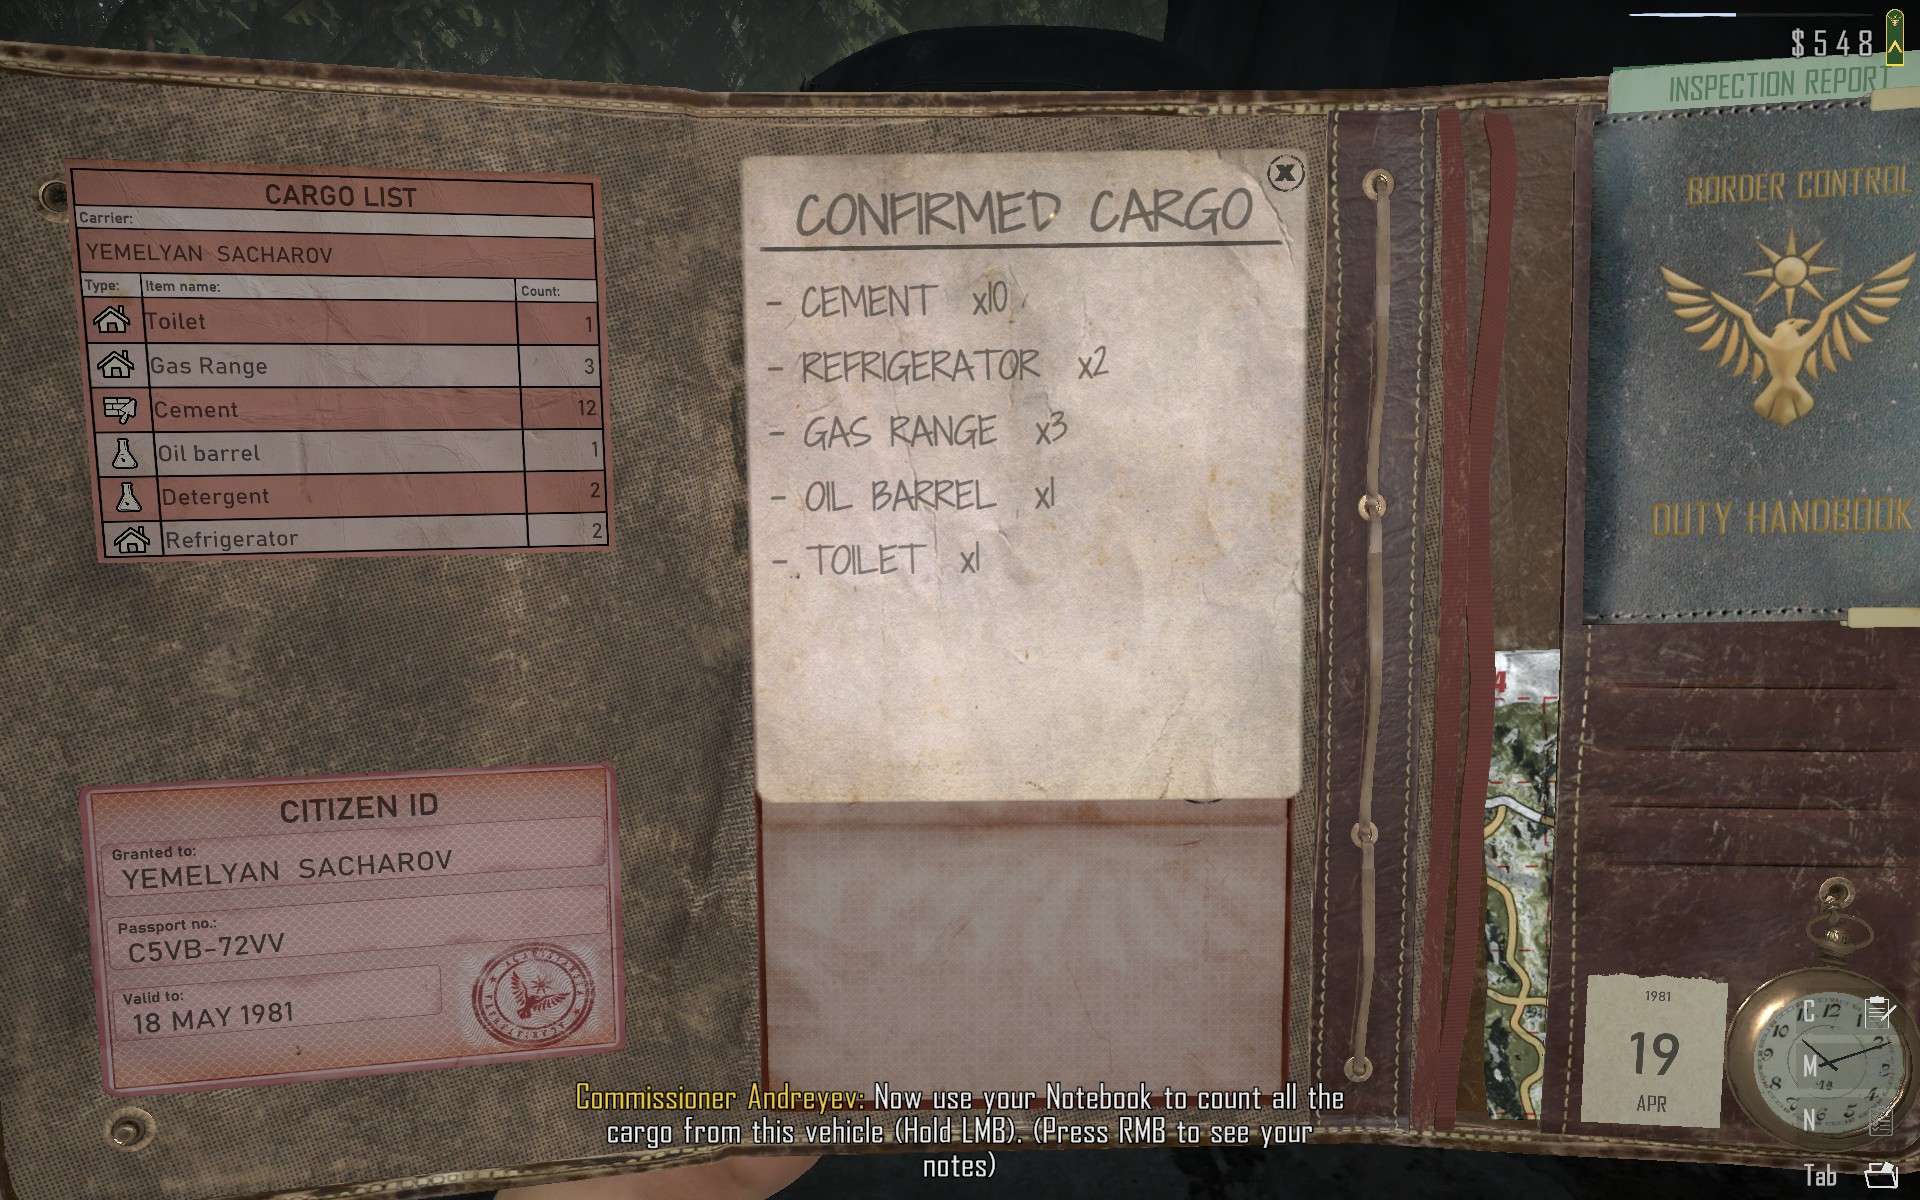
Day 4 adds the cargo list (cannot use comparator), you have to compare the cargo they have with what they claim on their cargo list. ALSO, make sure to compare spelling of name on cargo list too! Usually best is to mark all the cargo items and hit the button to remove them from vehicle, check them over for smuggler marks and return them (talk to the guard with the white ! mark over his head to return cargo to vehicle), and finally compare confirmed cargo list with the paper cargo list they gave you. See screenshots below. If you can reach them all you can also just mark them all and not take them out, then compare the lists, but usually this game doesn’t time crunch much.
- 1st vehicle: Deny, Cargo list, papers?.
- 2nd vehicle: Smugger, arrest. 4-5 locations
- 3rd vehicle: approve, no marks
- 4th vehicle: deny, cargo list, papers (name)
Day 5
You can now trade with vehicles (the little money bag icon). It’s somewhat random who you can trade with.
- 1st vehicle: Deny, cargo?, Papers
- 2nd vehicle: smuggler, Runner, arrest. 3-5 locations
For vehicles that just run the blockade there’s a few things you can do. If you load up the police van in the morning of a runner with prisoners or contraband, you can make drop off(s) after you run the vehicle down if you are quick especially if it’s on the way back (there’s usually a timer to get back) Note: Check the runner vehicle before leaving, otherwise you will miss out on contraband from runner vehicles. You can actually search most of it while the guy is awaiting arrest, so it won’t start the timer.
Don’t forget to transfer prisoner from van to prison! Else he might escape.
You can also cheese the runner by parking the police van past the exit gate, vehicles will run into it and stop. In this case you could do that when you first wake up, or after the first vehicle. Or you can just run them down and return. HOWEVER, you cannot cheese this particular vehicle, they disable your van’s engine start until after they run.
You will receive a pistol after this, and as far as I know there’s no way to win this fight.
Fake Help Chapter
Remember to check the board! This time around there’s “Entry Regulations” about not accepting people from Kingdom of Erkei who have goods or luggage that will apply for the whole chapter. The passport says where they are from. Make sure to check Entry Regulations on the inspection report as a reason not to let someone in if they meet these restrictions.
Day 6
- 1st Vehicle: Deny, Entry Regulations
- 2nd vehicle: Deny, Entry Regulations, Cargo list?, papers
- 3rd vehicle: Arrest smuggler, 6 locations
- 4th vehicle: Deny, papers
- 5th vehicle: Approve, no marks
If you’ve had a perfect inspection record up until now, this 4th vehicle inspection will get you promoted
After finishing the inspections on this day, it’s a good time to make run(s) to drop off contraband or prisoners or both. If you’ve found all the contraband the storage is likely close to full. Don’t forget to talk to mechanic to repair the van afterwards if it needs it
Day 7
- 1st vehicle: deny, entry regulations, cargo list? papers?
- 2nd vehicle: arrest smuggler, 4 locations (1 tire, 2 cargo, 1 central console front)
- 3rd vehicle: approve, no marks
- 4th vehicle: approve, no marks
- 5th vehicle: Deny, entry regulations, papers
There will be a raid that happens at 1pm, if you want max perfect scores, don’t have a vehicle present at this time, like wait for the timer if it’s close with the inspection bay empty. If you are low on ammo from previous attacks, make sure to hire vlad to stop by to resupply, or hide in outhouse. You will get paid a fixed amount. As far as I’ve found, body loot is only ammo. And all the bodies disappear immediately after the last raid enemy is dead, so if you are strapped for ammo, consider looting mid battle, although this is dangerous. There’s another guide with details about cheesing raids by hiding in the outhouse.
Day 8
- 1st vehicle: approve, no marks
- 2nd vehicle: deny, cargo list, papers
- 3rd vehicle: approve, no marks
- 4th vehicle: deny, entry regulations.
Note: The 4th vehicle is the first one that asks you to let him in for a special reason, and is needed to approve to get the Merciful achievement. Week 2 patch fixed this achievement and it can be earned now.


Be the first to comment