
Some personal notes for how to survive & thrive in “Darkest Dungeon”.
Table of Contents
Hero Selection & Outfitting
Note: Credit goes to RE
The following build and recommendations are strictly with the Darkest Dungeon quests in mind.
Upgrade the Stagecoach as soon as possible. This provides several bonuses, including:
–wider selection of available classes
–larger number of heroes / week
–possible higher hero starting level (which gives free learned skills and equipment)
For a full roster of 30 heroes, I recommend having 2 of each hero class, except the following:
–4 Arbalests / Musketeers
–4 Vestals
–3 Plague Doctors
–3 Lepers
–3 Bounty Hunters
–can do with only 1 Highwayman or Crusader (default Dismas & Reynauld)
Prioritize Heroes with the following Positive Quirks, and lock these Quirks in with the Sanitarium. Remove all Quirks that penalize these bonuses:
Ranged Heroes:
Fated ACC
Unerring DMG
Eagle Eye CRIT
Natural Eye ACC
Natural Swing ACC
Melee Heroes:
Evasive DDG
Precise Striker CRIT
Tough HIT
For Any Hero:
Eldritch Slayer ACC / CRIT
Quick Reflexes SPD
Hard Skinned PROT
Deadly CRIT
Eldritch Hater DMG / STRESS
Irrepressible VIRT
Unyielding DTHBLW
Fight the Corvid beast as often as possible to gain Corvid Quirks such as
Corvids Eye ACC / Scout
Don’t bother locking in area-specific Quirks unless you want to build an anti-area team (+scouting and -stress are best Quirks for this).
Team-Building Exercises
One of the single best all-around team builds I have discovered is (from left to right)
4 Arbalest / Musketeer
3 Arbalest / Musketeer
2 Vestal
1 Bounty Hunter
Equip the Arbalests or Musketeers for DMG, Vestal for 2nd-slot HEAL, and Bounty Hunter for damage and survivability (DDG, HP, DMG, SPD). The Arbalest and Musketeer benefit from most damage-increasing trinkets, especially class-specific ones. Equip the Vestal with the Profane Scroll and either another healing Trinket or a Martyrs Seal. Give the Bounty Hunter a Wounding Helmet, Berserk Charm, or another Trinket that gives SPD.
With this build, Mark targets with the Bounty Hunter first thing every turn. With luck, the two Arbalests / Musketeers will be able to kill at least 1 “light” enemy per round, and gain a damage and accuracy bonus against large or heavy enemies. The Bounty Hunters MARK power also reduces enemy PROT and gives him a SPD bonus. You will probably have to spam healing with the Vestal, but if you have some breathing room, use her Dazzling Light or Illumination powers.
Special Teams
These teams get a special name when equipped in the right order; I do not know if this special configuration gives any actual bonus, or just cosmetic. From left to right:
4 Plag 3 Vest 2 High 1 Crus = “Red Hook”
4 Plag 3 High 2 Vest 1 Crus = “Tricky Glory”
4 Vest 3 Plag 2 High 1 Crus = “The Usual Suspects”
4 Grav 3 Occt 2 Abom 1 Hell = “Les Miserables”
4 Occt 3 Grav 2 Abom 1 Hell = “Heavens Devils”
4 Jest 3 Grav 2 High 1 Bount = “The Guilty”
4 Grav 3 Jest 2 High 1 Bount = “The Mercenaries”
4 Anti 3 Vest 2 Lep 1 Crus = “Seekers of the Grail”
4 Man 3 Vest 2 Lep 1 Crus = “Belle and the Beasts”
Making Money
Credit for this strategy goes out to the random internet, where I was reading up on “how to survive and make money in Darkest Dungeon“. There are numerous other guides to money-making strategies on the internet.
1) Keep torchlight at about 50% (or less, if you can afford it). This improves the amount of loot you receive from a victorious battle or successful use of a curio.
2) Use Provisions to protect yourself from curios (see list below). This will prevent negative effects, and give your heroes extra loot or a buff.
3) Have a high Scouting chance (with Quirks, heroes such as Bounty Hunters, Grave Robbers, and Highwaymen, or camping skills on these heroes). This lets you avoid fights you don’t profit from, and lets you find curios, quest locations, and secret rooms.
PROVISIONS & CURIOS LIST
Use Medicinal Herbs on:
Animal Carcass (Weald)
Rotten Fish & Coral (Cove)
Iron Maiden & Alchemy Table (Ruins)
Banquet Table & Moonshine Barrel & Feeding Cards (Warrens)
Use Holy Water on:
Troubling Effigies (Weald)
Fish Statues / Idols (Cove)
Eldritch Altar & Altar of Light & Urns & Confession Booth (Ruins) (guaranteed at least 1 gemstone for use on Ash Urns)
Bone Piles (Warrens)
DO NOT USE Holy Water on Skin Totems / Skin Racks (Warrens).
Use Skeleton Keys on:
any “Locked” chest or item
Sarcophagi (Ruins)
any secret room chest (guaranteed 1-3 spectacular gemstones)
Use Shovels on:
Giant Clams & Barnacle-Encrusted Chests (Cove)
Gravestones (Wealth)
any blockages in any area
Use Bandages on:
Spiderwebs & Mummified Corpses (Weald)
Rusty Cleaverboards (Warrens)
Use Antivenom on:
Ancient Trees (Weald)
Brackish Tide Pools (Cove)
DO NOT USE Torches on:
Red Orb Shrines in any area (unless you want a tough fight)
Book Piles or Book Cases (causes stress & may inflict a negative Quirk)
The Second Darkest Dungeon Quest
Thankfully, for this quest, the quest locations are fixed.
Make sure 3 of your 4 heroes are equipped with the Talisman of the Flame Trinket. Equip the Talisman on the 2 front-line heroes, and give the third Talisman to either a Houndmaster or Man-At-Arms (a hero that can Guard the last hero who does not have a Talisman).
I prefer Houndmasters over Man-At-Arms for this quest due to the Houndmasters high DDG, which can be improved with Trinkets such as Protective Collar and Ancestors Coat. Spam Guard on whichever hero does not have the Talisman for stacking bonuses to the Guarding hero and effective immunity to Revelation for all 4 heroes.
Stack anti-bleed and anti-blight (and PROT, if available) on your tank or front-line damage-dealer hero; stack HEAL, VIRT, or anti-DTHBLW on your healer.
For this quest, I managed to complete it after three attempts with: 4 Arbalest 3 Vestal 2 Houndmaster 1 Bounty Hunter, with 3, 2, and 1 equipped with the Talisman. I did lose the Arbalest to blight before reaching the 3rd Iron Crown, but managed to out-damage the final Templar to complete the final room. I camped a room or two before each Iron Crown room.
The Third Darkest Dungeon Quest
The quest description comments

– it speaks the harsh but honest truth. You have to be very lucky to make this a short(ish) quest, and by this point, you should know that you can’t count on luck alone.
Load up on Bandages, Antivenom, Food, Holy Water, Torches, Medicinal Herbs, and Laudanum (all of which you should easily be able to afford by now). You get exactly no loot for doing this quest, so your entire inventory space should be full of necessities. You will NOT need Shovels or Skeleton Keys.
It is hard to predict how and when you will take STRESS, so use Laudanum sparingly. When I attempted this quest, my Houndmaster started with 50% stress for reasons I can’t explain. (He went mad.)
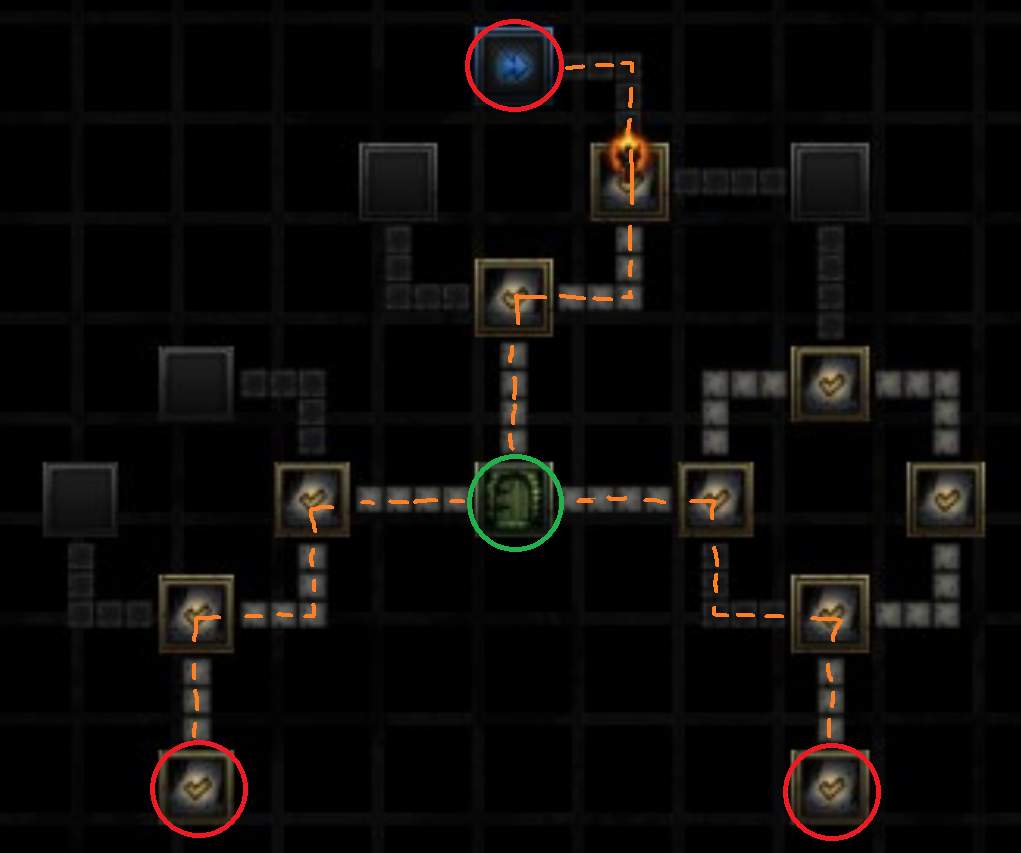
—-
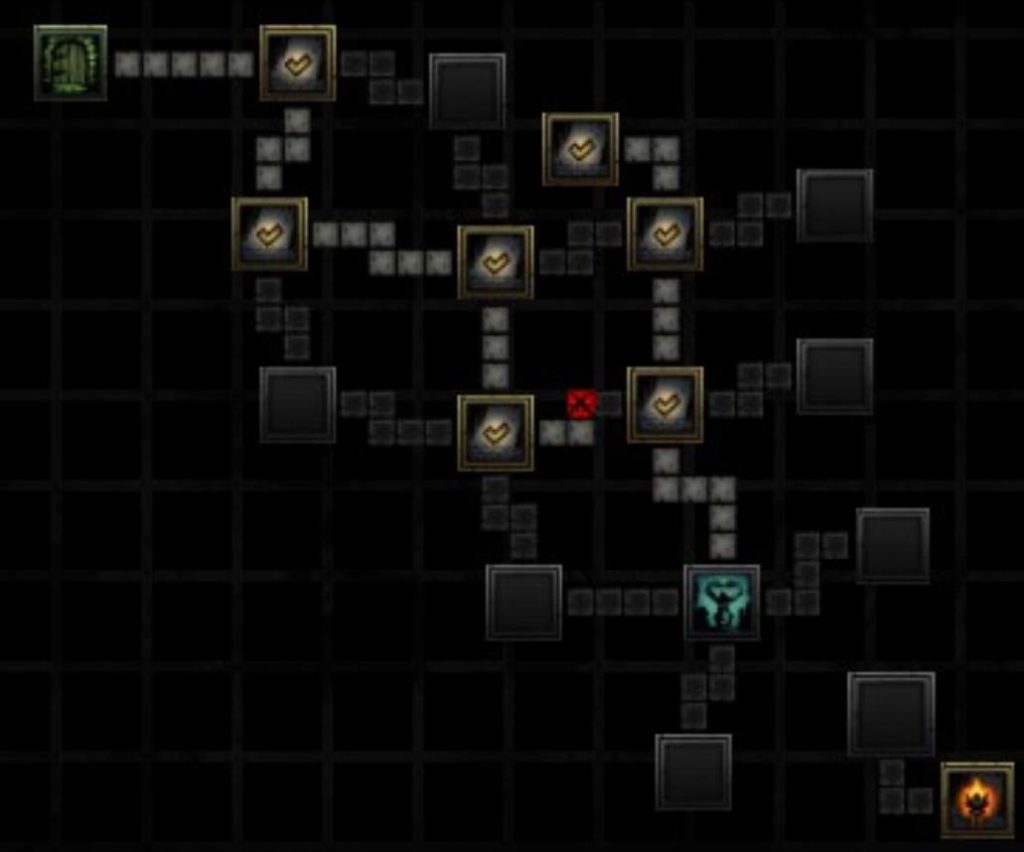
—-
As you can see, the path to the quest location is fairly simple; the problem lies in fighting enemies in the hallways between each room. On the hallways that lead into the quest location (and often, other hallways around the map), you will find a Mammoth Cyst (large enemy that does heavy damage and blight) and a Polyp (tricky small enemy).
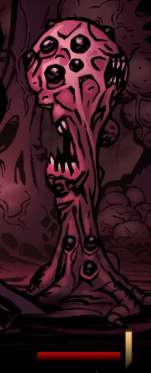
These little [expletive deleted].
Though not marked on their abilities list, they will use “Teleportation” on your entire group of heroes, which, of course, teleports you to another random room (occupied by “light” enemies) somewhere else in the Darkest Dungeon.You will have to fight to clear that room of enemies, and then track your way back towards the quest location in the center. If you are lucky (heheheh), you will end up close to a path you have already cleared. I recommend fighting your way back to the path you have already blazed towards the quest location, because 1) these hallways and rooms remain clear, and 2) if you fight the same Mammoth Cyst and Polyp that teleported you in the first place, they keep whatever damage they suffered in your first (or second, or third) battles.
The only way to avoid being teleported is to kill the Polyp before it can use any of its abilities (besides Teleportation, it has a HEAL, a STUN, and a STRESS). This takes a lot of good luck with your ranged damage-dealer such as an Arbalest or Musketeer (and Marking it helps); killing the Polyp also forces the Mammoth Cyst to use one of its two actions to Summon another Polyp. The trade-off is that this will reduce the damage you are doing to the Mammoth Cyst, meaning you will have to survive turns and turns of its high damage and blight attacks.
Camp regularly (after each teleportation fight-room, for example); that’s why they give you 4 campfires. If you do use a Houndmaster, save the Dog Treats for your fight with the Cyst and Polyp that will get you access to the quest location. You automatically scout after each room, and the dungeon layout is the same anyway, so use your camping skills to HEAL, buff, and de-STRESS.
Upon entering the quest location, you will fight at least one Templar (and maybe some other enemies), which thankfully does NOT have the “Revelation” ability this time around.


Be the first to comment