
How to build an efficient base and remain solvent while exploring the galaxy.
Table of Contents
Guide to Habits
Note: Credit goes to Bismar7
Starting Off
Note: Given that the devs already updated the economics of the game so some of this may not be necessary, but its all still useful.
This may contain some small spoilers related to progression or unlocks, do not proceed if you want to avoid all spoilers.
I’ve done 7 playthroughs, 6 ended in failure and this guide is all stuff I did on my 7th.
Running an efficient successful base comes down to understanding a some things:
In the early game, be patient. Be Patient. No seriously… be patient don’t over purchase, don’t over buy, be small, efficient, be patient, and save money.
Always, Always, hire as cheap as possible. Your gaters will be able to be trained and will learn their primary skills quickly. The salaries of a Gater never increase, so you are immensely rewarded for paying as little in salary as possible. It is better even to pay $20000 upfront with 10 days than to increase the salary above $4,000. Never run a team that costs more than $10,000/month. Gaters gain experience through daily actions, using the training room, and missions. This experience translates into increases in their skills. You will need to save money to get past the mid game and if you don’t do this you set yourself up for unrecoverable scenarios (* note, this may no longer be true due to balance changes made by the devs).
When you start only run one science team. The game tells you to run more than one… don’t. Get three scientists and use them where you can. My most successful playthrough so far only ever had 3 scientists and most of the time they were always on the same team. This is for several reasons:
- Mission risk is level locked, meaning the higher level the scientists, the more things they can do, which rewards sending the same team of 3 scientists on every mission.
- Gathering missions like science missions or ore missions have a limitation where only the appropriate class brings back the gathered material. So if you send a soldier on your science team, you can only bring back 2 theories (even though you used a full node). If you send three scientists, you can bring back 3 theories. The most efficient means to get ahead is running 3 scientists with the highest skills and level (via doing lower level missions) for every science mission you do.
- Science missions are not infinite. Particularly at certain parts of the game, this is most important around the start of the mid game when the game’s required costs explode due to hiring medics, soldiers, and engineers. You may only have 15 total science missions you can do before you have to expand and if you don’t have the science level or suits then you can easily put yourself in a bad situation that cannot be recovered from (* note this was before game balance changes and may no longer be the case).
Don’t ever stop sending this team of scientists on science missions until you have <500k in the bank (then I would send them on the occasional artifact mission). If they are busy researching theories or building a patent then be patient and wait.
*A note about patents, ONLY EVER do 5 theory patents unless you absolutely have to do less than 5. Ignore rarity and month bonuses and every time you get 5 theories in a genre make a patent.
Early Game
Unlock the medbay first, training room second, recreation room third, Security fourth, then dump everything into the workshop until its 12/12 unlocked.
You want to have a barracks going into the midgame with 14-17 beds and lockers (if you build this correctly by placing lockers first, then beds next to them, you can cheese the space that beds require). It can be important to place the lockers next to beds with space as Gaters use them before and after sleeping, so efficient placement can save you headache. I split the way the barracks is set into 2-3 areas. 1. Scientists, scholars, and engineers. 2. Medics. 3. Soldiers. If done correctly you can do 2 & 3 as part of the same barracks zone. I run a small rec room for each barracks with a few arcades. Your training room should be adjacent to the solider barracks. Your medbay should be adjacent to your medic barracks. Your workshop, science lab, and library should be adjacent to each side of your scientist/scholar/engineer barracks.
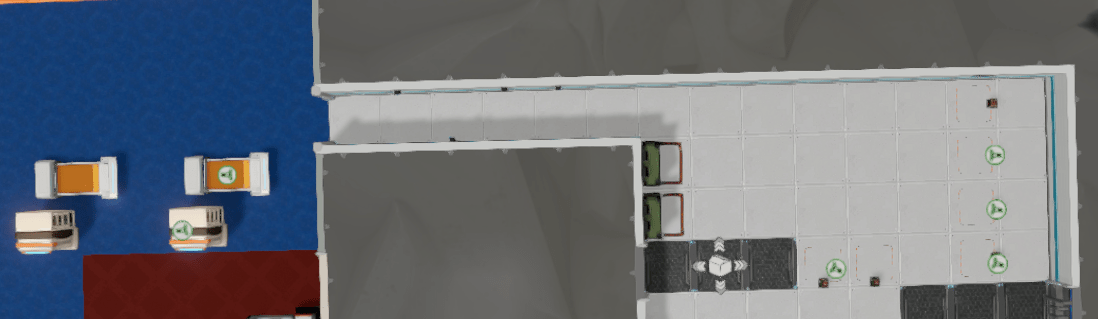
You want your power room connected by a 1×1 side hallway connected to your soldier barracks, weapons should be at the front outside the hallway, you want to have the first 5×5 in the power room to be open and set with guard stations (unlocked with security) pointing at the killbox hallway entrance, with your generators behind the guards. This creates a chokehold for invaders seeking to destroy your power supply where once they enter the room, all 6 guard stations open concentrated fire to reduce losses.
This is ALL setup to be able to survive two things.
- When the committee funding ends
- When the invasions start.
You are going to get 600k from the committee in total and I would recommend having $200-$400k in the bank for when invasions start. Things will go wrong and you need to have money to deal with it when they do.
Example of the Soldier Room
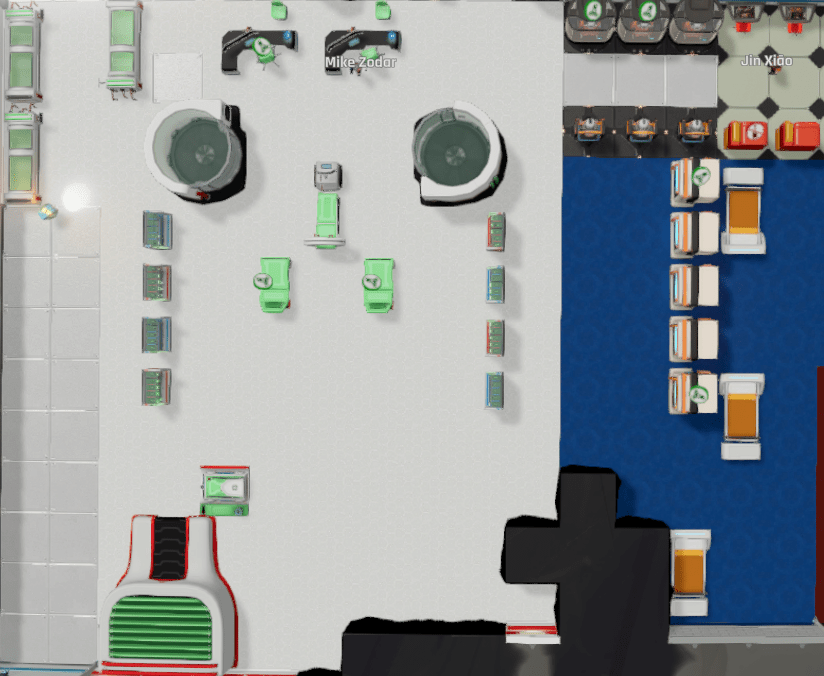
Example of Endgame Medic Room
Early -> Mid
During the Midgame you are going to want 5 medics (if you unlock the intensive care unit and build two of them its possible to just run 3 medics, this method is more efficient but has a high price tag of 600 tech points). This is because your soldiers are going to constantly need care and because if one medic goes down with severe mental illness it will take 2 to get them back up on their feet (running only 2 medics killed my 4th playthrough). However, right now just start off with 3 and scale as needed when you have the money.
When you unlock soldiers, hire 3 of them, make a team, and start sending them on story missions. It doesn’t matter if you fail, you just want a couple levels on them before invasions start. Now comes the hard part.
The midgame effectively starts when you run into a specific mission, you will know the one because every 10 days after you will have base invasions. This is what wipes a lot of players out and is why there was such a response in feedback that resulted in game balance changes by the devs. Your 50k funding/month and the invasions generally start closely around each other, so its a double whammy where you have to manage less income AND constant invasions that will destroy the power in your base (which makes it even harder to generate income).
Midgame
The midgame effectively start when you run into a specific mission, you will know the one because every 10 days after you will have base invasions. This is what wipes a lot of players out and is why there was such a response in feedback that resulted in game balance changes by the devs. Your 50k funding/month and the invasions generally start closely around each other, so its a double whammy where you have to manage less income AND constant invasions that will destroy the power in your base (which makes it even harder to generate income).
The combination of invasions costing you money, the need to speed money to hire soldiers+build rooms, and the ending of the free 50k/month, means that if you are not prepared you will enter a spiral state that cannot be recovered from (*note this may no longer be true due to dev balance changes).
After invasions start you want 3 Scientists (sent out as often as possible if they have nothing to research at base), 6 soldiers, & 3-5 medics. During the midgame you will unlock engineers and scholars. Your third team will be a scholar, engineer, and a soldier. Send this team on missions to discover ores as much as you can. Its okay to take a small loss month to month after invasions start, thats why you build up 200-400k as a bank and you will make up the difference selling metal Asteril ingots in the midgame. It will feel stressful and you will see your bank dwindle until after the you finish implementing the next paragraph.
As soon as you find a level 1-3 Asteril ore planet, build a workshop with ore storage, a foundry, connect the foundry to Asteril storage with foundry connectors, and hire 3 engineers (again as cheaply as possible on salary) Teams 4, 5, & 6 will all end up being engineers. Put them in a team together and send them on 4 days interval missions (manually stop their missions if someone comes back wounded and remember to send them out again once they are fixed up).
You will want to find 3 Asteril ore planets around levels 1-3 and 3 full teams of engineers rotating constantly on 4 day intervals to these 3 planets (as teams level up using ore planets level 4-8 is fine but beware that engineers can die working on those planets). This is largely because ONLY Asteril ore can be sold. Once you feel comfortable with your bank, occasionally send these engineer teams to gather the other ores, but be aware they can only be used for suits and you cannot sell them for money. Expand to have another foundry as needed.
- A note about selling ore. Don’t believe its going to go up. Don’t have hope the price will increase. Assume its only ever going to drop until it gets to $450-$500 where it will taper off. This means if its above $500, sell the ore. Even if its only 1, yes, sell it.
Example endgame workshop:

This setup will push you into the endgame, your primary goal should be remaining solvent on income and as long as you keep managing the scientists for patents. Eventually things will get better, then things will get easy, then boring, then you will have all the artifacts.
- A note on Artifacts. You find the type of artifact on missions of the people you send. So if you want to focus on all 4 science, send your science team. If you want all 4 engineer, send one of your engineering teams. Scholars need not apply and are not required.
In my endgame I retired 4 soldiers and 2 medics, then expanded to an extra team of engineers. So I had 3 scientists, 3 medics, 12 engineers, 1 scholar, and 2 soldiers; sometimes mixing 1 slot in teams to focus on gathering specific artifacts.
Be the first to comment