
A basic guide to the tank designer, tanks, and how to use them effectively.
Table of Contents
Introduction
Note: Credit goes to InfiniteFred
This guide assumes you have No Step Back, though much of the advice will still apply without it.
In my time playing multiplayer, I’ve run into a lot of players who don’t know how to use armor effectively. This guide is intended to address some of the mistakes I see frequently, and offer some basic tips on the use of tanks.
Since this is intended for new-to-intermediate players, some of the more advanced strategies and tactics (specifically for multiplayer) will not be covered. Those I cover here are effective in most situations when done properly, but be advised that your mileage may vary in a competitive game.
Feedback, questions, and comments are appreciated.
When to Use Tanks
First of all, we have to establish that tanks should NOT be designed, built, or used for no reason. Armor is very expensive to produce and uses fuel. Don’t waste effort trying to make armored divisions if you don’t need them.
In terms of stats, tanks are by far the largest sources of hardness (which mainly reduces soft attack damage), armor (which reduces damage and provides several combat bonuses), and breakthrough (which allows a division to attack for longer) in the game. Their soft attack, hard attack, and piercing are also good, and they are often quite fast.
If tanks are so good, why not use them for everything? Tanks generally suffer large penalties from terrain, have poor defense and hp, and need good supply to function. Combined with their high cost and fuel consumption, this means they are best used sparingly. Making an entire frontline of tank divisions is a massive drain on resources, and a poor use of armor.

Infantry is far cheaper and more easily available, better in poor terrain and low supply, and thanks to high defense and HP is just as good defensively in most situations. The one thing infantry can’t do effectively is attack. Due to their low breakthrough and soft attack, infantry struggles at taking entrenched positions.
This is where tanks come in. High breakthrough and soft attack combined with damage reduction from armor and hardness mean that tanks are ideal for breaking through strong defensive positions. Heavier tanks even have bonuses against forts!
Tactics
Having established that tanks are used for attacking, how should these attacks be conducted?
The most basic tactic (referring here to a player strategy, not the game’s tactics system) is the push. In a push, units attack along a large stretch of frontline with the goal of overwhelming the enemy and pushing them back.
Pushes are easy to organize: just assign a frontline and make an attack order. They’re also very low risk, since the entire frontline moving forward will pin enemy defenders and reduce the risk of being encircled.
However, pushes have two major issues. One, they need overwhelming force to overcome the enemy’s defensive advantage, and two, since the enemy is being pushed back rather than destroyed they can simply keep retreating. This lets them delay your advance and inflict more losses, and can lead to a push stalling as your own troops lose combat effectiveness.
A more advanced tactic (and the primary tactic for tanks) is breakthrough.
In a breakthrough, units concentrate overwhelming force on a single point in the line to punch a hole, then move rapidly to encircle and destroy the defending units. This can be done via an attack or spearhead order used along a small stretch of line and/or by manually moving units. I strongly encourage readers to practice this, as it can be a little tricky to get right.
The nature of the breakthrough means that units should be specialized toward offense in order to punch through rapidly, and fast enough to exploit and encircle after the gap is created.
Sound familiar?
Breakthroughs are much more effective than pushes when done correctly. Even a small breakthrough can be used to severely weaken the enemy army by encirclement or take key positions. However, an unsupported breakthrough can itself be encircled, resulting in the loss of some very expensive units. Remember to commit enough troops on the flanks of the attack to prevent this, and consider pushing any enemy units in the vicinity in order to pin them.
While some players prefer breakthroughs exclusively, I’d recommend a mix of both tactics where appropriate. Pushing will pin enemy units during a breakthrough, help destroy them once the breakthrough is achieved, and are effective at overwhelming the enemy once you have the advantage. Just be sure to use breakthroughs where a regular push can’t make progress, or you risk bleeding your army dry.
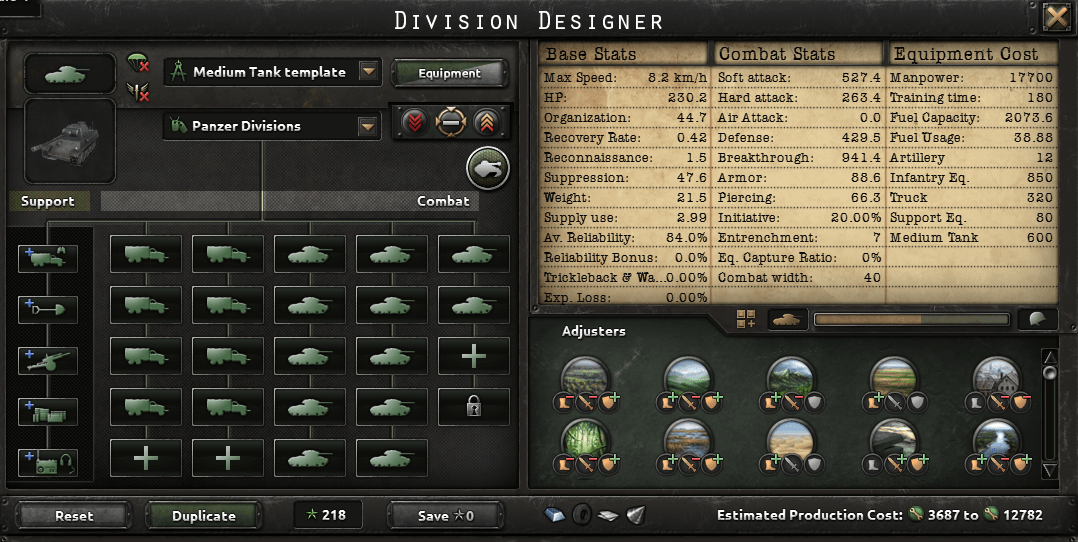
Templates
Tank templates, more so than others, should seek to achieve a number of stat goals.
These stats are dependent mostly on division composition rather than tank quality:
- Organization: a basic stat that I see too many people ignoring. The commonly accepted threshold is 30, as organization is needed to move and fight effectively. Org is gained by putting infantry, cavalry, mechanized, or motorized in the template.
- Hardness: having greater than 50% hardness in a division allows for the Blitzkrieg and Breakthrough tactics (referring here to the ingame system) to be used. More hardness will reduce soft damage further.
- Combat Width: determines how many units can participate in combat within a specified terrain. Without trying to explain it, combat width for tank divisions should generally be between 20-42.
These stats rely more on the tanks themselves, but still need good composition:
- Speed: since this is very important for encirclements, try to have as much as possible. Don’t include units that are slower than your tanks (i.e. infantry), or they’ll bring the speed down for the entire division. I like to aim for 8 kmph, but some may prefer their divisions faster or slower.
- Armor/Piercing: listed here together, because they’re really two sides of the same coin. These are averaged from all battalions, then weighted 40% towards the highest value in the division. The number you aim for depends on what armor and piercing you expect your enemy to have.
- Soft/Hard Attack: cumulative value, does damage. No set thresholds, but more is always better.
- Breakthrough/Defense: cumulative, more is better. The former allows you to take less damage attacking and is mostly gained from tanks, while the latter does the same for defending and mostly comes from motorized/mechanized.
A couple important notes for division composition:
Since the enemy’s attack will be matched against your breakthrough and your attack will be matched against their defense, one should try to amass as much of these stats as possible in each division. Thus, larger division sizes will be generally more effective.
Since armor and piercing are weighted, having a single battalion with high armor or piercing in the division will bring up the divisional value significantly. This can be done at a much cheaper cost than making all tanks the desired armor/piercing value. I’ll discuss this later in more depth.
Ultimately, the main decision in composition is between more motorized and more tanks. Tanks will give you more offensive stats, but will increase cost and decrease organization. More motorized will give you better organization and defense, but drag down armor and piercing. The best ratio is up to preference and circumstances.
Personally, I like to have a high armor to motorized ratio, even if it does make my divisions glass cannons. I tend to play aggressive with my armor and let my infantry handle counterattacks.
Here’s some basic battalion setups I like to use, barring the support companies:
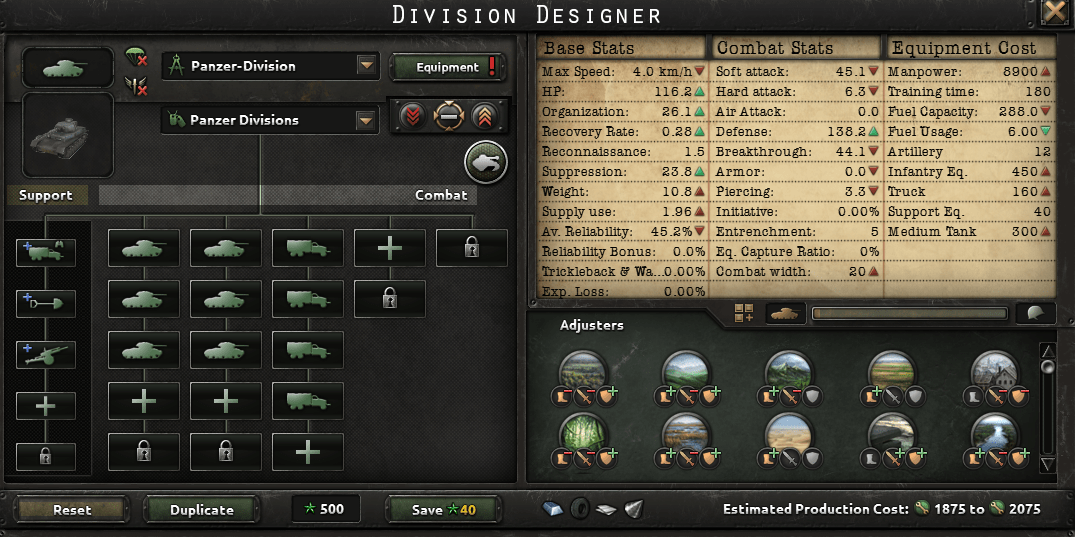

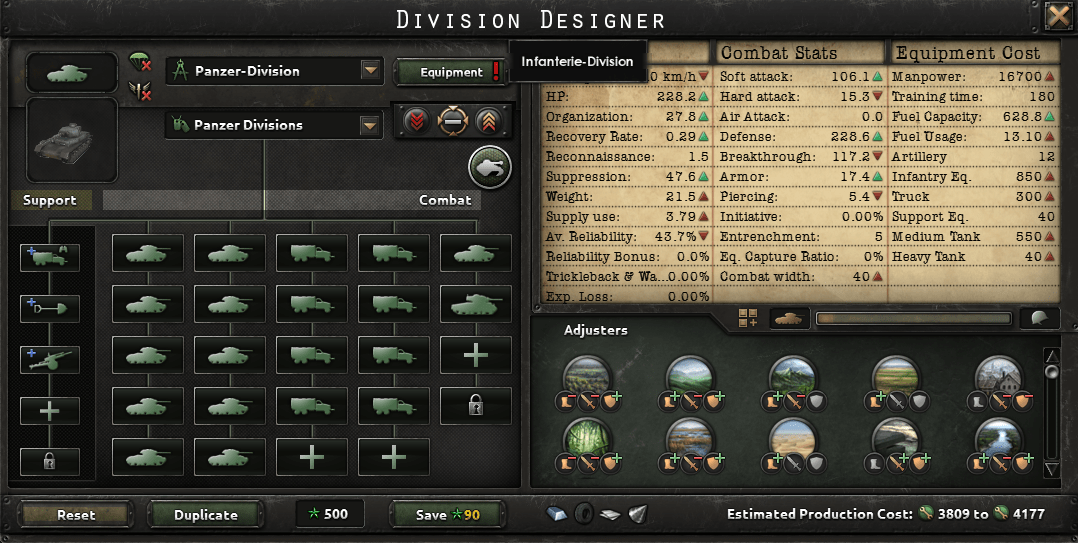
For support companies, I recommend Engineers for the river crossing bonus, AA to protect against aircraft, and Flame Tanks for the terrain bonuses. Artillery, Motorized Recon, Maintenance, Logistics, and Signal companies are also good choices depending on the circumstances.
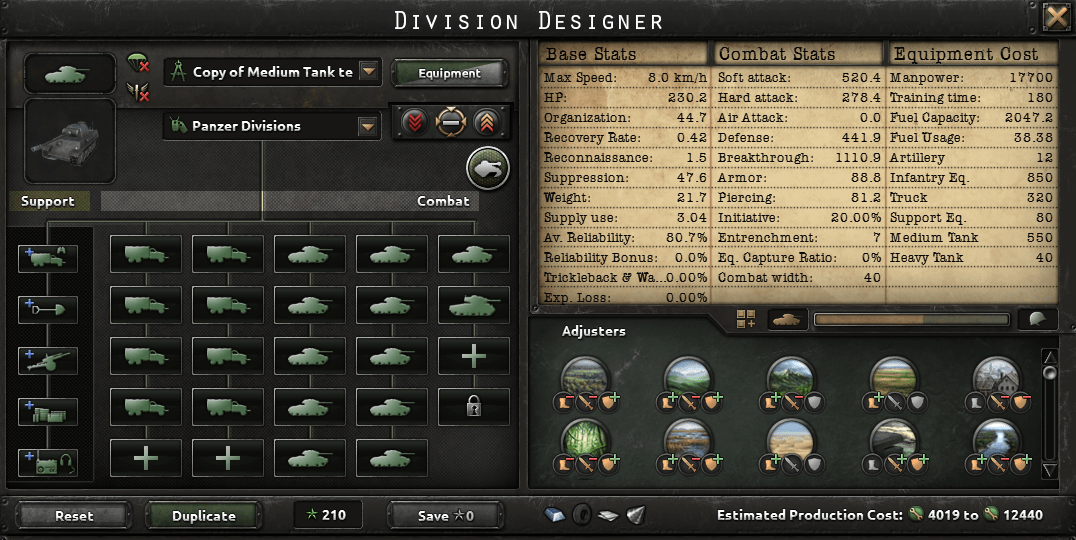
Tank Design
The tank designer is pretty complex, so instead of trying to cover each module I’ll give an overview of each class of tank and show you a couple of the designs I use.
Some basic principles:
Reliability should hover around 80-90. More than 100 won’t give any benefit. You can go lower, but be advised that your attrition losses will be much higher.
The engine and armor tickers are the most cost-effective source of speed and armor respectively. Unless you have trouble meeting goals for reliability, you should try to meet your armor/speed goals by maxing out the tickers rather than adding extra components.

The mobile tank design concern is the best one for all countries that have them. This is because reliability and speed are often the two main bottlenecks for a design, since the tickers use a lot of both.
Turrets and guns are the best sources of breakthrough and attack. Don’t start adding on too many additional modules for these, as you’ll just drive up the cost more than anything.
Lights:
These hulls have poor armor and can only mount small weapons, but have a couple of advantages.
You might be thinking ‘speed’, but I’m not so sure about this one. Mediums can achieve similar speeds to lights pretty easily while still having much better armor/armament. Rather, the main advantage of lights is convenience, being both incredibly cheap and reliable as well as available from 1936. Just don’t expect much from them in the field.
I’d recommend the 1936 hull for most cases. You can research the 1941 hull, but it likely won’t make a significant difference and mediums are available by then anyway.
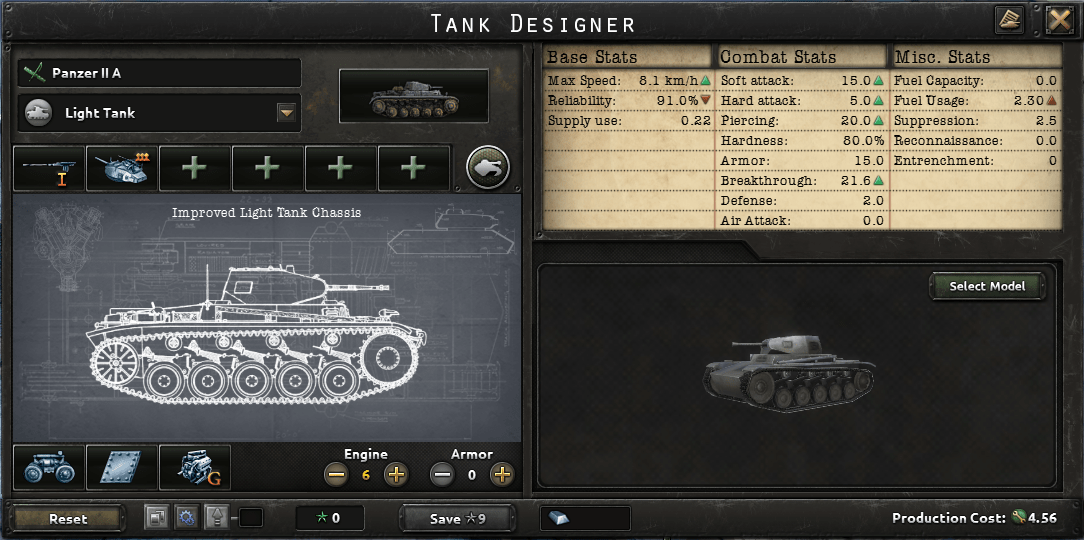
Something like this should suffice for most cases. Use the engine tickers to reach any speed goal you have (I personally aim for 8 km/h with all tanks, as it helps simplify logistics), then pick a main gun and turret and you’re good to go. Breakthrough and Soft attack are the name of the game here – don’t waste time with armor, since it’ll get pierced 90% of the time anyway.
Finally, keep the cost as low as possible or you’ll just wind up with something as expensive as a medium and half as effective. Hell, slap a machine gun and one-man turret on it if you want.
Mediums:
Mediums are the bulk of most tank forces, and that affects my design philosophy for them.
Thanks to good stats all around, mediums make a good jack of all trades. They are by far the most cost effective source of armor in the early game, but this isn’t why I use them most of the time.
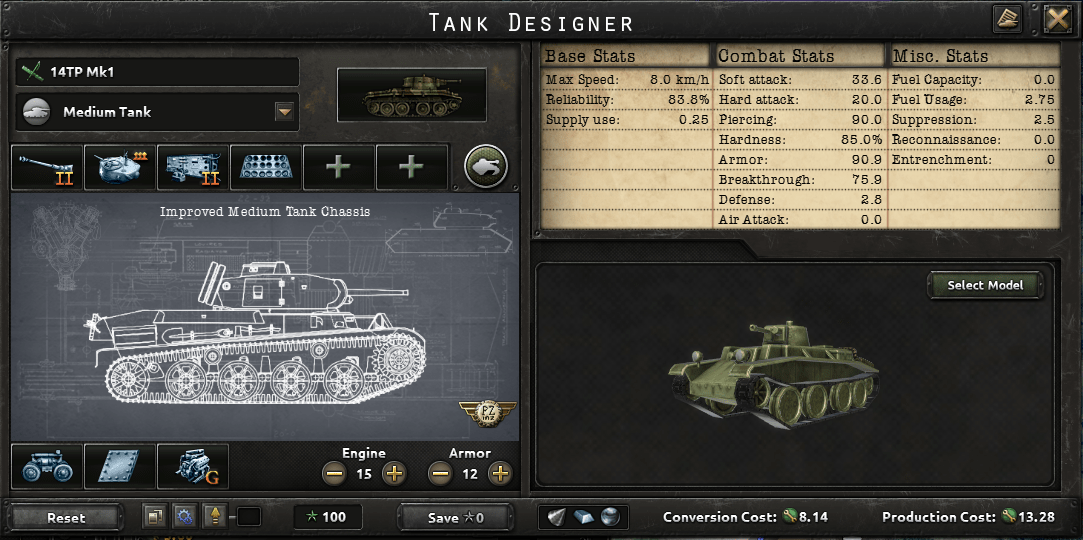
The main advantage of mediums is high breakthrough and soft attack. Rather than trying to make the best vehicle possible, make a decent, inexpensive vehicle with an abundance of these two stats.
The reasoning for this is that while armor and piercing are useful, they’re averaged in a division and weighted towards the highest value. SA and breakthrough are cumulative, and therefore every medium in the division will add to them. When you have 10 battalions of mediums in a division, this adds up really quick. If you’ve only got one or two medium battalions, feel free to disregard this advice and make them as armored as possible since the extra cost will only be necessary for a couple of battalions.
The 1938 medium is something of a stopgap with poor armor and poor reliability. It’s much better than lights, but you’ll want to upgrade if you plan on fielding a larger force. Expect around 50-80 armor.
The 1940 medium is sufficient for most needs with good armor and good reliability. I’d recommend mass-producing these, as they can be made to fit most requirements. Expect around 80-100 armor.
The 1943 hull has very good reliability and armor, but remember to weigh the advantages here against the production hit you’ll take switching over from earlier models. Expect around 100-140 armor.
Heavies:
The design philosophy for heavies is simple: bigger is better.
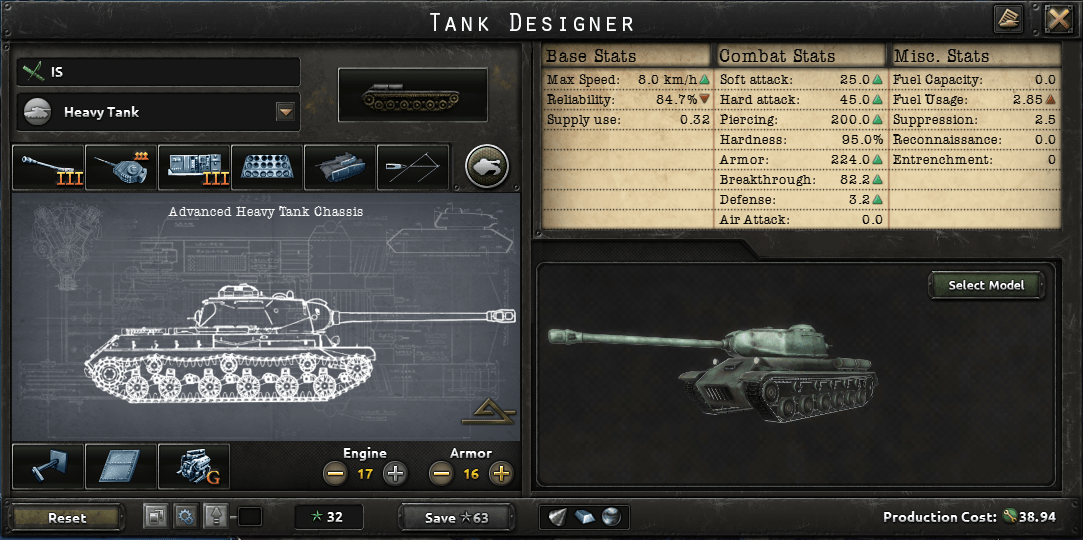
The main point of these is to pack as much armor and piercing as possible into the vehicle, so go nuts. Reliability and speed are in short supply though, which is why the mobile tank designer really shines with these.
Consider using cast/welded and sloped armor modules to really drive the armor value through the roof.
People who use heavies as their main tank in a division tend to under-develop them, which simply results in a tank that could be matched by a good medium at half the price. Don’t fall into this trap: go big with these, or go home.
Because armor and piercing are weighted towards the division’s highest value, all you need is one battalion of heavies to increase the divisional armor/piercing by a huge amount. How much this amount is depends mostly on how much armor/piercing the few heavy tanks have, so the largest value possible is generally the best. This is why reliability and cost are less important for heavies – you should only need to produce a few of them anyways.
The ’36 heavy is in something of a weird place: you can achieve a similar armor value with a 1938 medium for a fraction of the cost. The only real advantage I’ve found for these is the ability to mount a heavy cannon from game start, otherwise they’re best avoided. Expect around 60-80 armor.
The 1940 heavy is the first viable hull of it’s class. Countries without a mobile tank designer may want to use a medium turret and cannon, or they will find it hard to meet speed and reliability goals. Germany, on the other hand, can go crazy with these before most other countries can match them. Expect 120-160 armor.
The 1943 heavy is much more impressive than it’s predecessors, with enough reliability and armor to really go all out. A mainstay of late-game tank battles. Expect 200-230 armor on these behemoths.
Tank Destroyers:
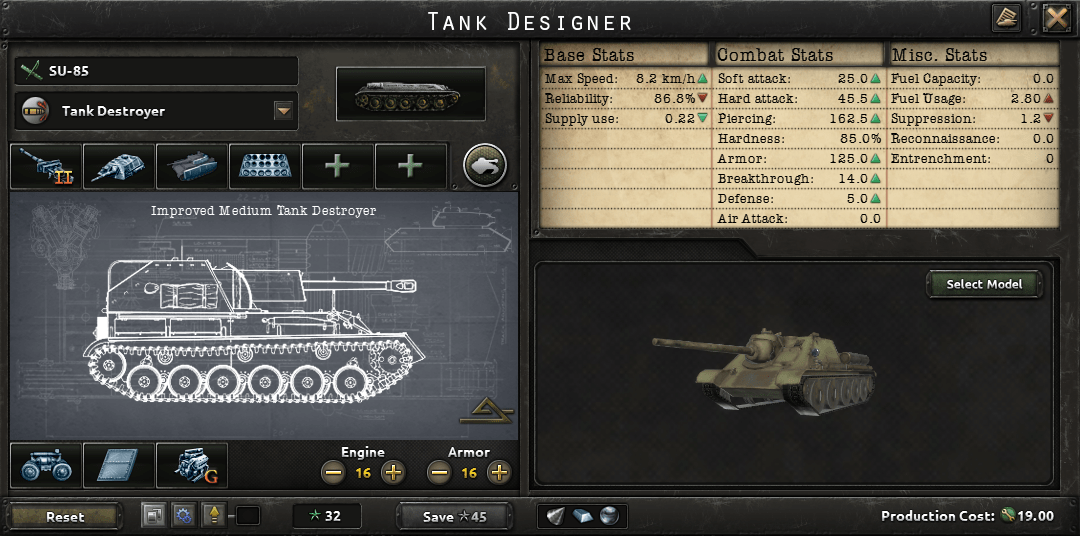
These are something of a special case, being similar to regular tanks save that they trade breakthrough for piercing. They also have the ability to mount a gun one class higher than their hulls would normally support by using a fixed superstructure instead of a turret, which has the added bonus of high reliability.
Since piercing is the main reason for building them, you should generally install the biggest gun possible. You can ignore breakthrough as well since it suffers a large debuff just from being a tank destroyer. The one-battalion-per-division strategy applies here, same as with heavies.
Other than that, I just make them like I’d make any other tank. Light TD’s can be made cheaply and slotted into existing divisions, heavy TD’s can have high armor as well as piercing, and medium TD’s can strike a nice balance.
Flame Tanks:
Simply put, design doesn’t matter here. Make sure the speed matches the rest of your tanks, make sure they’re mediums as those provide the largest bonuses, and make sure it’s actually classed as a flame tank. Everything else is irrelevant, so consider just converting these from existing tanks.
SPG/SPAA:
I don’t have much to say on these. SPGs trade breakthrough and hardness for soft attack, and SPAA provides anti-air. They’re both pretty niche, and I haven’t really been able to find a good use for them, so if anybody knows how to get value out of them let me know in the comments.
One Heavy Template: A Proof of Concept
I’m sure some people have doubts about the one-heavy-per-division strategy I mentioned earlier, and they’d be right to some extent.
Better mediums or a full division of heavies will have better armor than a division of lightly armored mediums with one heavy in many cases, and this can make a difference in a competitive multiplayer environment.
However the one heavy strategy remains more cost efficient and effective in most situations.
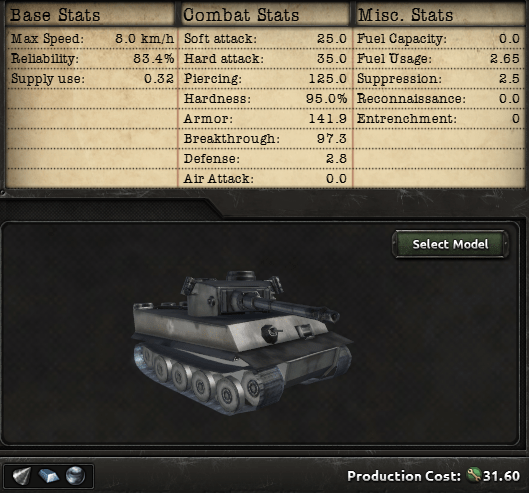
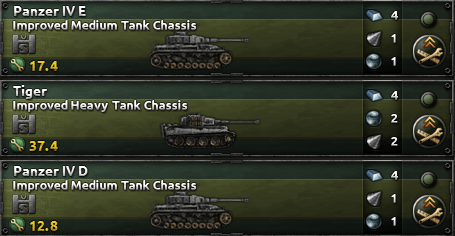
Here’s a set of designs I came up with for a 1940 tank division. The IV E is heavily armored, the Tiger is what you’d expect, and the IV D has less armor to reduce cost.
Here’s what a division using all IV E looks like:
And here’s a test with the IV D and Tiger:
I forgot to add the radios for the IV E, which is why the breakthrough is different.
Other than this discrepancy, you’ll notice that the divisions are very similar in every way. Let’s look at cost, then.
After running the math:
- The IV E division comes out to 10,440 for the cost of it’s tanks (17.4 x 50 x 12).
- The IV D / Tiger division comes out to 8,536 (12.8 x 50 x 11 + 37.4 x 40 for the Tigers).
You’ll find this becomes more pronounced with 1943 heavies, which have much more armor. For maximum cheese, the heavy can be replaced with a heavy tank destroyer to add extra piercing.
I could do all Tigers, but this causes armor to go up by only 13 while cost doubles.
There’s also the logistical component here: if the mediums don’t need great armor, one doesn’t need to replace them with 1943 mediums and it’s easier to make up shortages.
Conclusion
Armored warfare is a big part of HoI, and I’m surprised more players don’t use it. Hopefully this guide has given you some ideas to try in your next single or multiplayer game.
As always, theory is a poor substitute for experience. I urge players to get some practice, try new things and see what works for them.
Seriously though, if you’ve read this far you might as well open HoI right now and start a new game. Pick a country on the back foot – say, Soviet Union or Britain – just get a feel for what armor can do, and you’ll be making award-winning encirclements in no time.


Be the first to comment