
Hammer: How to Play & Meta Guide
Ву Kat.
Introduction to the Weapon
Hammer is a Weapon of Medium Mobility and Strong hits Coupled with its Pretty Close Quarters reach, The Weapon had a Big redesign compared to the Older generation where it’s trying to be less Charge centric and more Combo Oriented, We retain the Keeping Sway from Sunbreak at the cost of lowered Distance, and a Offset-Attack with any Golf-swing we do and the ability to hold it and release it as we wish.
This makes Hammer have a more Risky Playstyle compared to the older iterations of wanting more Methodical Positioning and timing.
This Weapon is for you if you:
- Have the patience to learn from mistakes.
- Want to improve as a player.
- Enjoy optimizing your gameplay around Learning and how to Combo/Time them.
- Enjoy Comically large Hammers.
- Bonk… good.
Inputs and Basics
The following is a list of the most commonly used moves.
Basic Moves:
- Side Smash: Forward+X Just walking Normally
- Overhead Smash 1: X Can be done out of Certain combos or Off Neutral
- Overhead Smash 2: X Done after Side smash or Overhead 1
- Upswing (Commonly Referred to as Golfswing): X after Overhead 2. and is Our Offset-attack. Can be held.
- Spinning Bludgeon: X+A Can be done after ANY move.
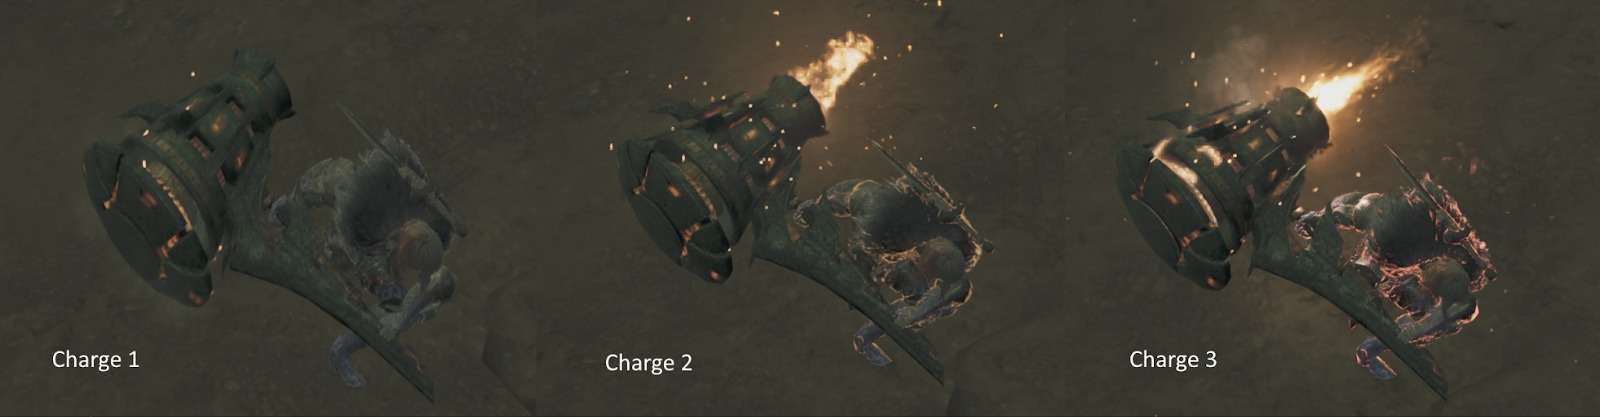
- Charge: ZR will begin Charging your Hammer
- Charged Sideblow (Charge 1): Tapping Charge will do a Charged Side blow.
- Charged Follow-up: Common Follow up to Charge attack 1 and 2.
- Charged Upswing (Charge 2): CANNOT COUNTER despite being an upswing. good Distance closer. has good KO for those Pesky Fast mons.
- Charged Big Bang (Charge 3): Fast High damage Move with okay Reach.
- Mighty Charge: at the end of Certain Combos (did Upswing or Big Bang 4) or at Charge 3 Pressing X+A will Initiate a Mighty Charge which are Much higher Damage moves.
- Mighty Charge Upswing: Immediately available After initiation. While it loses Damage to its older sibling it has a Good place for quick Pot shots at the end of Combos since you can get a Free hit in with it.
- Mighty Charge Slam: The single Strongest Move on Hammer Can be followed up from most of its strongest combos aswell.
- Big Bang 1: A initiates the Big Bang Combo The best combo on Downs.
- Big Bang 2: A Follow up.
Big Bang 3: A - Big Bang 4: A here you can either initiate a Mighty Charge or go for a Big Bang Finisher. which to do depends on the Window you have
- Big Bang Finisher: A Lower Damage than Mighty Charge Slam but is Much much Faster.
- Sheathe: Y
- Dodge: B
- Focus Mode: ZL
- Focus Strike (either mode): ZL+R on wound (Holding ZR will charge the hammer)
Important Combos:
- Triple Pound Combo: X > X > X
- Triple Pound Combo Mighty Charge: X > X > X > ZR + X
- Big Bang Combo: A > A > A > A > A
- Big Bang Mighty Charge: A > A > A > A > ZR + X + A
- Mighty Charge Slam: ZR (to 3) > X + A
Note: You will learn more about the combos in section below.
These are the Stats Hammer users should care about:
Weapon Stats:
- Attack: Important for all Playstyles, universal damage, usually referred to as Raw. Wilds, for the first time ever, lets us choose between Bloat and True values, the option for that is in Game Settings -> Page 3: Weapon Attack Power Display -> Display Without Coefficient. This Guide will only care about True Values.
- Sharpness: Acts as a modifier for Raw and Elemental Damage. Being a High Rank Game, every set will want to have white sharpness throughout the overwhelming majority of any given hunt.
- Unlike other Weapon types, Hammer does not have built-in sharpness reduction modifiers, every input consumes 1 unit of Sharpness. Due to the changes to the Skill System, sharpness skills compete with Critical Boost, which means that they don’t compete, making Sharpness Management a Player Skill instead of an Armor Skill.
Sharpness Table:
| Sharpness | Raw Mod | Elemod |
| White | 1.32 | 1.15 |
| Blue | 1.2 | 1.0625 |
| Green | 1.05 | 1 |
| Yellow | 1 | 0.75 |
| Orange | 0.75 | 0.5 |
| Red | 0.5 | 0.25 |
- Element: Status and Element is listed here if applicable, depending on the specific set you aim for, all of these can be important, or they can not matter.
- Affinity: Every important Move in Hammer’s kit is able to crit, making it the singular strongest stat in the current state of the game.
- Defense Bonus: Due to the nature of the Defense stat’s scaling, any additional defense is unlikely to have an impact on damage received, making it a negligible Bonus at best. Safe to ignore.
- Slots: All maxed out weapons have either 3-2-1 or 3-3-1 slots. The exceptions are Artian weapons, which have 2-2-2 on the Rarity 6 and 7, and 3-3-3 on the rarity 8 Versions, always.
Thanks to the GameFeedbacks.com website for the data.
Mechanics
Hammer only two Mechanics in Wilds Are Charge and Off-set.
Charge Level Indication by Glow:
Pressing X + A at Charge 3 will Initiate a Mighty Charge.
Hunter Holding Upswing
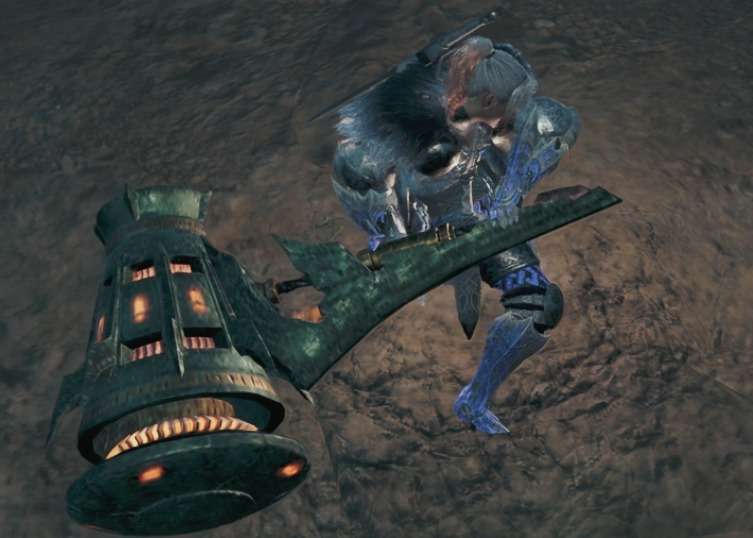
Timing Your Upswing With a Monster attack with Result in an Off-set. Offsets will trip the monster backwards and give you a Window to deal Damage, Off-sets Have a Cooldown but Landing one will still significantly reduce the damage Taken otherwise.
Focus Mode/Strike
Hammer Can Charge During the Focus Strike by Just Holding ZR after hitting the Wound. This lets you Follow up with Either a Mighty Charge Or Charge Big Bang Punish.
Another big addition was the Frenzy Mantle, which acts similar to Frontier’s Fencing+2 skill, in that it gives some Attacks a second, weaker, hit. For Hammer, This Buffs The Triple Pound combo insanely. Any Damage you deal about 33%~ gets dealt again capable of Critting. However you wont see it covered much since Mantles Do not reset on Quest start at the moment.
Sneak Attack
While a monster has not spotted you and is not engaged in combat and grounded, you can approach it from behind and follow the button prompt (A) to use Sneak Attack, The Damage is Nice and you can Follow it up with a Upswing to Hyper armor through the roar animation.
Playstyles, Assumed Movesets and Utility Moves
Hammer has two notable playstyles:
- Charge Methodical Slower Playstyle which centers around Getting as many Charged Bigbang/Mighty Charge into any windows as possible.
- Riskier Triple Pound Playstyle which centers around using your Triple pound and Offset Move to maintain high Aggression against the monster.
- Hammer is mostly Raw and Element isnt of Much Use at the time of Writing this guide.
Utility: Charged Step
After a Dodge or During a Charge you Can press ZR + A or Just A respectively and in doing so you will get Iframes and get to maintain your Charge level as well.
Utility: Off-set
Doing a Spinning Bludgeon or Charge 3 Ledge or Just Triple Pound will lead to a Upswing. These Upswings can be Held to potentially Clash with the monster’s attack causing them to offset and mitigating the damage you would otherwise take.
Optimal Damage Combos and Damage Loops
Big Bang Mighty Charge Slam
This is our Highest Damage Combo. Reserved for KOs and Longer Downs.
- Big Bang 1 > Big Bang 2 > Big Bang 3 > Big Bang 4 > Mighty Charge > Mighty Charge Slam.
- A > A > A > A > ZR + X + A > Charge > Release ZR.
This Combo has a 390 MV of concentrated Blunt Damage Goodness. However it is by far our Longest Combo where Focus 3 Helps the Most with Shortening the Charge time.
Big Bang
In Downs where you may Not be able to do a Mighty Charge Doing the standard Big Bang is also really good.
- Big Bang 1 > Big Bang 2 > Big Bang 3 > Big Bang 4 > Big Bang Finisher.
- A > A > A > A > A
It falls behind the Previous Combo at only 326 MV however its Much Much faster Allowing you to dish out damage if the monster you knocked/Stunned flings off.
Triple Pound Loop
Triple Pound Loop is your Bread and Butter on non downs or windows. But do not let this short combo trick you for it is not far behind even Big Bang in terms of DPS.
- Overhead Smash 1 > Overhead Smash 2 > Upswing
- X > X > X
The beauty of this combo is on top of the high DPS it has its also Further augmented by Frenzy mantle which propels it to the Strongest DPS combo yet on hammer during its Active time. You also have access to the Upswing at the end of it to do Off-sets with.
Triple Pound Mighty Charge Slam
Its the same as the Previous Combo with the addition of Mighty Charge at the end of it. This Increases its DPS slightly but also increases the time window needed. do it if you Know you can land it or the monster Flinches.
- Overhead Smash 1 > Overhead Smash 2 > Upswing > Charge > Mighty Charge Slam
- X > X > X > ZR + X + A
While it is a DPS increase this Combo becomes much better at Focus 3.
Mighty Charge Slam Spam
here it is. our Theoretical Highest DPS. However for Obvious Reasons its also Extremely Boring to play. This also Wants Focus 3 to actually Outclass the other options we have.
- Charge > Mighty Charge Slam
- ZR > ZR + X + A
You need focus 3 for this to be good and competitive. Its also boring as shit.
Advanced Player Tips
This section will be short due to how new the game is.
Focus Strike:
Focus Strike can be Charged During them and Followed up with a Mighty Charge Punish.
Might Pill:
Might Pills now overwrite the Buff but not the timer of Might Seeds, meaning that if you take a seed and then a pill, after the pills 20 seconds are over, might seed applies again.
Player Skill Benchmarks
- Inexperienced: Players who barely know the weapons moveset, having very little understanding of its mechanics and intricacies, having very little or no experience playing it at all.
- Intermediate: Players who have an understanding of the weapons moveset, can hit about half of their Off-sets, and can clear quests reliably within 8-15 minutes.
- Advanced: Players who can target and hit parts at will, formulate and change their gameplan, hit most of their Off-sets, have good spatial awareness and usually clear without carting within 6-8 minutes.
Expert: Players who have good understanding of the moveset, nail nearly all of their Off-sets, have great positioning and Can mostly Lock a Monster down with Different Flinches and knocks and usually clear any quest within 4-6 minutes. In addition, they have a good general grasp of most monster’s movesets.
Build Guide Assumptions
All Sets listed in the following Sections generally assume players to have general knowledge on moveset options and knowing Hammer’s kit and general matchup knowledge, aswell as having reached endgame and general access to the higher tier decoration quests.
Skill Priority
Armor Skill Priority
Offensive Armor Skill “Priority”
| 1 | Agitator 5 | All these Skills share two crucial things in common: They give affinity and are on Armor. Every single important move in Hammer kit can Crit. |
| 1 | Weakness Exploit | |
| 1 | 2 Piece Gore + Antivirus 3 | |
| 2 | Counter Strike 3 | Free Raw on Offsets off Cool-down |
The table is called “Priority”, because there is no actual priority. You will fit all these skills together, most other skills are either immensely situational or just straight up don’t work. Whether they are “just” bugged or the intend to nerf a lot of alternatives to heavy crit investment is currently unknown.
Weapon Skill Priority
Weapon Skill Priority
| 1 | Critical Boost 5 | Undisputedly the best skill in the game, once again. |
| 1 | Focus | Makes Mighty Charge Combo Finishers faster letting you squeeze it into more windows. |
| 2 | Handicraft | Good for Focus/Handicraft. |
Gear Requirements
Strictly speaking, the baseline requirement for most sets is HR41. Due to the Talisman and Weapon upgrades, aswell as the Artian Weapon Meta, most builds will only fully come online at around HR70-80, depending on grinding strategy and deco/material RNG.
Every Non-Level 3 Decoration becomes target meldable at HR 100, meaning you’ll never truly be locked out of a set completely. In situations of extreme strokes of bad luck, you might have to give up 1 level of crit boost, which hurts, but has no hunt-breaking impact given how short lived monsters in Base-base Wilds seem to be.
Other Considerations
Food Skills:
- First Slot: Meat as a base for food grants +2 Raw.
- Second Slot: Caprice Meal (Hi) (Airy Egg) gives +15 Raw in random intervals during its Duration, which last for 10 seconds each.
Alternatively, Tumbler Meal (Mud and Turbid Shrimp) grant additional Iframes on dodges. Lastly, Moxie Meal (Specialty/Slid Garlic) can prevent one cart.
Third Slot depends on Set and Location:
Ultimately, there is no stand-out absolute banger meal that will make a ginormous impact, so eating whatever is available or cooked by villagers or even just Meat is good enough.
Out of quest-set:
There is ongoing testing whether items consumed while having Mushroomancer and Item prolonger equipped retain their buffs through changing your Set, how they interact with Wide Range and if they persist through Quest Start. This might become optimal, and will receive an update in Section 3 if so.
Cat:
The current consensus is to either give it a Para Weapon or to leave it at home. Para is the preferred status, as it does not interfere with Agitator, which is taking a more central role in this Meta again.
Cat unlocks extra abilities by doing its Side Quests, namely:
- Revive on cart with half health (once/quest)
- Spawn Vigor Wasps
- Steal materials
Cats max out at level 30.
Meta Build Guide
The following sets are ordered from weakest to strongest. They do NOT assume Might Seed, Demon Powder, Mega/Demon Drug or specific food skills due to how annoying they are to farm. They DO however assume the Power Charm, obtained by doing the Double Ajarakan Arena quest (“As Gatekeeper”) from Rex’ Questline in Suja.
Additionally, Mantles will not be accounted for unless otherwise specified, as they do not reset between quests without the use of third party mods. Overall, the current Meta is strongly reminiscent of Iceborne’s Fatalis Meta.
Preamble: Artian Weapons
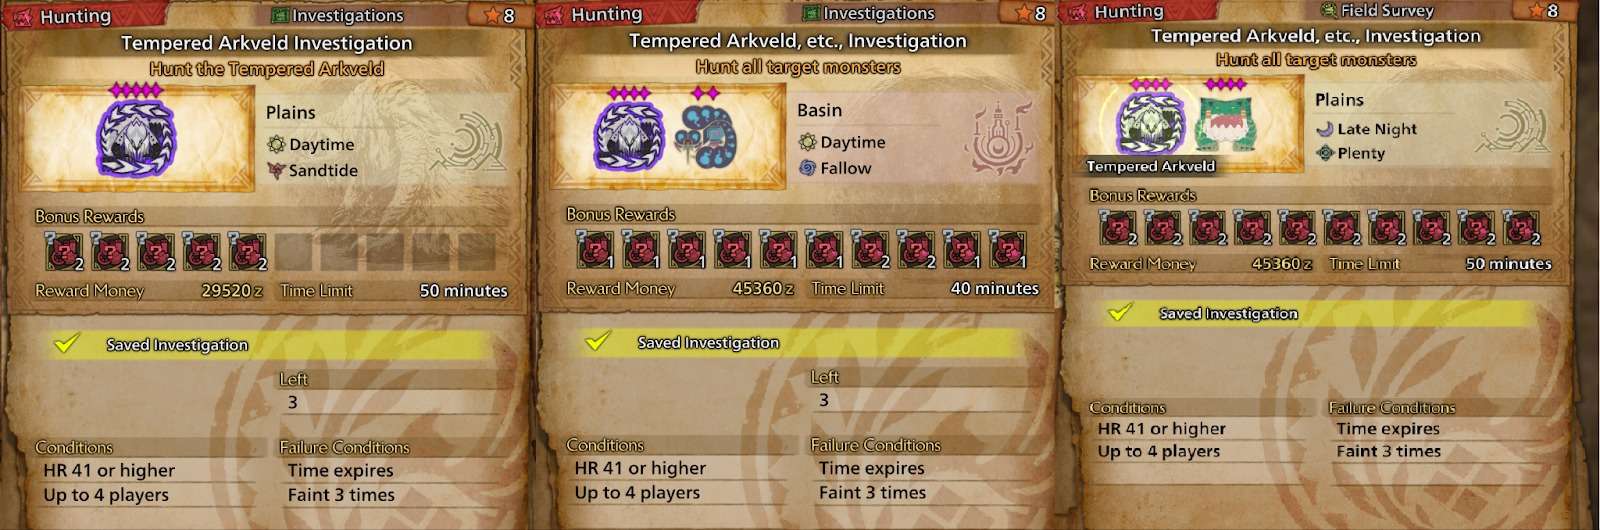
The Current meta revolves around Artian Weapons. The Materials to craft the good ones are obtained from HR41+ Tempered Investigations. Good Investigations look like this:
Investigation Examples
The Three materials needed to craft a Hammer are 2x Disc and 1xTube. To craft an Artian Hammer, talk to Gemma and select the Forge Artian Weapon option.
Next, select the parts.
Crafting Menu
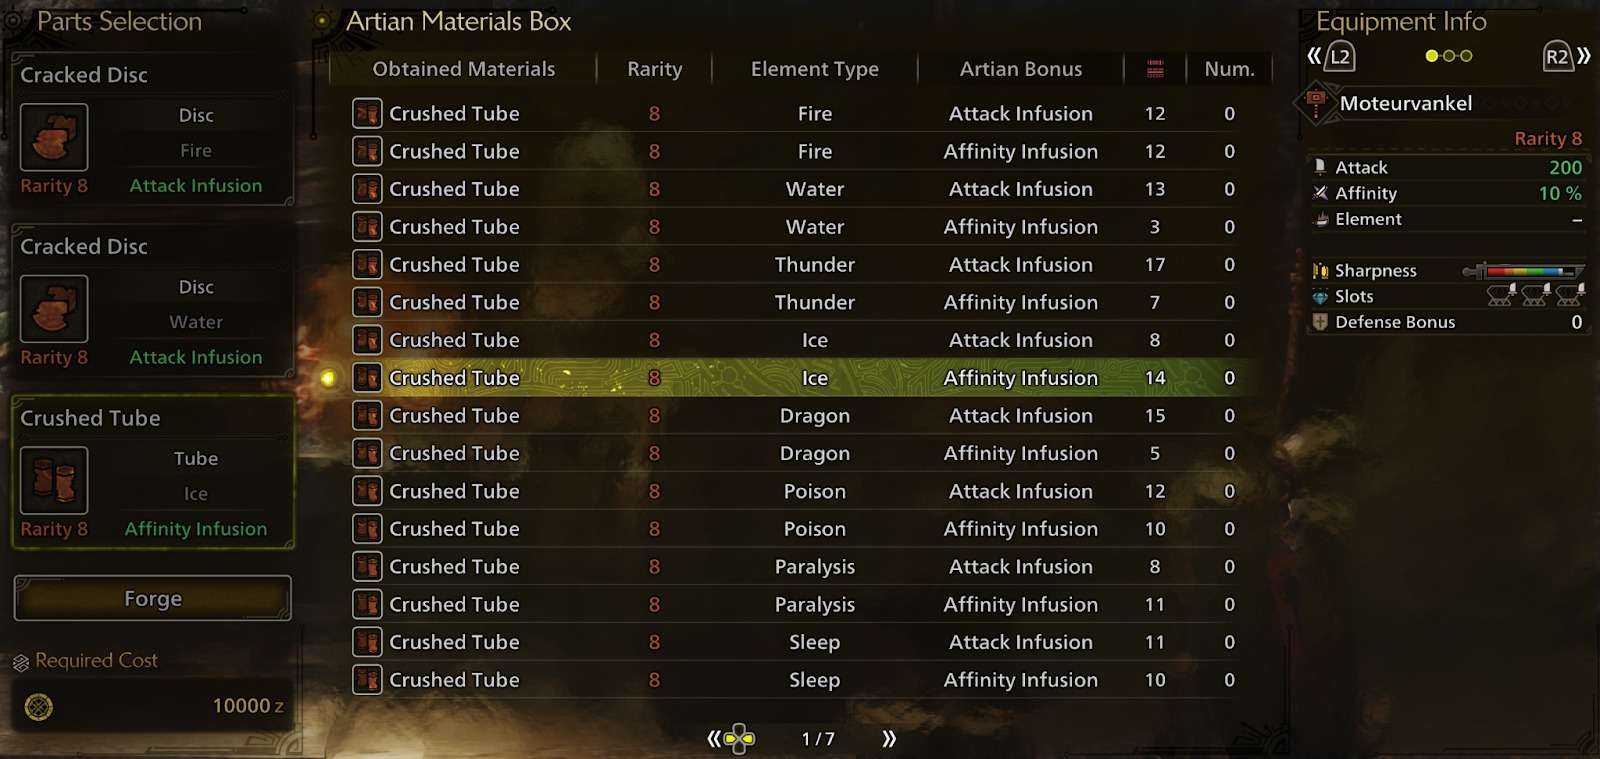
Each part has an Element (or a Status), and either Attack or Affinity associated with it. Using two of the same Element/Status makes the resulting weapon have that Element/Status. For a Pure Raw Hammer you want to be Using 3 Parts all of Different Status/Element to get No element. Using the same Element/Status three times boosts the value a bit.
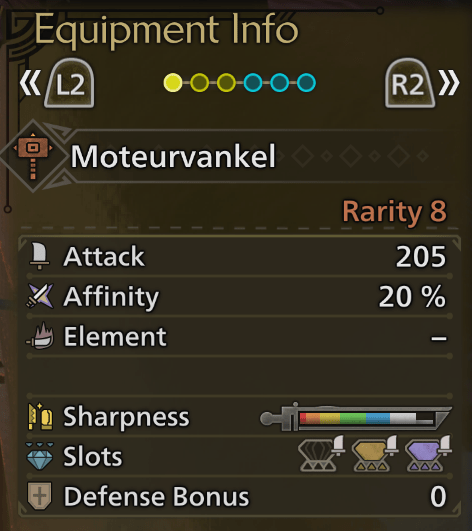
The “Infusions” on these parts always resemble 5. Current Highest Tier Artian Weapons have a base of 190 Raw and 5% Affinity, aswell as 20 Units of White Sharpness. They always have 3-3-3 Slots.
The above example uses 2 Attack Infusions and 1 Affinity Infusion, which means the resulting weapon will have 190 + (2×5) Attack and 5+(1×5)% Affinity.
The results thus work like this…
Artian Crafting Examples
| Part, Element, Infusion | Part 2, Element, Infusion | Part 3, Element, Infusion | Result |
| Disc, Fire, Attack | Disc, Water, Affinity | Tube, Sleep, Attack | 200 Attack, 10% Affinity, Dragon Phial (26) |
| Disc, Dragon, Attack | Disc, Dragon, Attack | Tube, Ice, Attack | 205 Attack, 5% Affinity, Element Phial, 32 Dragon Element |
| Disc, Water, Affinity | Disc, Water, Affinity | Tube, Water, Affinity | 190 Attack, 20% Affinity, Element Phial, 35 Water Element |
| Disc, Paralysis, Attack | Disc, Paralysis, Affinity | Tube, Paralysis, Attack | 200 Attack, 10% Affinity, Power Phial, 15 Para |
| Disc, Sleep, Attack | Disc, Poison, Attack | Tube, Sleep, Affinity | 200 Attack, 10% Affinity, Power Phial, 12 Sleep |
Note that you cannot mix and match Parts of differing Rarity. Rarity 6 and 7 Artian weapons are strictly not worth it.
Proceeding with the currently optimal pick of 3x Para, the weapon is crafted with the stats from the Result tab. After crafting comes Reinforcing. This is done via the “Reinforce/Dismantle Artian Weapons” Menu option at Gemma.
Pick the Reinforce option and the Weapon you want to gamble on:
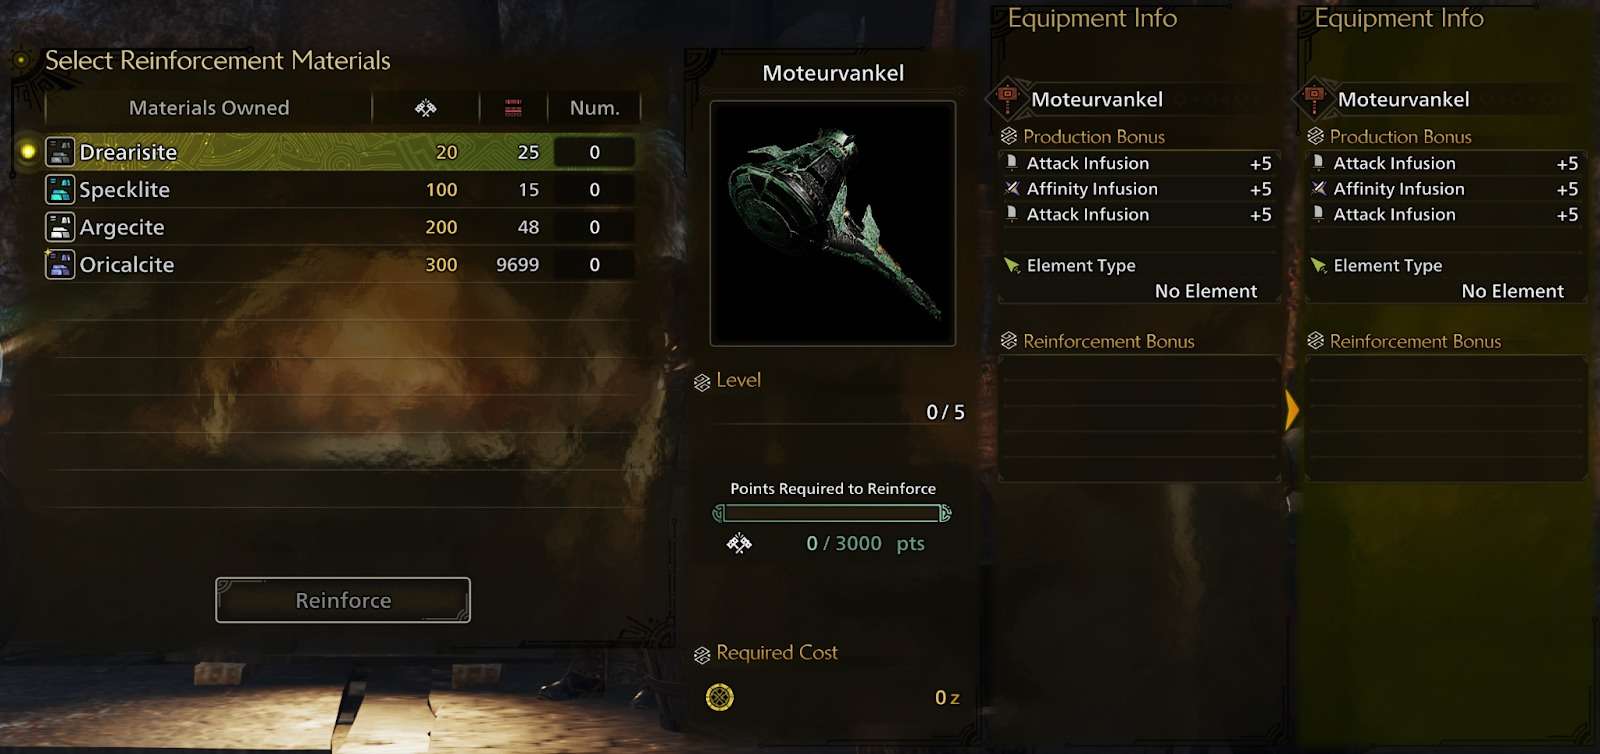
Reinforcement Materials can be obtained by trading with the secondary forge in Azuz. Trade your unneeded Monster Materials and Licenses for Oricalcite.
It takes 10 Oricalcite per roll, for a total of 5 rolls = 50 of those ores.
The Gamba Part
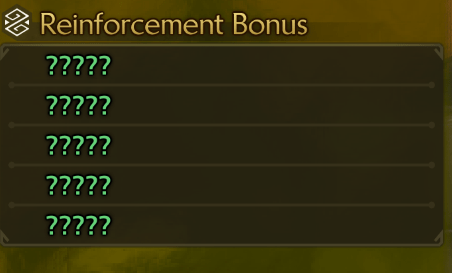
This is where the weapons are truly made. Each “Reinforcement” adds 1 of 4 possible rolls on the weapon. These are:
- +5% Affinity; +5 Element/Status (bloated to 50); +5 Raw; +30 Units of Sharpness.
Depending on what you are building for, you may want differing rolls. This guide generally recommends going for a total (this includes the parts used to craft the weapon) of +10-15% Affinity (2-3 rolls), +60 Sharpness (2 rolls), and the rest into Attack (3-4 rolls), to end at 205-210 Attack, 15-20% Affinity, 80 Units of White Sharpness.
1 Roll off Optimal Roll

You will likely not have a great result. While the Sharpness and affinity are good, If you Happen to Roll and you get a Roll like this thats 1 Roll off you can safely Keep it and use it as the gains arent as much or as big.
If You get a Bad roll, go to the Reinforce/Dismantle Menu and select Dismantle.
G stands for Get back Ore
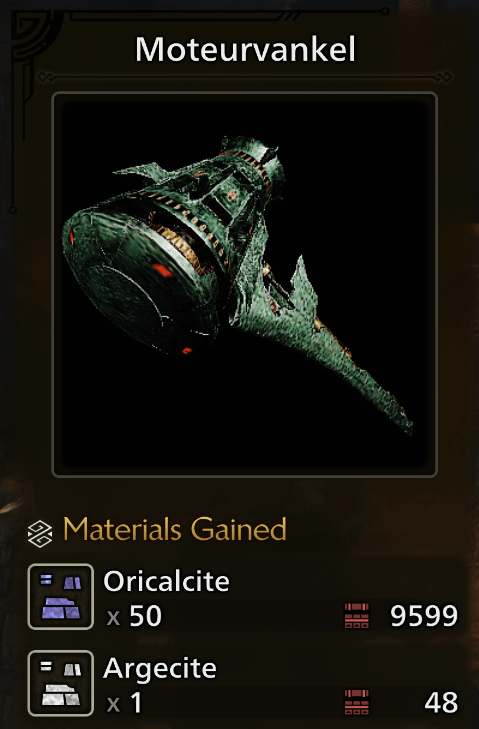
Dismantling an Artian weapon returns the Ore used to Reinforce it back to you. You lose the Parts (2x Disc, 1x Tube) used to craft it, but the Ores are one less worry you need to have.
Comfy Raw MP
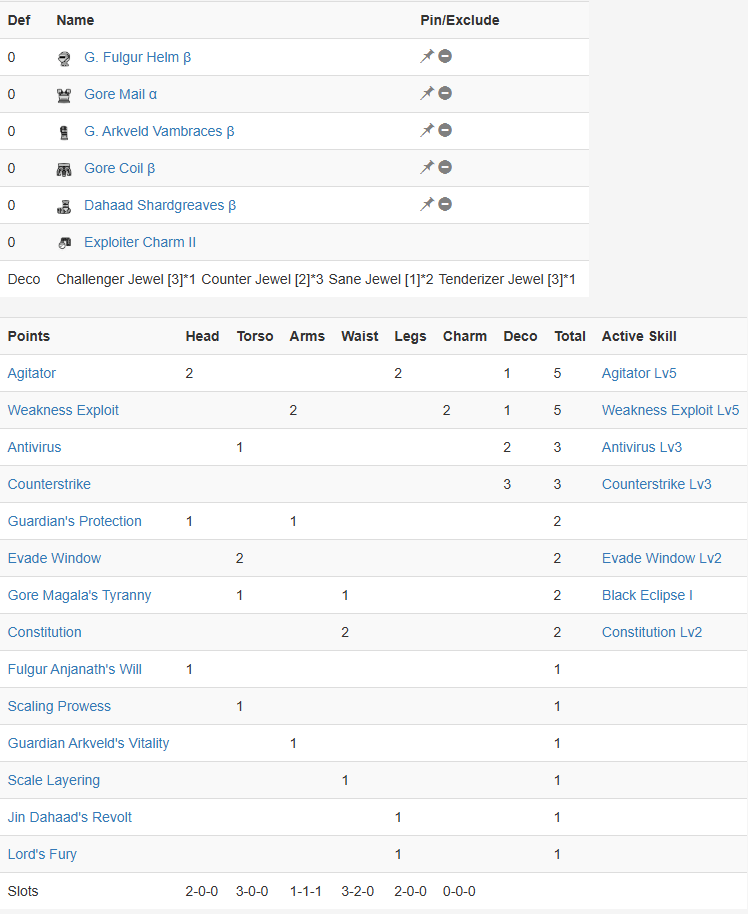
Requirements:
- Artian Weapon total rolls: 2x Affinity (15% Affinity total), 2x Sharpness.
- 1x Challenger, 2x Antivirus, 1x Tenderizer Charm, 3x Any Level 2 Deco of your Choice But Counter is the Best DPS option.
- Exploiter Charm 2.
- 1x Crit boost 3 + 1x Crit Boost 2 OR 2x Crit Boost 3 Decoration, and 1x Focus 3 Decoration.
Gameplan:
You Can Play This in the Standard Hammer Gameplan You Where you Focus the head and Try to Lock it as Much as Possible. Recommended Comfort: Shockproof 1 for MP, Weapon Deco: Focus 3/Handicraft 1 Decoration, Stun/Tremor… Res, Aquatic Mobility 1, Quick Sheathe, Adaptability 1.
Alternative Builds
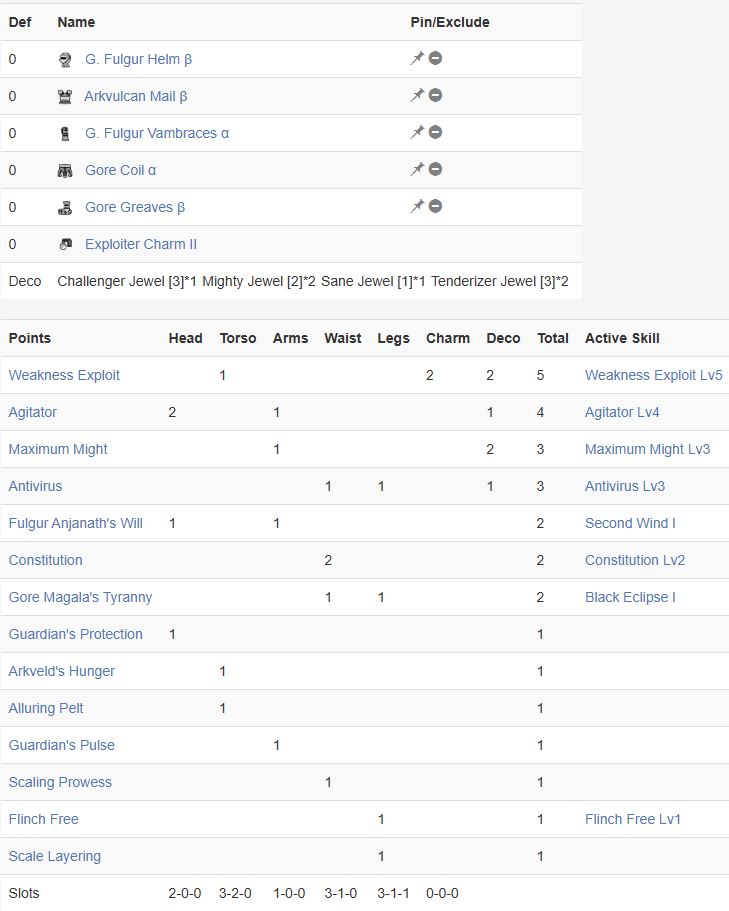
Due to Popular Demand here is the MM set with 2pc Fulgur.
Requirements:
- Artian Weapon total rolls: 1x Affinity (5% Affinity total), 2x Sharpness
- 1xChallenger, 2x Antivirus, 1x Tenderizer Charm, 3x Any Level 2 Deco of your Choice But Counter is the Best DPS option
- Exploiter Charm 2
- 1x Crit boost 3 + 1x Crit Boost 2 OR 2x Crit Boost 3 Decoration, and 1x Focus 3 Decoration
Gameplan:
You Can Play This in the Standard Hammer Gameplan You Where you Focus the head and Try to Lock it as Much as Possible.
Recommended Comfort: Shockproof 1 for MP, Weapon Deco: Focus 3/Handicraft 1 Decoration, Stun/Tremor… Res, Aquatic Mobility 1, Quick Sheathe, Adaptability 1.
FAQs
Why no Slugger/Charge Up?
Stun Modifiers only Increase the SPEED of which you get KOs not the Count. this makes them more Oriented towards Speedrunners and such and can Hurt you if you Exhaust all your KOs Early
What about Flayer, why Don’t we have it?
It makes Wounds appear faster. Level 2 makes them appear the fastest, We hit mostly only the Head, Wounds have a Cooldown on a BY PART basis so it’s not helping us as much.
Why no element sets?
Because element does not work properly currently. Potentially bugged.
Why no mantles?
Because they don’t reset on Quest Start/End.
Why not Partbreaker, it says it increases Focus Strike damage?
It currently does not increase Focus Strike damage.
Why do the sets overcap affinity? Frenzy gives 15% and Antivirus 3 gives 15%!
Frenzy gives 15% when cured. Antivirus only gives 10%. The description is wrong.
Why do the decorations in my Set not Save properly?
That feature is currently bugged, we don’t know why.
How much does Power Charm add?
Power Charm grants +6 Raw.


Be the first to comment