
Table of Contents
Growing a Civilization
Note: Credit goes to bli-nk
Most of this part of the guide is something people who have played Civilization or other hex based 4x games are already familiar with. If you are new to this genre or just want to make sure you know ALL the details for Oriental Empires, keep reading.
There are a handful of strategies you can use in Oriental Empires to win the game but all of them are based on growing your civilization faster or taller than the competition.
The game difficulty does affect roughly how fast the AI will grow but generally the main effect you will notice as a player is the AI on higher difficulties will declare war and send armies from 50+ hexes away forcing you to commit more resources to defending your civilization and tending to dominate the AI tribal civilizations who have slower technology and income growth in the first half of a campaign.
The Grand campaign is a very basic start with a single settler/city but technology research is at 100% speed.
Warring States starts most factions with 2-5 cities and some military units just on the cusp of entering the Warring States era but technology research is at 50% speed- you can adjust this in the menu.
If you want more interesting AI enemies and don’t want to spend 50 turns simply exploring and establishing cities then the Warring States or other later campaign starts that come via DLC are recommended.
I personally prefer technology research speed at 75% as you can actually complete most technology in the game before reaching victory. At 50% you will not reach the end of the tech tree in 300 turns unless you carefully manage temple and encounter research bonuses. At 100% speed you will usually run out of things to research in 300 turns, especially if you begin a Warring States campaign with the early part of the tech tree already researched.
First 50 turns
Recruit a Settler and military units to scout as soon as you can. Settlers are usually do best following rivers as there are more likely fertile plains + mountains for mines nearby which tend to result in the best locations for maximal city development.
Scouts should identify the map terrain near your starting cities both for future development and to know where to station your armies. The second reason to send out scouts early is to explore the map before it is filled with hostile civilizations and locate the best and worst places to fight so you can begin planning your diplomacy. The gold cost of scouts is rarely an issue vs the advantage of knowing the future battle grounds, especially as early on your need for gold is quite limited as there are not many buildings that should be built and most of your early wars can be won with one or two armies.
On higher difficulties the AI will constantly harass your scouts so after the first 20-30 turns they should start traveling in pairs or bring them back your your borders and start buying information about enemies from friendly factions, it depends on who those factions are at war with and leaves many blank spots on the map but if far less of a hassle and keeps your units nearby for the hostile incursions that neighboring civilizations will send into your territory trying to pillage your farms.
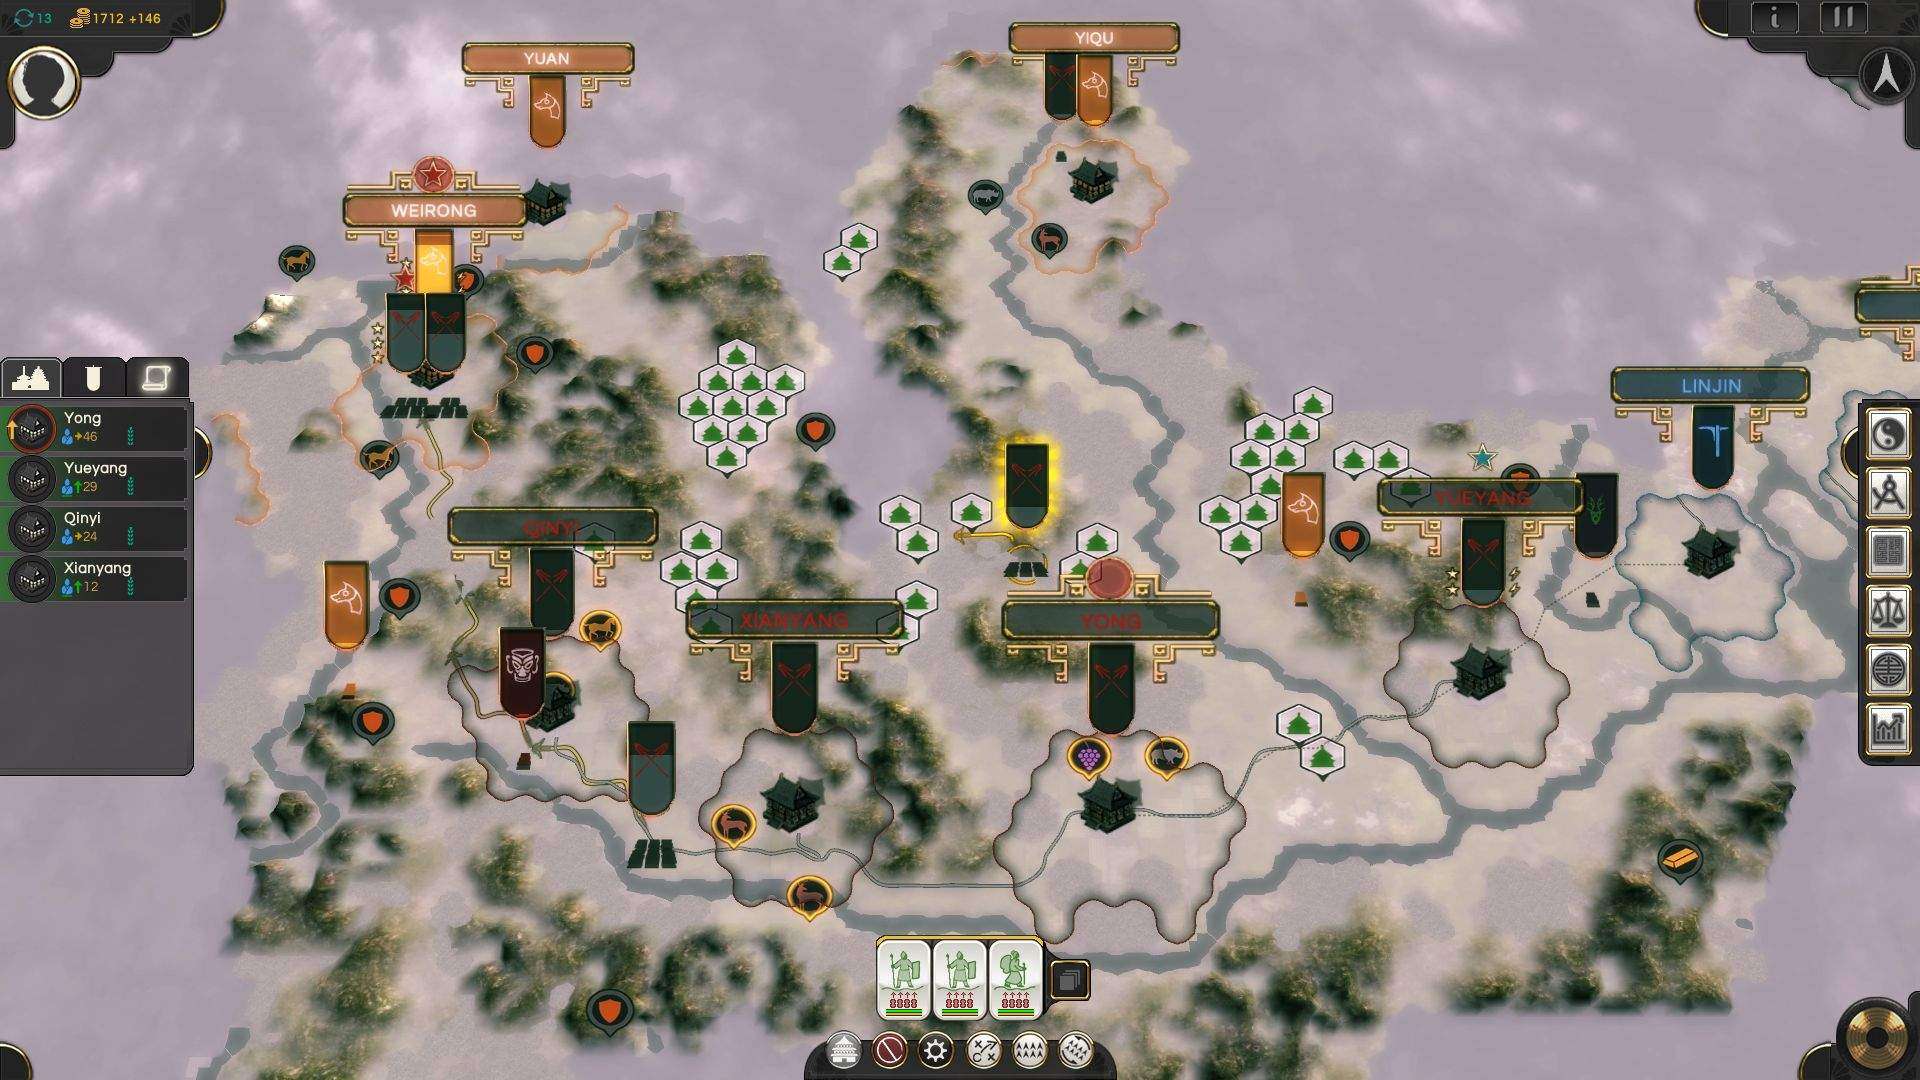
This is turn 13 of a Qin Warring States campaign. The Qin were the people who ultimately won out in bronze age China and make a good starting campaign in the Warring States Era.
As you can see there is a war vs the tribal Dog Rong faction and the ideal place to attack is the Dog Rong capital of Weirong because there are 2 copper mines and Weirong will protect the western end of the valley while having access to enough fertile plains to support a decent sized city. To the north of Weirong is mostly grasslands which can not be farmed while further west are mountains and forest without any obvious great settler locations despite some great mining resources.
There is a settler just north of Yong being escorted by 2 military unit, bandits or random AI scout attacks are a real threat early in a campaign and settlers cost 500 + 2 population and are worth protecting. The valley the settler is about to enter is well protected but narrow and with limited fertile plains, due to the copper it was worth scouting and can provide a decent settlement location for the early and mid-campaign but a city placed there will not be able to reach the optimum 200+ population. The better settlement location for population growth is the river valley between Yong and Yiqu because there is more room for farms and a city there will protect Yong from northern marauders.
Oriental Empires rewards playing tall more than wide as Authority establishes a relatively hard limit on how wide you can expand, as well fully developed cities are worth 4x to 10x more income as smaller undeveloped cities.
Hostile units pillaging your main cities is far more detrimental than smaller periphery cities which are both easier to defend (smaller number of hexes with fewer farms) and have less population to make happy or suppress as well more likely to have forced labor stoppages due to natural growth constraints where the labor workforce will recover from pillaging. Your main cities whose goal is to reach 200+ population and whose labor force should rarely if ever stop working suffer most from pillagers.
50-200 Turns
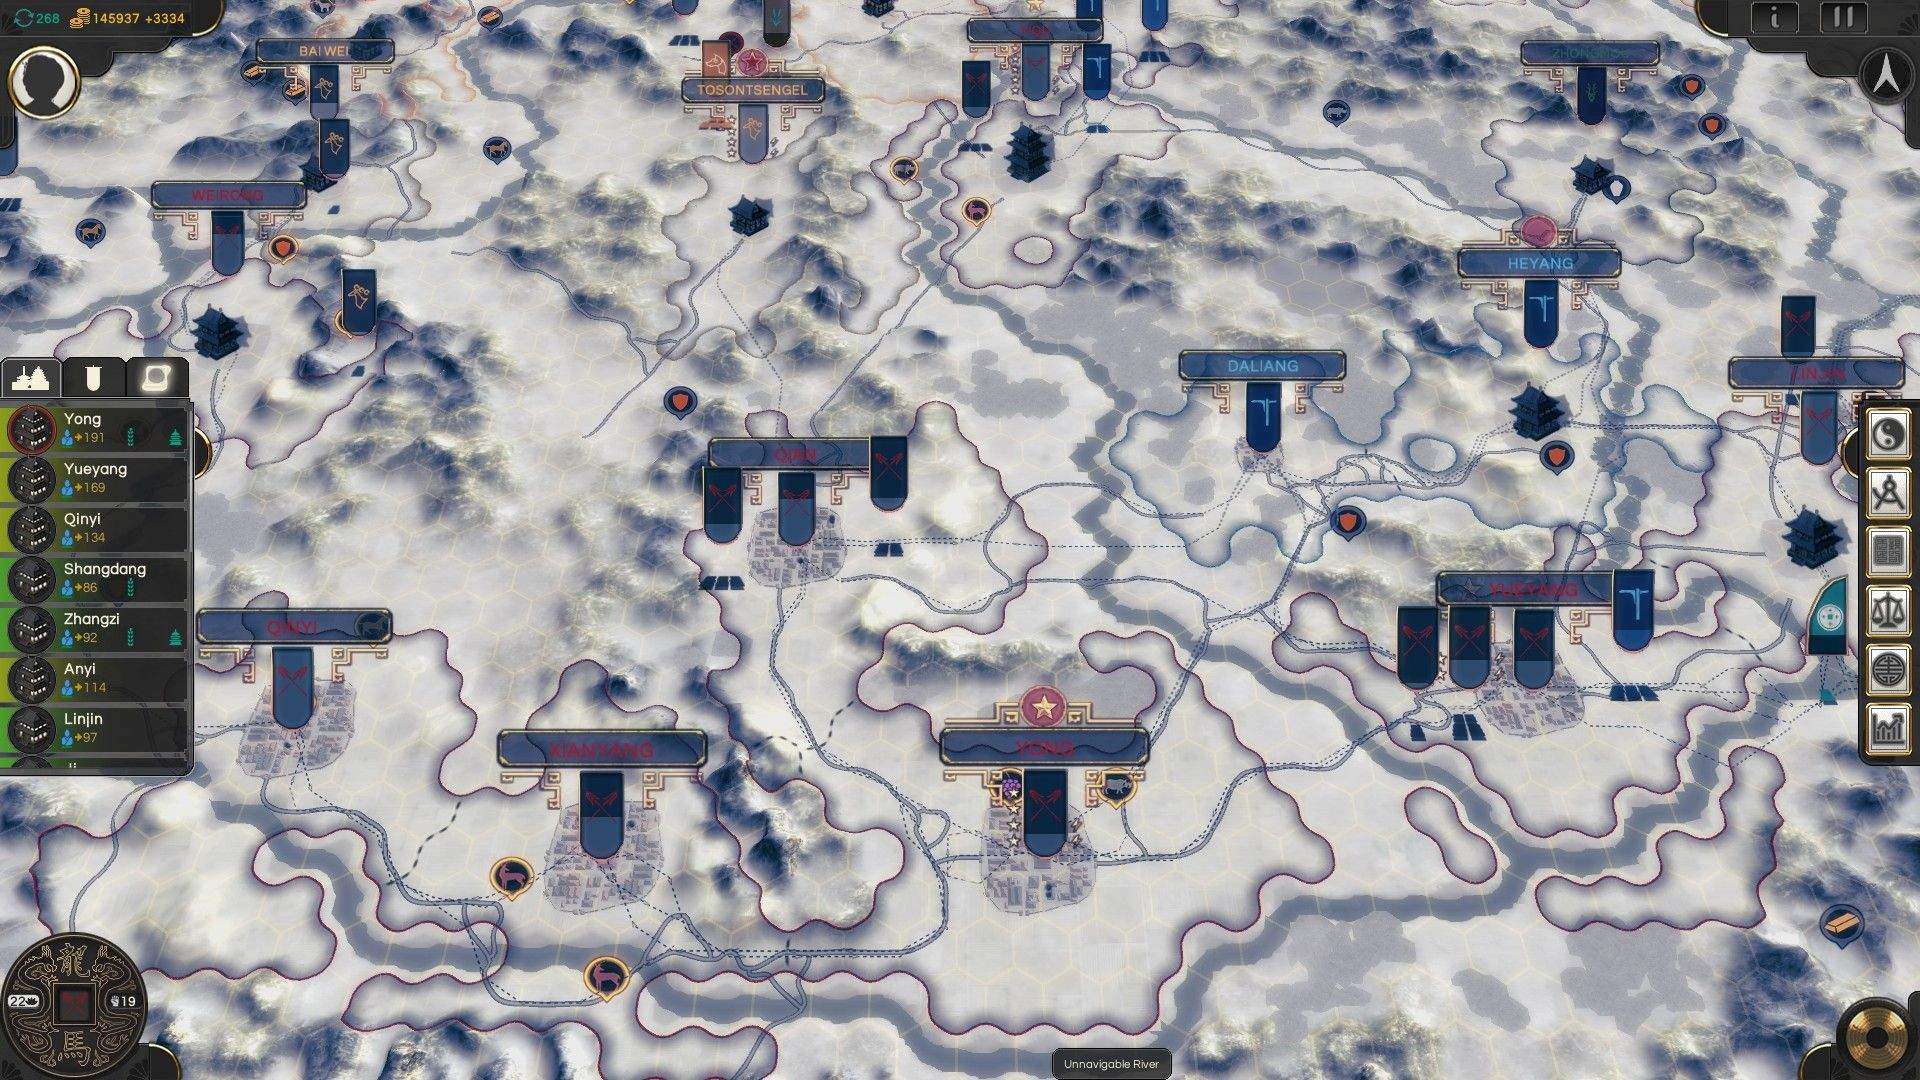
This screenshot shows ultimately how the Qin civilization grew over the next 200 turns. The settler opted for the protection of the valley where the northern entrance was easily defended from enemies and there was a copper mine.
The war with the Dog Rong lasted nearly 60 turns with the result all their nearby settlements were destroyed except for Yiqu which was made a military outpost due to the presence of both a food and income resources as well the location bordering the northern tribal peoples made it an ideal defensible fort that could have a road connection to the rest of Qin.
Bei Wei was a Qin settlement created for the gold mines which combined with the settlement taxes provided 600 income for over 70 turns but was limited to 30 population with a lack of access to fertile plains and was ultimately given to the Xiongnu in combination with destroying half a dozen Xiongnu settlements in a later war to force Xiongnu to accept being vassals of the Qin and also free up valuable Authority for a larger and more prosperous city taken in a war with the Wei.
The tribal peoples in this game will settle nearly anywhere they can fit a city but rarely offer much of a military threat until late in a campaign when they have unlocked better technology including cataphracts and strong infantry that can successfully lay siege to walled cities. Most of the time the encroaching tribal settlements offer easy trade income and will accept fraternal pacts as they are weaker civilizations but when they have no obvious enemies they can declare war and are less likely to accept being the vassals of farmers.
Ultimately the challenge of a campaign rests in the middle 150 turns. You can have a bad start and recover or a great start and get bogged down during the middle portion but how your civilization grows in this part of the campaign sets up the end-game where you are either defending your first place status or viciously attacking the top contenders to have a chance at winning where later turns it is often a grind of 30-50 armies per faction filling every hex near a front and taking dozens of turns to capture a single city.
200-300 Turns
The final 200-300 turns of a standard length campaign is less about growing your civilization and more about war, either by capturing the necessary population from your enemies by taking their cities or if the number of cities under your control is limited by authority, you will want to destroy enemy cities or pass cities to your loyal vassals.
Settling and Growing a New City
Where to put down your Settler and found a new city is a combination of luck, exploration, and long term planning.
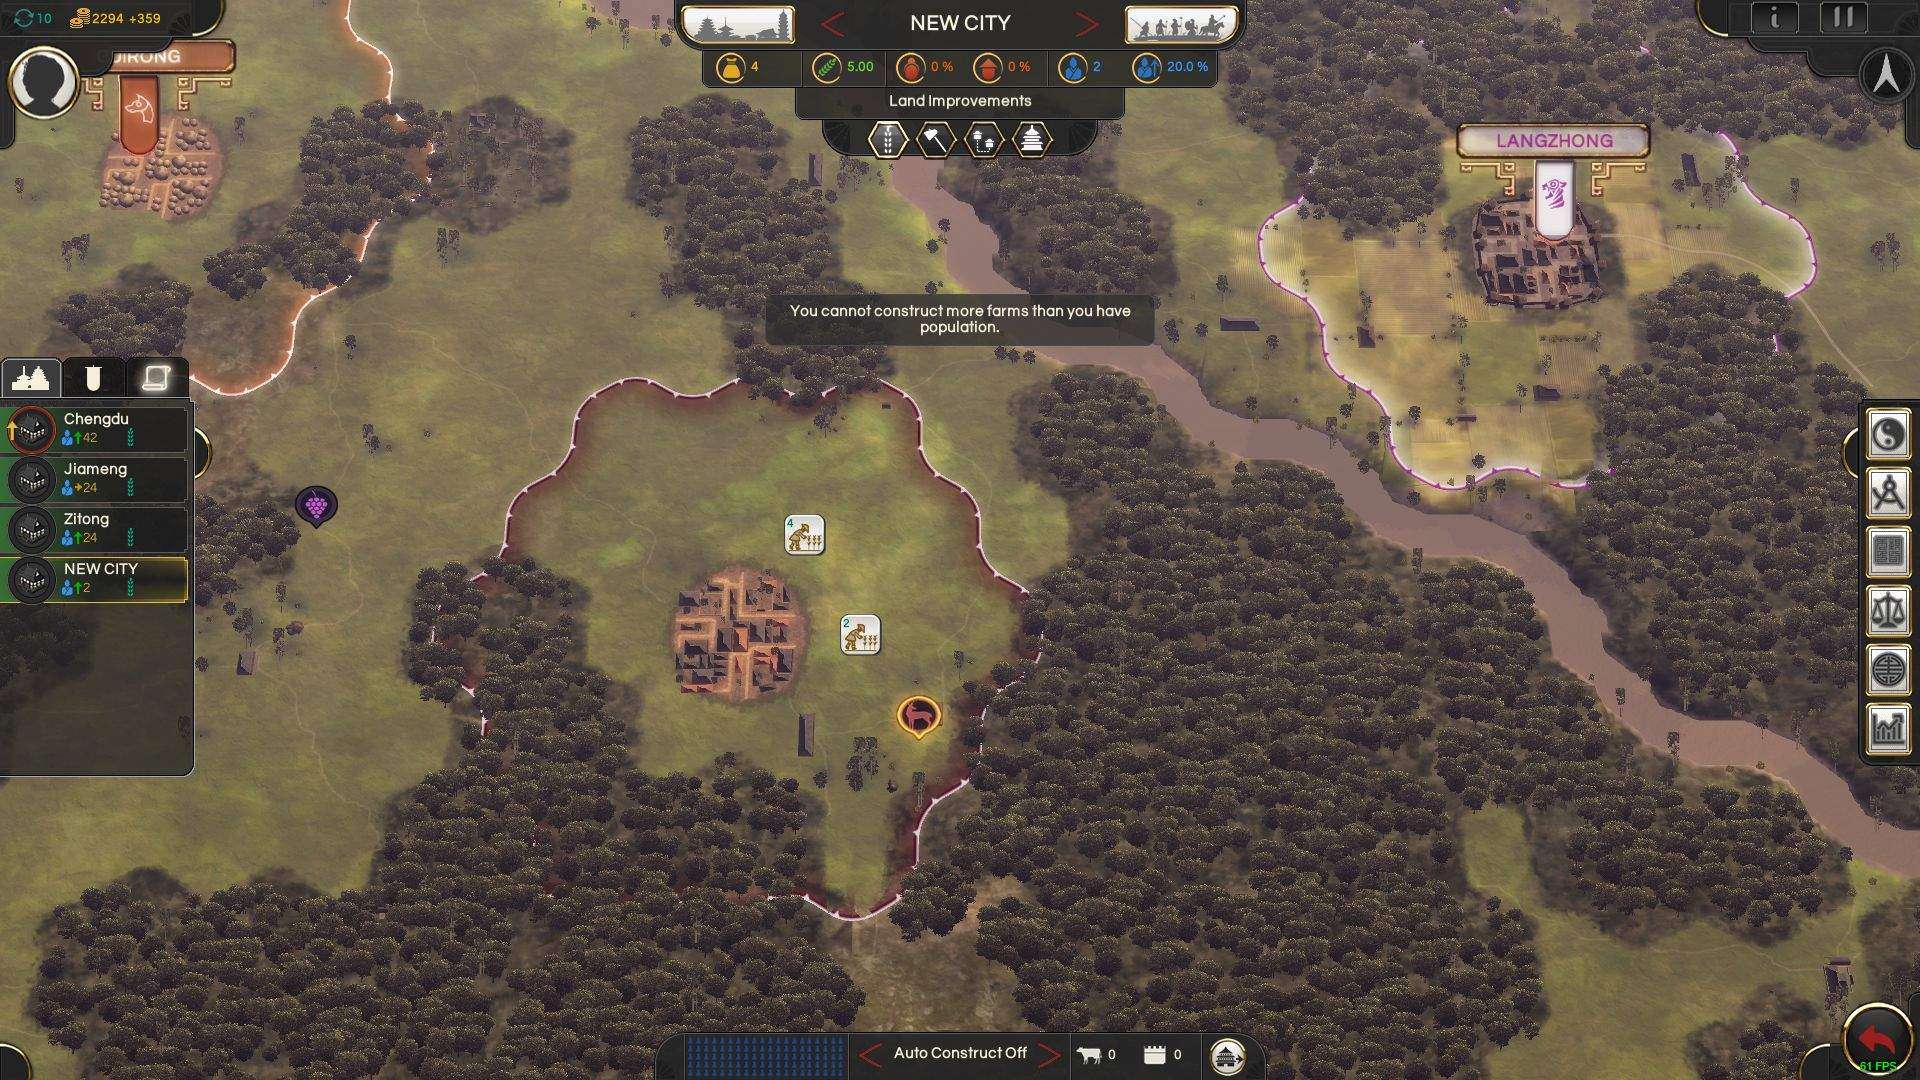
The main things to keep in mind are that cities can eventually grow to exploit resources up to 5 hexes past the city border. For reaching resources deeper in mountains this is useful but it requires the city to be at 100 population. At 40 population a city can reach 2 hexes beyond its borders and this is something EVERY city should plan for as 40 population arrives quickly.
For a city to use any resource other than a mine or an external building, it must be within or adjacent to the resource, food resources must be within the city limits to use.
A city with less than 40 population has only a single hex + 2 hexes around it under its control until farms are built to extend the border.

Here from a Warring States Shu campaign we can see a wide area of the map explored by turn 9 and we can get an excellent idea where to put cities and what enemies we might face early.
There are only 3 factions nearby, the farming Ba, the tribal Dog Rong, and the farming Qin further to the north.
The settler built in turn 1 has reached 2 hex distance form the Wild Game food resource near the center of the screenshot while the Mulberry resource is 5 hexes away and well within reach for when the city expands. The nearest Ba city is a bit close but is on the other side of a navigable river which will provide a natural border and allow water trade while there is quite a lot of forest, there are fertile plains beneath most of the trees which allow easy farming.
Settlers moving south to settle the Sichuan basin can stop on their way and help clear some of the trees. When a new city is settled, trees within 2 hexes are automatically cleared, in the same turn that city can be disbanded and the settler move on to a new location in the next turn.
Some people consider this an exploit and it is banned in many MP games but since Settlers cost 500 gold and 2 population, I personally think it is fine to add an 8 turn detour on their route to found a new city to help clear some forest or simply to transfer population from 1 city to a new city so that mines or other buildings can be built more quickly. Keep in mind the extra population will starve if no food is available but in cities with food resources but low population it can be a way to boost early labor and build more quickly.
Looking at the map there are 5 really good locations for future cities;
- Where New City will be founded in the next screenshot.
- Between the Rhinoceros and Copper east of Jiameng and north of Langzhong. The Ba will have to be subdued and Langzhong conquered to steer its development away from this city but there is plenty of space for all the cities to develop toward 200 population if farms are developed away from the other cities.
- The clearing far south of the New City near 2 Copper resources and Zhennan wood and Bamboo for a total of 4 resources + a navigable river and lots of fertile plains.
- There are 2 Copper southeast of Chengdu and a Jade that will be very difficult for Chengdu to claim but a city closer to the mountains can easily develop that Jade.
- Far south of Chengdu another 2 Copper, a Gold resource, and lots of fertile plains + a navigable river.
The settlers for New City did settle once to clear forest and once because I miscounted the distance of the wild game food resource that provides 3 food to help this city grow more quickly. The Mulberry resource nearby will not be important for a long time but this city is perfectly placed as a future Trade Hub with trade routes to at least 12 cities and possibly more via the navigable rivers.
It is placed roughly in the center of future Shu territory, Langzhong will eventually be captured but other Ba cities will be left to them when the Ba accept being vassals, located between 2 navigable rivers, and with a luxury bonus resource in the Mulberry which gives +30% to Silk trade and has 2 Jade, 8 Copper, and 2 other luxury resources within its future trade network.
The Dog Rong will eventually have to be cleared away but it is actually useful for tribal herders to settle nearby in some circumstances. They bring flocks which are a food source that can graze on undeveloped land and their settlements are easily conquered anytime in the first 150 turns meaning you can often take over a tribal settlement that has flocks and then build farms which is nearly like having several food resources in that city and saves the time to terrace hills or uses grasslands that farmers otherwise cannot use.
In this example, Guirong that the Dog Rong just settled will need to be cleared away as it will block the development of 3 Shu cities but Qiangfang to the north with gold, wild game, and a lot of grasslands nearby is an ideal early conquest as it will add flocks that can graze the grasslands while still bordering fertile plains to build farms on.
Cities expand borders by reaching 40 population where cities can use resources 2 hexes beyond the border, then at 100 population cities gain 3 hexes from their borders, building farms toward the resources you want to claim later is important in city development.
When there are several cities built close together but there is open land between their borders, you can steer your city development to claim that open land first by building farms in that direction as soon as possible.
Chengdu to claim the Jade nearby would have to spend a lot of labor terracing the hills to expand in that direction but a city founded closer could eventually claim the Jade simply by reaching 100 population while only planting farms on fertile plains and not wasting labor terracing hills.
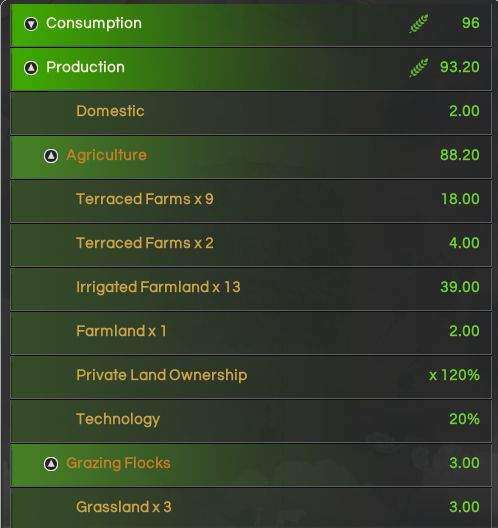
The other important things to keep in mind about growing cities quickly is that Irrigated farms take more labor than the food they produce initially. Growing city borders via basic farms creates more food in a shorter amount of time than Irrigated Farms or Terraced Farms.
Cities should only resort to Irrigating Farms or Terracing when there are no available hexes to create a basic farm. Basic farms provide 2 food and and additional 35% from techs. Irrigated Farms add 1 food but combined with techs end up producing 4 total food from a single hex late in a campaign only after many turns of research.
Irrigated Farms require more labor and should only be built when there are no further basic farm hexes to expand into and there are no resources beyond your city borders to develop towards and claim. Terraced farms should only be built if you want to expand toward a resource or towards Fertile plains when your city borders are constrained.
Secondly, population that is not farming does not pay taxes other than the Salt Tax but can produce trade income.
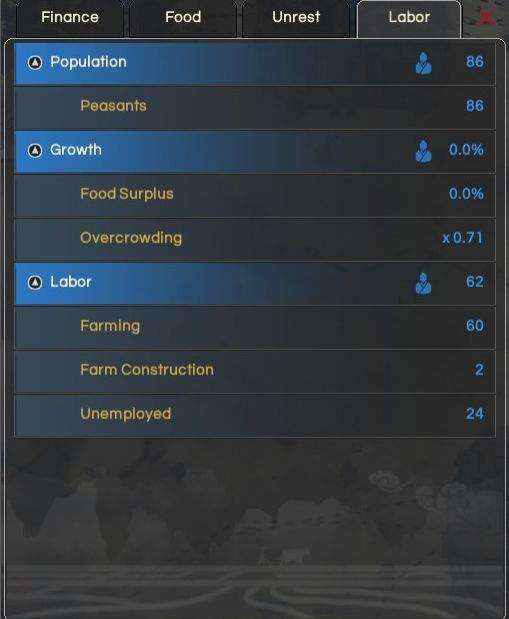
Here you can see overcrowding is reducing growth by nearly 30% and that is due to giving the peasants a break from forced labor while population continued to grow so there were fewer hexes than population and building Terraced Farms to steer a city development toward fertile plains on the other side of some hills.
This will temporarily slow food growth but in this example there were no more fertile plains available adjacent or within the city so developing some hills to gain adjacency to fertile plains was the best option. Reaching adjacency to 6 fertile plains hexes allowed an additional 22 food and allowed the city to hit 100 population gaining 3 additional hexes beyond its borders which allowed a 2nd Copper mine to be developed and immediately claimed several fertile plains hexes before a nearby friendly city could expand there.
This city later reached 169 population when I ended the campaign.
Technology
Technology is fairly simple in this game, there are only a few really important technologies with the rest being small bonuses to various things or mostly a steppingstone to the next important technology.
There are only a few techs that allow edicts which directly boost income from higher taxes and for the first half of a campaign taxes are the most important revenue source though trade should surpass taxes in most starting locations once a civilization has a handful of 80-100 population cities to trade between and by the end of a campaign the majority of income will have come from trade but mostly in the last 100 turns when the longest distance trade buildings have been built and almost all cities in a trade network are developed.
I won’t cover every technology, just the most important or ones which might have effects easily missed.
Food techs
1 food = 1 population = 2-4 money from taxes and 1-8 money from trade. For most of the early game more population = more income and thus growing population fast translates into a stronger military, better diplomacy, and overall more options on how to play.
Food surpluses translate nearly directly into a higher population while food shortages lead to population dying off and city income declines. Pillaged farms by hostile units thus can directly decrease population and can take quite a few turns to rebuild the farms and even longer to regain all the lost population and lost potential income.
Bronze era
- Bamboo Strips (allow Central Bureaucracy edict which allows Salt Tax, Private Land Ownership, Imperial Secretary, Imperial University, Civil Service, and Land Redistribution.
The most important tech in the game due to the Edicts it unlocks. The Private Land Ownership edict is +20% food, the single largest increase in food from anything in the game.
- Seedling Transportation +5% farms
- Brick Faced Walls +5% farms
Warring States era
- Crop Rotation +5% farms
- Iron Plow +5% farms
Tax techs
Not as self explanatory as population. Most of the tax techs are tied to edicts which tend to increase unrest but early in a campaign unrest is rarely an issue unless population are starving due to pillaging or a recent natural disaster.
- Bamboo Strips (allow Central Bureaucracy edict which allows Salt Tax, Private Land Ownership, Imperial Secretary, Imperial University, Civil Service, and Land Redistribution.
Salt Tax is on ALL population which is different from the field taxes as large cities tend to have a fair share of unemployed population.
Imperial University is an edict which adds +10% to the base taxes being collected so has more impact if you issue that edict after the other Tax edicts.
- Flood Control (lowers flood damage and allows the edict Well Field System which adds income from all population farming
- Coinage (allows longer distance trade and the Salt Tax edict). Notice here that the Salt Tax edict requires 2 techs to be issued, both Coinage and Bamboo Strips.
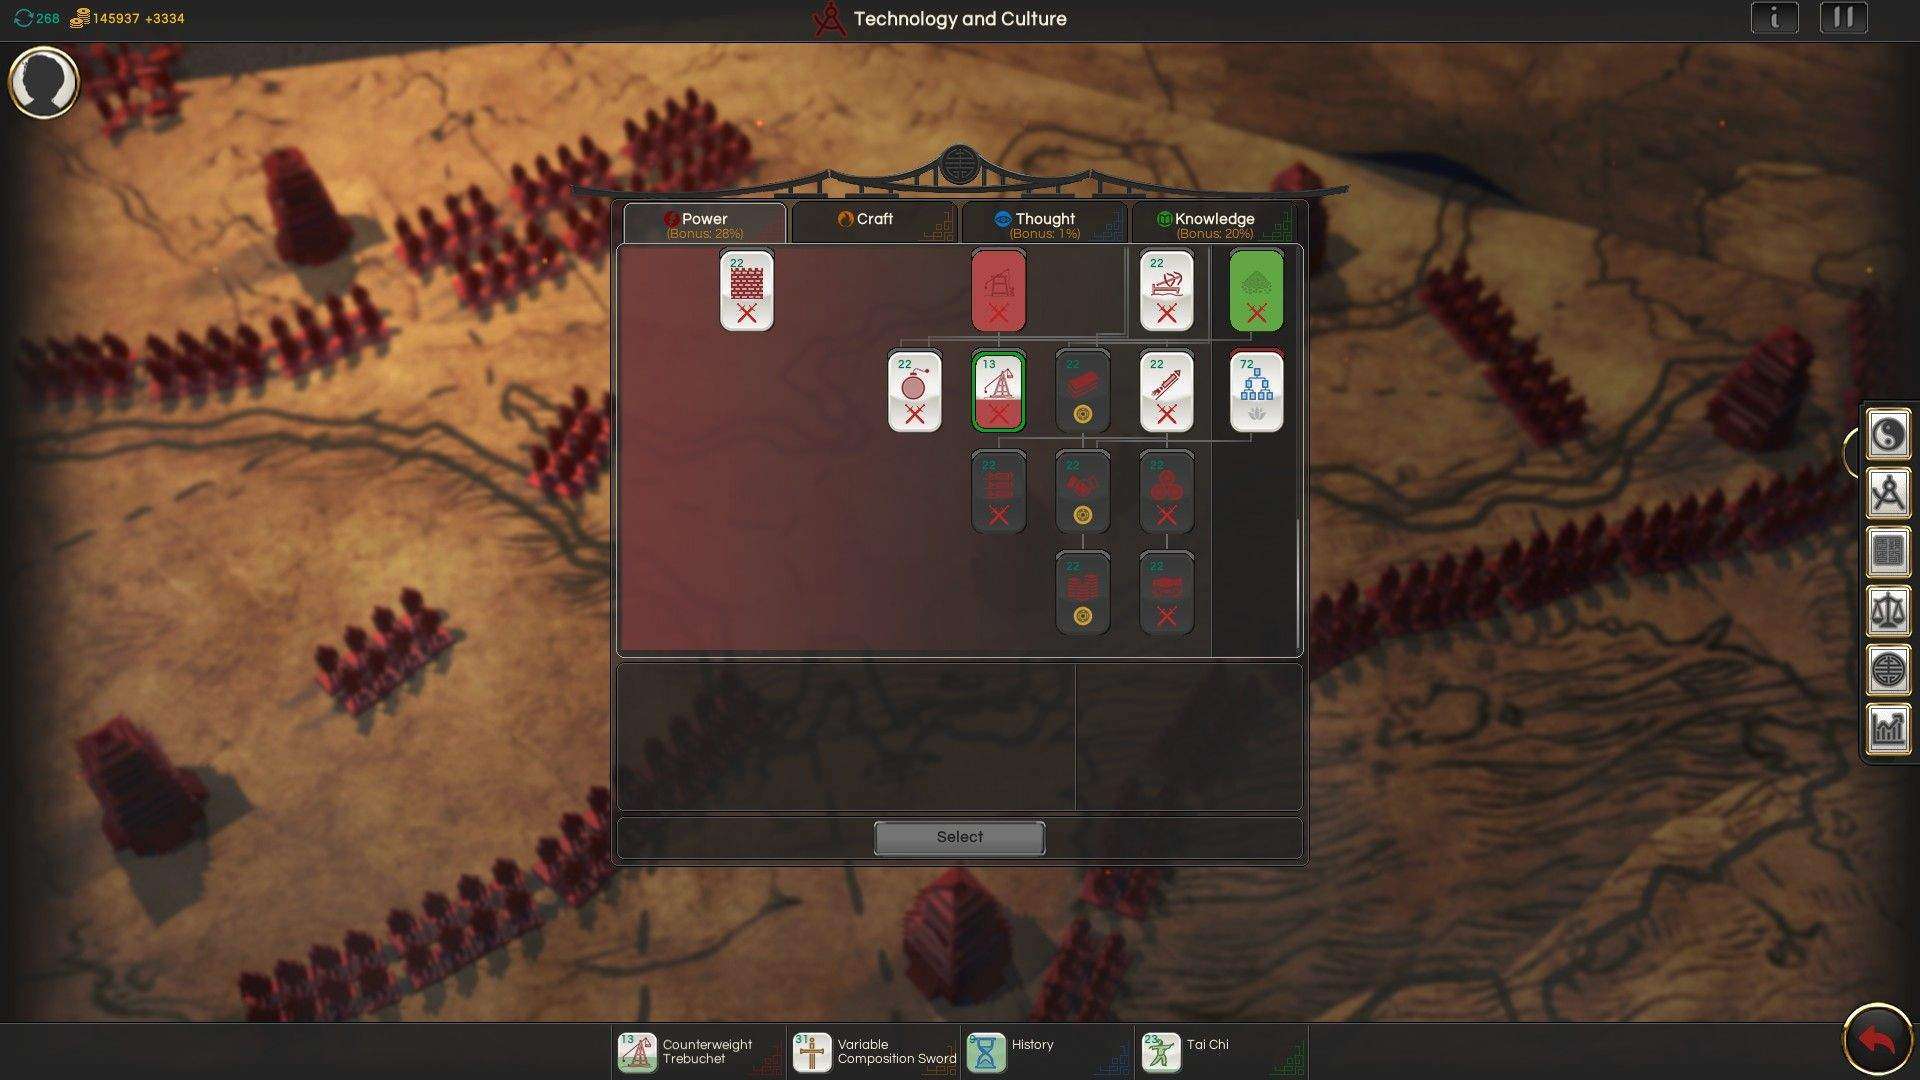
There are a few things which require multiple techs to have been researched as the screenshot below demonstrates. Techs on the right side of the screen in a different color are in a different domain and are required to be researched before the tech in the current domain can be selected. Gunpower is first researched in the Knowledge domain and then unlocked in the Power domain.
War techs
The most important techs for war varies depending on which faction and where you are fighting. Terrain impacts unit efficiency and if you are fighting constantly on hills or in forests or marsh, chariots and cavalry generally fight at a penalty compared to cheaper units.
That said, noble cavalry are the most powerful unit that is not locked behind a lot of techs or buildings and only require 4 techs, however those techs have some of the longest turn times in the game.
The Knowledge path for techs has several techs which reduces the effects of disease, battle casualties, and adds flaming arrows which are the best way to attack cities other than siege artillery until the late Imperial era which usually takes longer to reach than flaming arrows and all archers can use flaming arrows so your armies that were built to lay siege with 3-4 archers can keep moving forward without waiting for the siege artillery to rest and regain efficiency.
Cavalry are best used in clear terrain but the most powerful cavalry units can often defeat peasant units even in less suitable terrain but will take more casualties and lose efficiency more quickly than if there fought in favorable terrain. More details on that in the Battles section.
Peasant armies backed by Noble cavalry can be quite powerful, their main drawback is lower morale which means less ability to stand in battle, more routing and routing leads to increased casualties and lower efficiency.
Most civilizations can support 2x to 4x the numbers of peasants as trained units both due to cost and ease of recruitment. Many times the terrain prevents large armies from fully deploying those higher numbers. Unless a civilization is in the central plains or northern grasslands it is far more efficient to switch to using mostly trained armies which can generally fight 3-5 battles before needing to rest and heal which allows the military to keep its momentum up during invasions which is important as the AI can run out of recruits and money if it loses enough units.
Peasant levy armies can win battles and sieges but it will take longer unless those armies have wide open terrain to fully utilize the levies. Thus Trained armies are often more useful as Trained units also suppress peasant unrest which tends to matter at times in the mid to late campaign.
Other important techs
Crossbow requires first Knowledge tech and then the Power tech to unlock and is required to enter the Imperial era where most of the best techs for Trade are located.
Legalism is another important tech in the Knowledge domain as it unlocks Legalist schools which lower peasant unrest while boosting taxes and increasing Power domain research speed at the cost of Thought domain research time.
Advanced Bronze Casting gives a boost to the Bronze trade which along with Pottery, and Copper is likely to be most civilizations main trade goods until the late Warring States era just prior to entering the Imperial era. It also unlocks Weapon Smiths which are required for some of the better Trained units.
Massage gives +40% boost to efficiency recovery which is hugely important in keeping momentum up especially vs powerful opponents who can flood a front with armies. If armies are winning battles but taking several turns to recover, they are wasting both money and time.
The Power domain in the Imperial era has some useful siege techs which might be the best option if a civilization is already dominant and just needs to capture a few more cities a bit more quickly but those Power techs are locked behind Lineage Groups which is a Thought tech so be careful with building Legalist schools everywhere if you are behind on Thought research already.
The trade techs at the end of the Power domain are likely to double TOTAL income so if there is a tight race for 1st place and money is still an issue after 200 turns, those trade techs are usually the answer but they require the Thought tech Lineage Groups which is also quite long so it takes some lucky encounters, planning with building Temples/Schools, or a longer campaign to unlock the final 3 Power techs.
Diplomacy
The diplomacy in this game can work to your benefit if you understand some things which are not well explained.
The AI tends to attack factions which are close to its cities and weaker, the faction which is currently winning, the player’s faction (on difficulties above Normal), and factions which have a weak military or most of their armies deployed on a far away front.
To successfully use diplomacy you will need to plan ahead and prepare.
To avoid wars having a military at least as strong as your faction’s neighbors is fairly essential. It is better if the military is a bit stronger but being at least equally strong is important. Often, if your faction is behind in cities, culture, and population- it can be important to have an even stronger military than your neighbors.
That said, the AI may still attack when your cities get near even if there are other targets that may seem to make more sense.
The AI will often make the decision to make a formal declaration of war in the turn it officially meets your civilization so if you encounter a new power, you should always open diplomacy and attempt to buy information on enemies and get a Fraternal Harmony Pact.
If the AI refuses to agree to a pact of harmony it is likely planning on attacking your faction. The AI occasionally breaks pacts but even on higher difficulties that is rare as that harms future diplomacy with all factions.
To prepare you can ask another AI faction that is near your likely hostile AI faction to agree to attack within 7 turns, that can often cost a lot unless that AI was already considering attacking the targeted AI but is a way to divide the hostile AI’s armies. The main problem is that the AI has a slight anti-player bias and is likely to send a few more armies your way than vs its AI enemy and it might allow the other AI to capture cities before your own armies can arrive.
You can also prepare for the war by building military buildings in a city a bit back from the likely front line. Using a city on the front line to recruit units leaves your armies within that city’s borders unable to replenish casualties. Also if things go really wrong, you don’t want to lose the city that has several thousand money recently invested into military buildings the AI can now use against you.
For adequate planning, you should have been scouting from turn 1 and have an idea of the AI factions nearby and the factions on the other side of those AI factions. The map is too large to have scouted much beyond that and factions too far away are less likely to respond to anything other than lots of money which is 90% of the time better spent on your own armies and economy.
When is it worth it to bribe the AI?
- To attack rival factions, the AI will usually request a huge amount but it is always worth checking and remember that 4-5 turns of surplus income is not actually that much vs the value of your enemy dividing its armies.
- For information on enemies as this is usually relatively cheap and offers a way to scout the map without having to deal with hostile units constantly attacking your scouts. Friendly AI factions will often offer this for free or very little so it is worth doing only for AI factions in an area of the map you have little to no information on and are at war with a faction you have not met yet or the faction which is in the points or population lead.
- To become a vassal.
Often the AI will refuse to accept being a vassal until it is down to less than a handful of cities. That can take a long time and once you have reduced an AI by capturing its largest or nearest cities, there are often better targets to direct your military towards.

Vassals are very useful for securing a front, being steady trade partners, and in wars vs distant foes where the vassal armies can support your fewer armies until you capture a couple of cities and can build a forward base.
- For military recruitment rights. Maybe AI who are not vassals will agree to this but I’ve never found it to be the case, even vassals are reluctant but can be persuaded which can be very useful both for wars vs distant enemies or for tribal or farmer factions which want access to special units only available to the other culture.
- To be recognized as Emperor. In my opinion this is the most difficult victory condition to achieve but near the end of the victory turn timer, an AI can often be bribed to recognize you as Emperor if your faction is significantly more powerful than the targeted AI faction.
It might take 100,000 but I often have 300,000 or more saved when near 300 turns especially if the campaign started as Warring States or a DLC with more cities/tech unlocked at the start. For a Grand Campaign that is less likely to happen in 300 turns though you can always increase the victory turn timer in the settings when playing vs the AI.
When are bribes a waste?
Nearly every single time not listed above. The main thing to keep in mind is that vassals CAN betray you, especially early in a campaign when your military or power levels are relatively even, or when the power levels can change after your vassal recovers from the war and becomes stronger than your faction.
If your faction is securely in a dominant position over the vassal faction with stronger armies and more cities, a vassal is very unlikely to betray. The main exception seems to be in cases of different cultures where farming culture vassals will betray tribal factions or vice versa especially if there are no other nearby war targets, often because you have wiped out all nearby factions other than your vassals.
Does breaking your word matter?
Yes, the AI does keep track of how many times you agreed to attack within 7 turns and did not or if you bailed on a defensive alliance or refused to enter a war to defend a vassal or breaking a Pact of Fraternal Harmony.
That said, there are several levels of damage to your reputation and agreeing to attack a faction within 7 turns and then failing to do so barely changes the AI reactions to diplomacy unless you do it several times. Failing to honor a defensive alliance or defend a vassal results in more severe reactions where the AI is far less likely to agree to peace, accept becoming a vassal or recognize you as Emperor.
Breaking a Pact of Fraternal Harmony seems to have the heaviest repercussions and in a campaign when I tested it by breaking a pact before and after creating a vassal and several other agreements, the AI took nearly another 30 turns of war to force acceptance of becoming a vassal and the cost of agreements increased nearly 5x. I don’t know if it makes the AI more likely to betray its vassal status but it seems possible.
Edicts and Unrest
Edicts
Edicts are the main tool players have to make sweeping changes to their civilization in a single turn and there are several Edicts which make a huge difference to income, armies fighting abilities, or authority and culture.
Edicts are usually linked to specific techs and the most important of those techs are covered in the Technology section.
Some Edicts cost nothing or have limited consequences, some have permanent costs in unrest or money.
The lower right of the Edict screen shows the ongoing upkeep cost of an Edict while the lower left shows the single turn cost.
The effects of the Edict is described by the text when you click on the Edict. The costs are usually in unrest, authority, culture, or unit recruitment.
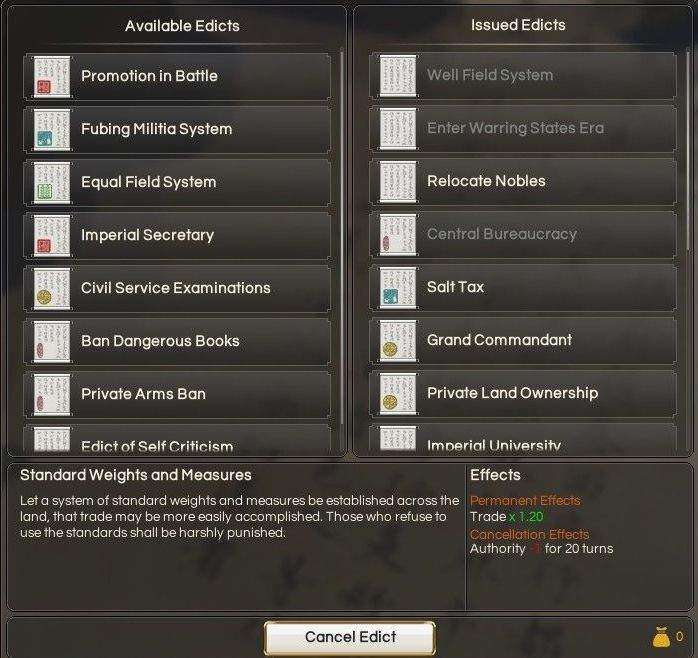
As you can see, some Edicts have a substantial permanent cost, it is not always worth it to issue an Edict as soon as it is available.
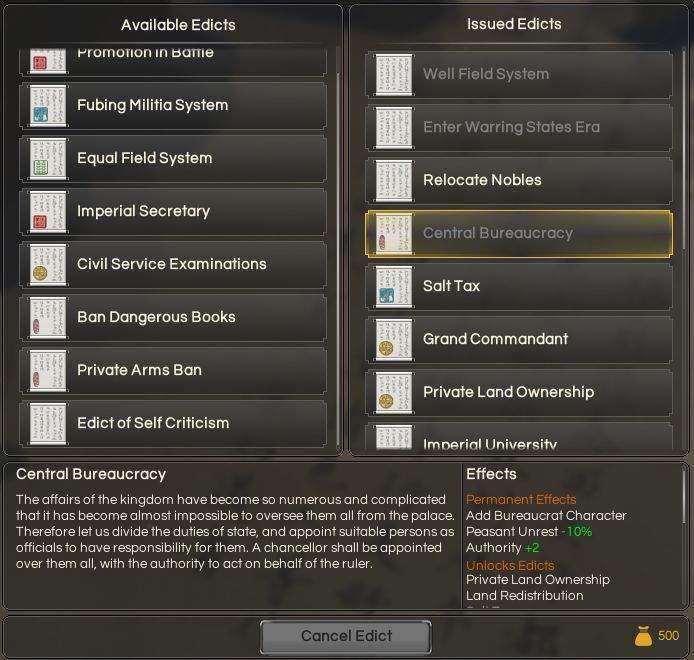
Central Bureaucracy costs 500 per turn but unlocks the Salt Tax edict and the Private Land Ownership edict which costs a further 300 but both can lead to increased income.
The Salt Tax should generally but issued immediately after Central Bureaucracy unless peasant unrest is an issue in several cities because it will raise taxes almost directly proportional to the number of citizens in all your cities and offset the cost of Central Bureaucracy.
Private Land Ownership increases food by +20% and if you have 300 population when you issue that edict, it will add 60 additional population within a few turns and many more throughout a campaign. There are other taxes, edicts, and feedback loops to consider but generally, without a handful of cities over 60 population, it probably is not worth issuing the Central Bureaucracy edict.
Even with 400 population the total cost of 800 for both edicts is unlikely to be fully covered immediately but generally the earlier you issue Edicts which increase unrest when you are at peace and your Faction Leader is young the better in the long term.
Edicts which will result in faster population growth which translates into both more taxes from a larger population but also larger city borders to capture resources up to 11 hexes away it can be worthwhile to issue even if it gives negative income initially.
There are four Edicts which have to be more carefully considered- almost all the other Edicts should be issued at some point in the game as the benefits outweigh any temporary costs in the longer term though not every Edict should be issued immediately.
Private Arms Ban This has a high temporary cost of +30% peasant unrest and -50% militia available for recruitment. The permanent effect of -20% peasant unrest is quite strong and this Edict is partially offset by Fubing Militia and results overall in a stronger military but by the time you have this Edict available, the +10% peasant unrest from issuing it could push several cities into revolt.
Fubing Militia Increases militia availability and +20% militia attack for the cost of 500 per turn. Keep in mind this does not increase ALL militia stats, only attack which for most militia is only an increase of around 1. Makes militia armies slightly better and works best in conjunction with Private Arms Ban.
Really only useful if you are still using a lot of militia armies in the late campaign. If you grew your civilization well enough by that point the money for Trained and Noble units is available and militia units remain less effective than those unit even with this boost. The only time I issue this Edict is when I have numerous highly experienced militia armies left over from early wars. The +40% efficiency gain from experience +1 attack stat will have peasant halberds attacking at 10.3 strength in a normal army and up to 13.9 when under the command of a full Qi character which is high enough to quickly capture most cities when used with siege artillery.
Ban Dangerous Books Situational, the extra Authority can be useful when pushing for Conquest or Son of Heaven victories as it will allow more owned cities but -3 culture is significant. It affects trade income and unrest in all cities.
Promotion in Battle Never issue this unless you are facing dire attacks from more than 1 enemy. -10% food is a very high cost as it will lead to all cities growing more slowly and cities supporting fewer population when fully developed which lowers all sources of income in exchange for peasant militias fighting slightly better. It is more interesting to consider in conjunction with Fubing Militia but in my experience rarely worth it unless locked in a struggle for dominance on the central plains which has abundant food and fierce military competition from all sides.
Unrest
Peasant unrest is reduced by garrisons of Trained Units and Nobles as well as buildings, Edicts and breaks from forced labor. Stopping hostile unit pillaging farms or building granaries to overcome temporary food shortages can also cancel peasant unrest.
Noble unrest is reduced by peasant garrisons, cancelling Edicts and certain buildings.
The most common causes of unrest in the early game are natural disasters, death of the Faction Leader, and pillaging by hostile units causing a food shortage.
As a campaign progresses the unrest will gradually rise from Edicts among the nobles and from overwork among the peasants as everything built in a city uses conscripted labor. Some edicts reduce peasant unrest while stationing nobles and trained soldiers in a city provides a 2% reduction per unit so 8 units = 16% which is useful in emergencies.
Peasant Unrest
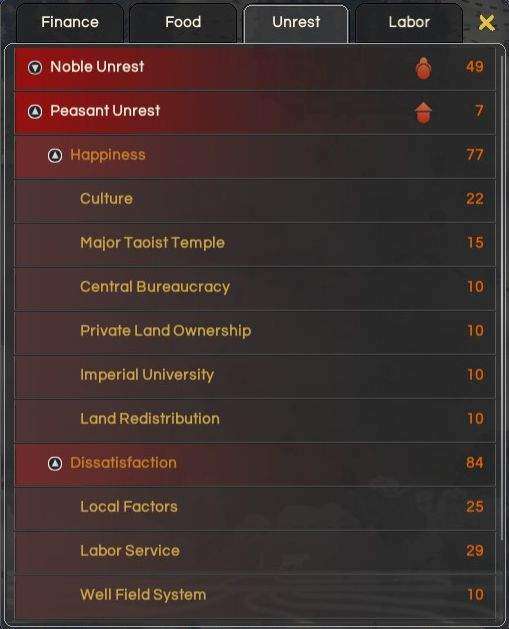
To attain a fully developed 200 population city requires quite a lot of work and to reach that goal with several cities will require the peasants in those cities to be nearly continually conscripted as forced labor. From my experience your cities can usually afford two work stoppages to give the peasants a rest and reduce labor unrest while still surpassing 200 population.
The first is when you issue Well Field system as unrest will increase +10% when both are issued and it is still too early to be spending money on happiness buildings or leaving trained units inside cities to suppress the peasants full-time.
Unrest will decrease slowly each turn and taking a 10-15 turn break assigning work to the peasants in most cities gives time for your population to grow a bit catching up with the farms that have been built and lowers unrest enough to be able to build a string of buildings without having to pay the upkeep of Trained units as garrisons or unrest buildings such as Courts/Prisons/Monasteries.
The 2nd pause should usually be timed with Equal Field system which adds +10% permanently to peasant unrest. By the time this Edict is available you are likely to have mostly well-developed cities and can afford to deal with the unrest but will still need more buildings or farms to reach 200 population. Taking a 10-15 turn break is likely to save garrison costs in the longer term more than the increased income from an extra few population per city coming a few turns earlier.
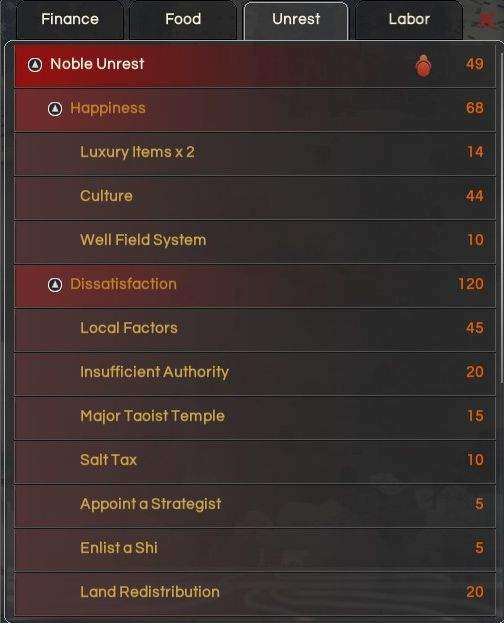
Noble unrest is mostly increased due to Edicts or exceeding Authority by owning too many cities. Certain buildings or owning a city predominantly of a different culture or various local concerns can increase Noble unrest regionally but is usually easily countered by cheap peasant garrisons. Luxury trade goods reduce Noble unrest but are not a reliable factor. Overall, Noble unrest has too little effect in the game in my opinion and recruiting Nobles as military units should increase their unrest by +2% per Noble unit recruited in a city and not disbanded.
Trade
To understand how trade works EXACTLY in this game would require a huge manual of a guide all on its own.
For most players, being that specific is unnecessary and general guidelines work quite well.
The most important thing to understand about trade in Oriental Empires is that it is a network effect. Having a single city of 270 population with all the trade buildings and several trade resources worked by the city will bring in money in proportion to how many and how large all the cities that are connected to that city by trade routes.
Trade is thus valuable MOSTLY in relation to connected trade routes which are the small dotted lines on the map that begin to appear when you have a few cities within 12 hexes of each other and have bazaars built.
Cities without any trade resources sell local specialties that have a low value and buy the trade goods of other cities in their trade network. That means you can develop a viable trade network with only a single city producing trade goods and your other cities buying those goods.
This is often the best way to go about trade early in a campaign when the trade values are generally small along with population sizes and technology boosts for trade not researched yet.
As your own cities and neighboring cities develop (nearby large friendly faction cities can be an important part of a trade network) the value of trade grows and different cities value different goods to various degrees depending on some complicated math only the developers fully understand.
Generally these are the most valuable trade goods;
- Jade
- Silk
- Copper
- Pilgrims
- Ceramics
- Various Luxury resources scattered around the map in smaller amounts
Valuable is not the same as important because Jade, Silk, and Pilgrims take quite a long time to reach full value.
For the first 100 turns Copper and Food resources are by far the most important. Food = free population but is not a trade good and Copper provides both mining income and trade income.
Gold mines can be a valuable source of income early in a campaign but gold is not a trade resource.
The other early trade resources that are worth it are pottery and bronze. Pottery is the only trade good you can build other than Copper mines that has 0 upkeep cost. Trading requires a bazaar which has 20 upkeep but any city with 30+ population and roads will make more than 20 income from a bazaar and a Pottery workshop so those should be built in every city other than a military outpost as it only costs 2 building slots and will provide income the entire campaign.
Bronze is created by a Foundry and does not require Copper and is required to build an Armorer and later Iron Foundry. Not every city should have a Foundry but most likely your capital or trade hub cities should all have a Foundry and later all military outposts.

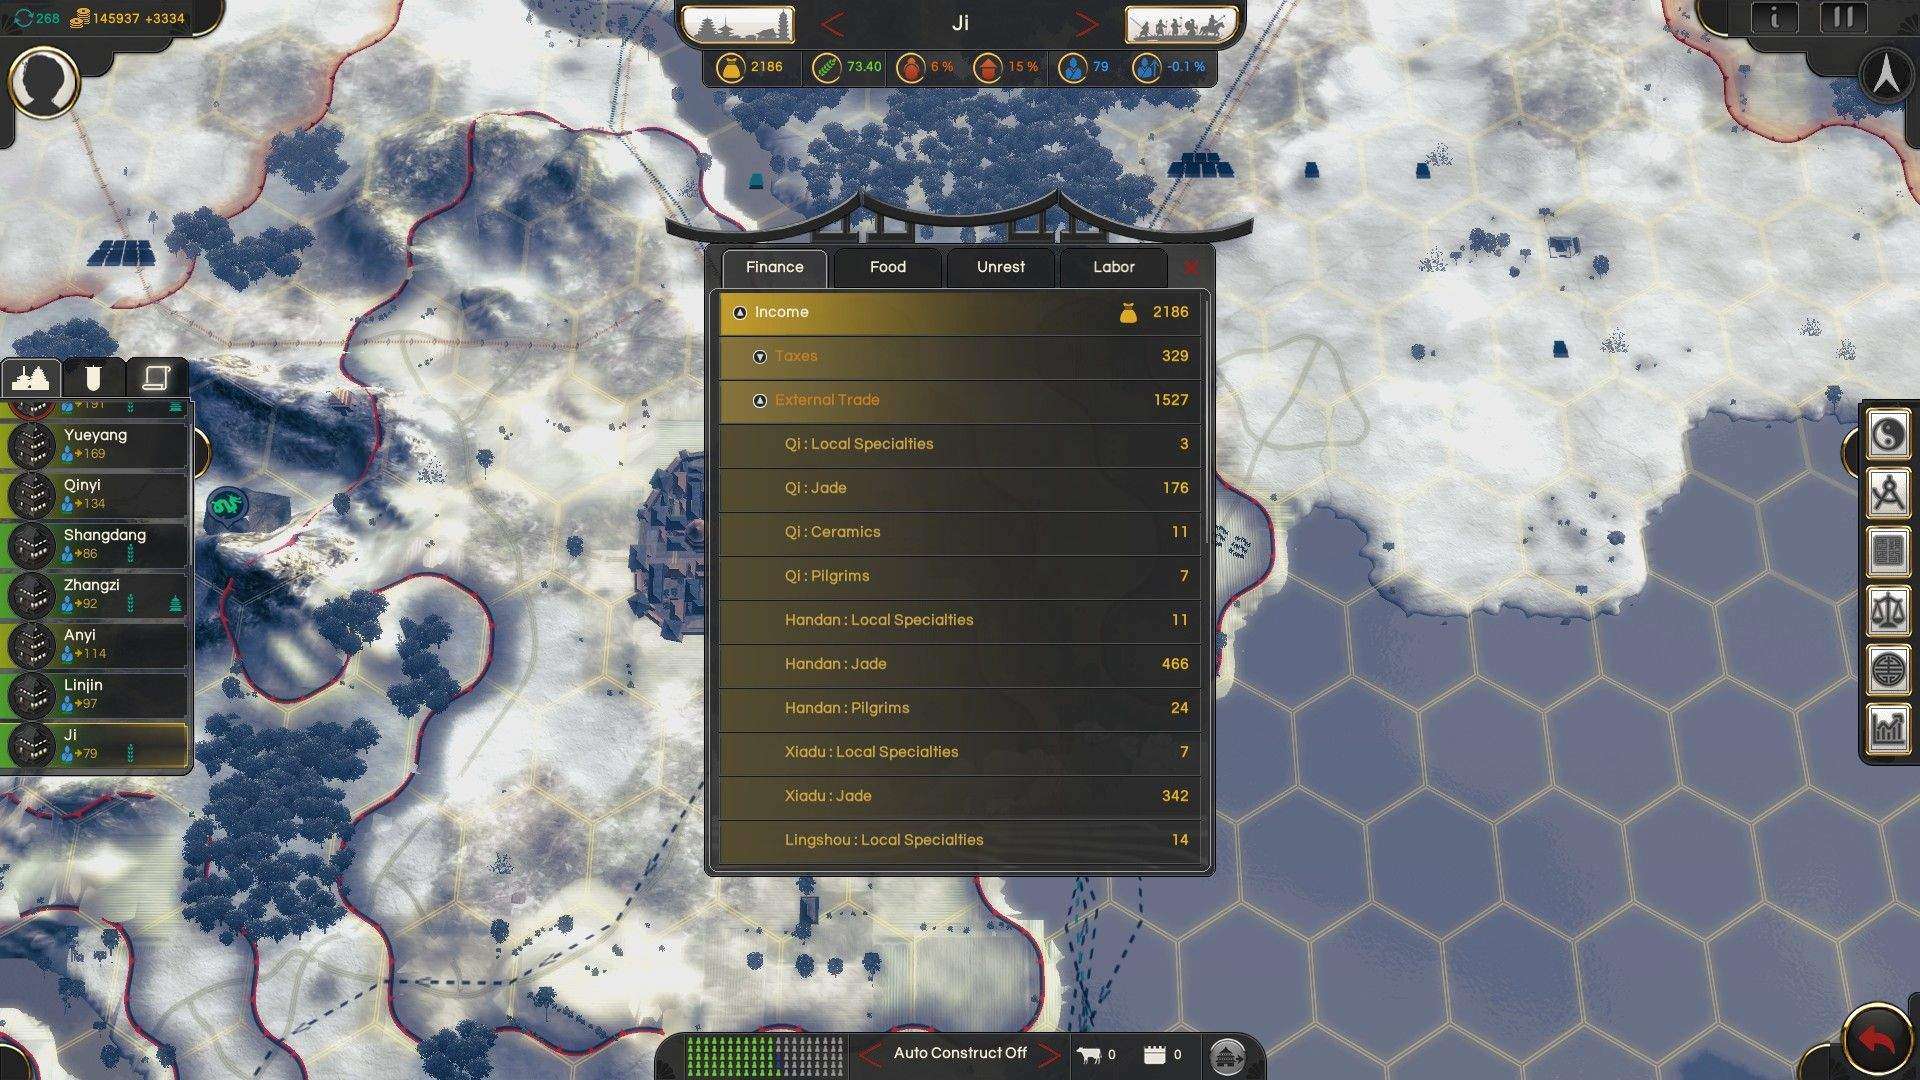
Ji is not a trade hub city nor fully developed but has a Jade mine bringing in 1,400 trade. That is why Jade is the most valuable resource, a trade hub city with Jade near other large cities could bring in 6,000 trade income with half that being from Jade.
Not every city that can should build a Port, generally only trade hubs or cities with Jade, Silk + Mulberry or Cermics + Kaolinite but the Port built here allows Ji to trade with 3 cities beyond the 18 hex Market distance via water trade and brings in 700 income from Jade specifically, far more than the upkeep cost of the Port which also brings in smaller amounts of income from other trade goods.
The Abacus tech, roads between cities, having cities borders expand around or adjacent to trade resources and increasing city populations are the main ways to grow trade income for the first 200 turns. Eventually research unlocks techs that increase trade by allowing new buildings and several direct +15% boosts to trade in the Imperial Era.
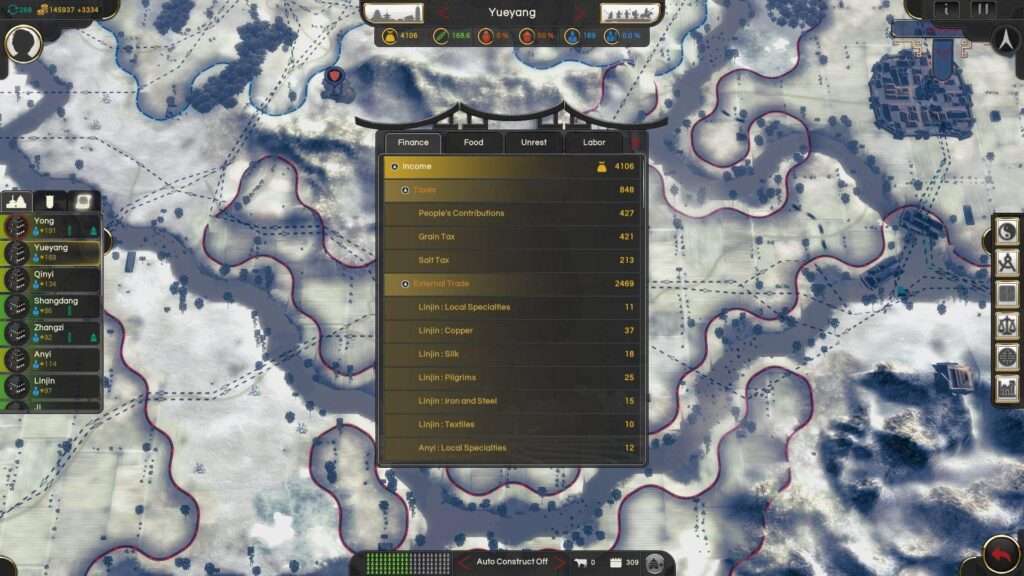
This is a trade hub city late in a campaign with most trade buildings built and a large trade network. There are several trade techs not researched which would add more than +50% to the income shown but it is rare even on higher difficulties that you will actually need to research those techs, a strong trade network is worth more than the trade techs.
As shown taxes are only about 25% of the income for this trade hub city. Internal trade and mines account for another 600 of income but more than 50% of the income is from the trade network of nearby cities reached via roads or river trade routes. There are mountains and no cities to the south so if this city was in a more central position with other cities surrounding it, trade income could easily surpass 5,000 if all trade techs were also researched.
The most important buildings in this city are the Copper mine, the Market, and the Port which allow land trade up to 18 hex distance and water trade up to 50 hexes away. The Legendary Shrine built here is bringing in 340 worth of Pilgrims for an upkeep cost of 60 + 2,400 in building costs. It paid for itself after only 9 turns at this rate.
Keep in mind, that 2,469 of external trade has additional costs as half the cities of this trade network are my own cities and their trade resources have a cost to develop and maintain but those cities are also generating trade worth around 800 + taxes and mines of another 400 making 1,200 total income for most cities that are not trade hubs.
The Qin currently have 18 cities but only 8 are attached to this trade network and only 5 of those have more than 150 population and could be considered fully developed.
As you expand the territory under your control, it would be wise to consider trade network value as most of the time you will only control between 8-16 fully developed cities and have only 16-28 cities in total.
That usually translates into 2-4 trade hub cities but conquering enemy cities in the midst of several neutral factions can be the most lucrative conquests though often more difficult to reach than cities directly on your borders, if you conquer in a line toward a potential trade hub city, you can transfer ownership of the staging cities back to their original faction so they will accept becoming a vassal and you get the most income out of the deal for your limited Authority.
Fighting Battles
Preparation
Battles are a core feature that differentiates Oriental Empires from most other 4x style games and allow human players that understand the battle system to outperform the AI and other players.
The main thing to know about how battles work in Orient Empires is that due to simultaneous movement, simply throwing your armies into battle is rarely the best tactic and even a small bit of planning and preparation can make a large difference to not only current turns battles, but the next battle, and even the battle after that.
The main part of preparation is building your armies and recruiting enough men to accomplish your objectives. Ideally, this will involve some scouting to gain an idea of enemy strength but alert or very numerous enemies will eliminate your scouting units and thus you have to gauge how many units are likely required based on total enemy military strength from the Statistics screen, geography near where the battle will take place, your current economic and military power, your recruitment capacity, the units you have available due to researched techs and constructed buildings, the number of turns before the battle will commence, finally- how far your units can move in a particular battle space.
Poor terrain, roads, neutral or vassal armies, and the enemy movements will all combine to affect where your armies can move which dictates both attack and withdrawal to replenish and regain battle efficiency.
Battlefield terrain
Terrain is often key to how you deploy your armies and the particular plan for a large battle. Choke points due to terrain are common in Oriental Empires and having a numbers advantage IS an advantage regardless of any other factors, thus using choke points intelligently is often enough to win a large battle even disadvantaged in all other ways.
Attacking from a height gives most infantry a small efficiency advantage while chariots and all cavalry lose efficiency on all terrain that is not flat though horse archers are the least affected by unfavorable terrain AND have the most movement at 8.
Any unit attacking into a unit defending from a height has a small efficiency disadvantage which means being the first to high ground can swing a battle if neither side begins holding the 2-3 hill hexes in the center of a front but there is a difference between gentle hills and steep hills, where most infantry have little to no efficiency loss when fighting on gentle hills but suffer efficiency loss fighting on steep hills which can be very difficult to spot the difference when hills are terraced into farms.
The only infantry which are generally unaffected by terrain modifiers are the Peasant Light Spearmen. Picked Swordsmen available late in a campaign gain +25% efficiency in marsh and forest which means led by a general and with full experience they fight at nearly 2x efficiency and can be incredibly difficult to dislodge without gunpowder or artillery.
Terrain matters most in the early battles when only 1 or 2 armies are involved and late in a campaign at the start of a war to determine the winner of the initial clash of armies which often looks like the screenshot below.
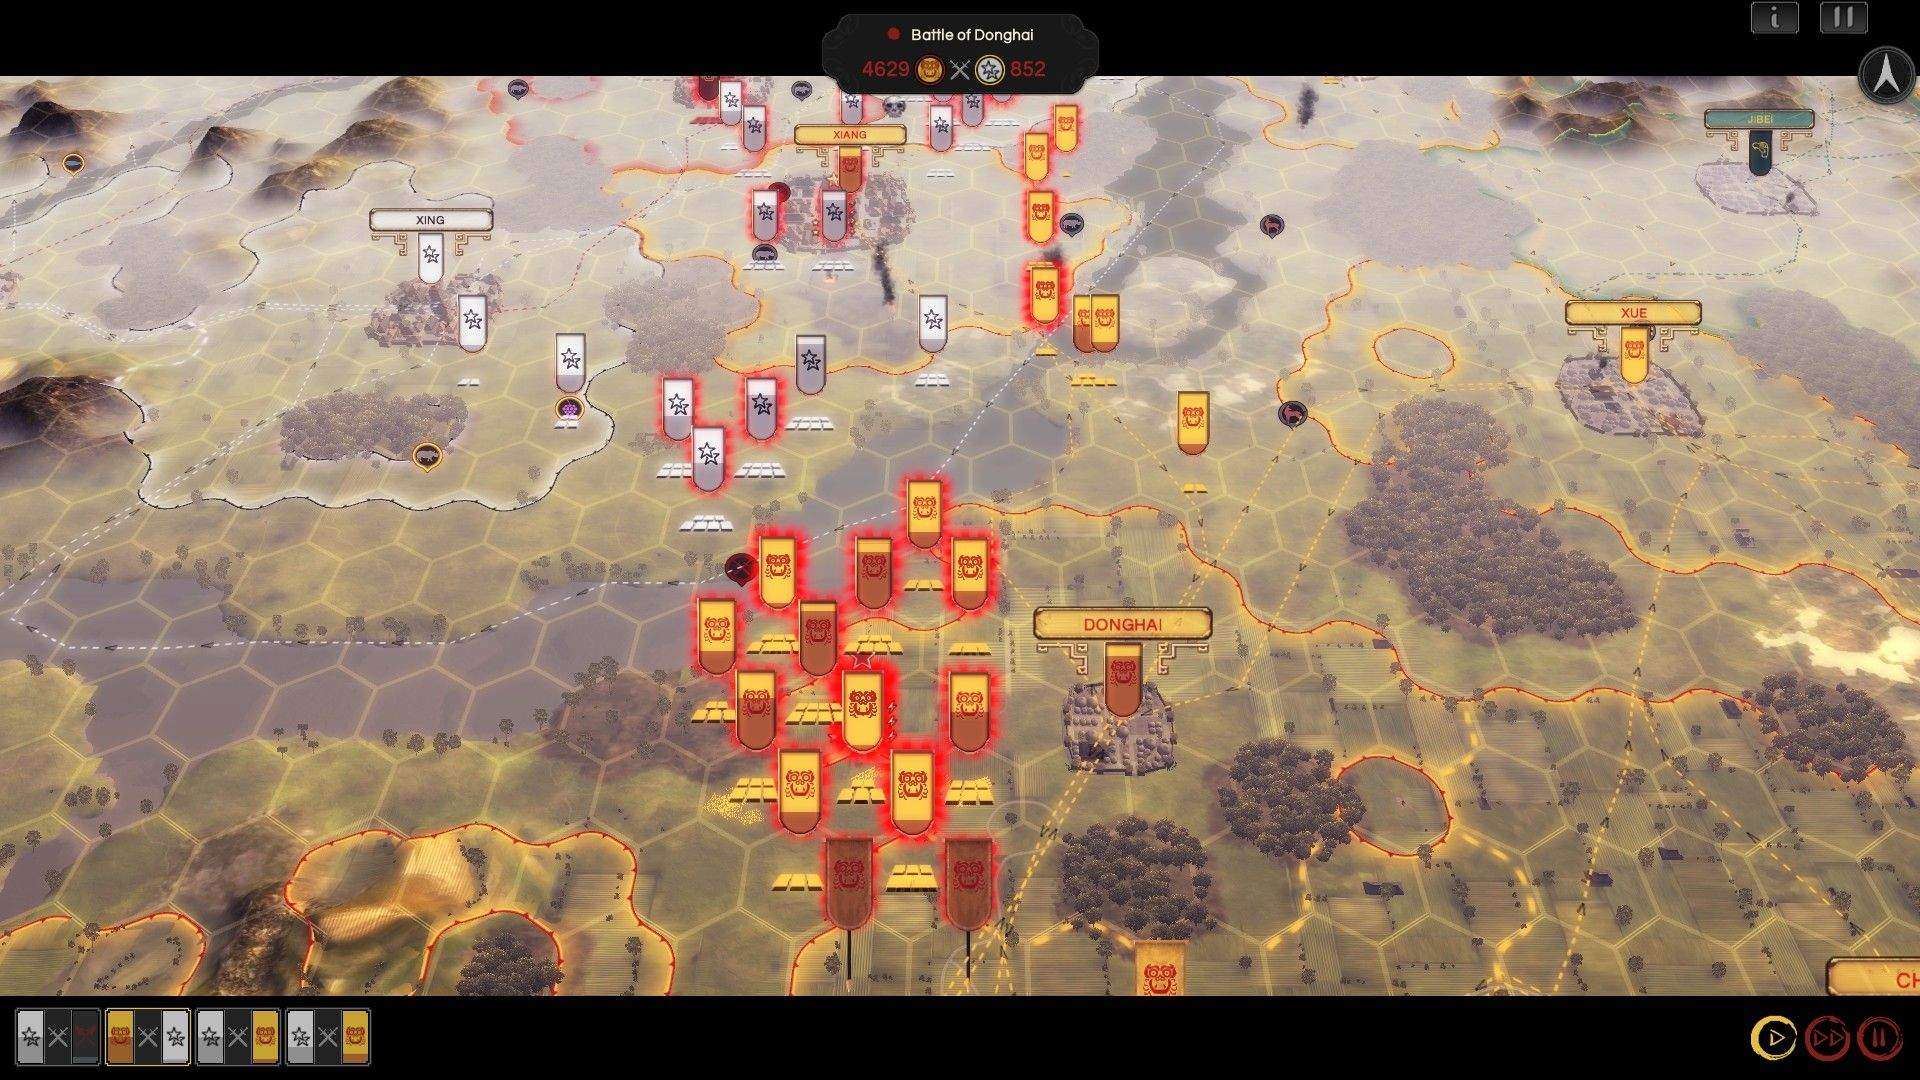
Here the war began only 3 turns ago between Zhou and Han with the Yellow river being the initial front line. The Han attacked just as the Zhou were finishing a war to the north and were able to cross the river and capture the city of Xiang but the river crossing delayed the bulk of the Han armies while the Zhou armies arrived and had a number advantage on the northern side of the river north of Xiang despite having fewer armies involved in the battles initially.
Now the Han have to contend with crossing a river into equal or superior numbers where the Zhou can attack the smaller river crossing from far more hexes and the Han have lost all the armies that forded the river in the opening turns of the war. Both sides of this war have around 50 armies but only 20-30 were deployed on this front.
The army flags highlighted in red are participating in the current battle. As you can see the Han greatly outnumber the Zhou despite attacking across a river and this is because the Zhou pulled back some armies to replenish and diverted some armies to recapture Xiang and had 2 armies without any battle plans set to attack and both of those armies are more then 2 hexes away from the hex where the battle is taking place (the river hex with the red battle marker).
The Han armies that attack first are the faster moving armies of 8 Noble cavalry which can move 6 hexes but crossing the river without a road which adds +1 movement to all units and cuts river movement penalty by -50% is not present so the Han cavalry can only move 1 hex from the river using 2 movement to cross and suffering -50% movement from the river (-25% when a road is present).
The Han armies stacked behind the river can participate in the battle because they all have at least 1 unit with an attack battle plan in every army and even the Han armies 5 hexes away have movement orders into the hex adjacent to the hex where the battle is occurring and can thus join the battle as infantry can move 4 hexes over clear terrain.
The Han win this battle and half their army is able to cross the river in the following 2 turns but then the Zhou capture Xiang and the full army of Noble cavalry in Xing which was replenishing joins the fight at the front as well as a 2nd army of 8 Noble cavalry just off the screen to the west which is marching up the road at 7 hexes move per turn until it reaches Xing and it moves off the road but from there it is exactly 6 hexes to the river crossing.
The Han Noble cavalry took few casualties in forcing the river crossing but lost a lot of efficiency and the 16 units of fully veteran Zhou Noble cavalry that arrived fighting at 140% efficiency defeated 4x their numbers of Han infantry plus the Han Noble cavalry fighting between 10-40% efficiency. The Han Noble cavalry were routed and since the river crossing was blocked they fled into neutral territory south of Xing but were hunted down by peasant Halberds backed by mounted crossbow cavalry recruited freshly in Xing on the turn following this battle.
The Han armies were led by 2 full armies of Noble cavalry but the other armies were a combination of spearmen and too many archers, the Han were planning to siege the Zhou cities and included 3-4 peasant archers in every army which lost quickly to the Zhou Noble cavalry.
In the very large battles common later in a campaign, terrain matters but it is more about the number of hexes you can fight your armies into vs the number of hexes the enemy has armies in that can reach the site of the battle.
The key points are that only armies with a unit with an attack battle plan that have movement orders within 2 hex of the battle hex will join a battle or units with defending battle plans on the site or adjacent to the battle hex.
Since heavy spearmen get a 4x defensive bonus vs attacking cavalry when operating under a defensive battle plan, this can be key to defeating higher quality units but you have to have guess within 1 hex where the actual battle site will be and the attacker can manipulate this using fast moving units like horse archers to arrive at a hex further away and initiate the battle there and have armies move toward that hex to join the battle, bypassing the army of heavy spearmen set with a defensive battle plan.
Logistics
Logistics in this game are limited but do exist as replenishment, unit recruitment pools, and regeneration of battle efficiency.
Recruiting from cities on the front line of a war leaves an empty recruitment pool which means units which are withdrawn from battle to replenish can’t until the recruitment pool refills.
Battle Plans
Battle Plans
Most of the battle plans are rather opaque when just reading the text and you have to understand ranks and battle movement order to make the best use of Battle Plans.
The order shown here follows the movement order that Battle Plans are executed in;
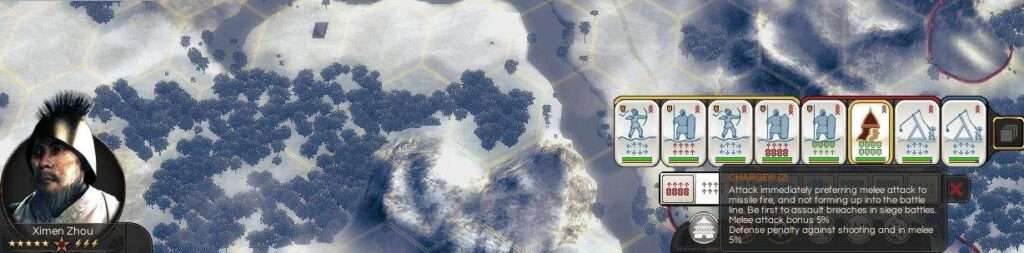
- Charge, units using this Battle Plan move to assault the nearest enemy immediately and gain a 5% melee attack bonus and get a 5% melee defense penalty against both melee and ranged units.
If you want to claim ground early in a battle and have superior units this can be a good Battle Plan but its main use is for Sieges. It is best that units in the front rank or all units in an army are on this plan for maximum effect if using it in open battle.
During Sieges only your strongest attacking units should be using a Charge Battle Plan as only 1 unit attacks a breach during sieges and you will want the other units in the front rank to be archers on Harass or heavy spearmen on Attack so they line up facing the town and their higher defense reduces losses from the enemy towers.
- Harass, units using this move into battle to attack the nearest enemy preferring to use ranged weapons if they have them and skirmish away from melee battle. Most useful for ranged units, particularly cavalry but in large battles setting the ranks after the 1st rank to harass can be more useful than Support as the units in the rear ranks will move into battle more quickly and seek favorable engagements rather than attacking everything.
- Outflank, this one is complicated to use in larger battles but can work really well in smaller battles particularly if your army has chariots or cavalry. The main benefit of this Battle Plan is that fewer enemy successfully run away and the enemy army loses efficiency and numbers more rapidly.
The danger is that the units of your army attempting to Outflank get attacked and overwhelmed by enemy reinforcements or being isolated from friendly units on the battlefield and this is why it is a higher risk Battle Plan for battles involving more than 2 armies.
This Battle Plan also seems to work well when the bulk of your army has low efficiency, put those units with low efficiency into the Withdraw Battle Plan and have a unit in the first rank on Defend or have faster units like chariots of cavalry on Outflank, this will draw enemy forces away from your side of the battlefield and allow your units attempting to Withdraw the time to escape.
- Attack, units form into a battle line which means in the ranks assigned and lined up with units from other friendly armies in nearby hexes, then attack after units in Harass and Outflank have engaged the enemy. Units in this Battle Plan arrive to the battle more slowly but with friendly units nearby and are less likely to take heavy losses, fighting until morale drops or the battle ends.
This is the main Battle Plan for most infantry, the only exception being Halberds when fighting lots of ranged infantry, halberds in that situation should be in Charge to close the distance more quickly and take fewer losses as well getting a small melee bonus, halberds have higher melee attack so +5% means more than -5% defense as halberd defense is already the lowest of any melee infantry. Only peasant light archers have a lower defense than halberds.
- Support, this is occasionally useful for situations when your army is greatly outnumbered but has a strong defensive position or advantage such as heavy spearmen fighting cavalry. Units hold position and only move when enemy units get very close or attack friendly units who are very close.
Ranged units put in a Support Battle Plan will not fire at the enemy until they are nearly engaging the units in the first rank of your army. The main consequence of this is many friendly fire casualties and that the enemy takes fewer casualties on approach. The main benefit is your units remain on the top of a hill and low defense ranged units stay behind the spearwall.
I really only use this Battle Plan when I want to protect some artillery in a large battle, an extra unit to aid a character on Defend, or halberds in ranks behind a front rank of heavy spearmen. The heavy spearmen in the front rank have high defense and will take fewer casualties from ranged units or the charge of enemy cavalry and chariots, then the halberds with their -50% armor attack move forward in Support of the front rank when the enemy arrives to melee.
- Defend, this Battle Plan can be very useful but can also backfire because units in Defend will not initiate battle ever. This gives them +10% defense and they will hold position but if the enemy moves into a nearby hex, these units will not join the battle and may still get overwhelmed when the enemy routs the army in the next hex and then the units in Defend are attacked from 2 or even 3 sides in larger battles.
I primarily use this Battle Plan when fighting Noble cavalry, Tribal infantry (they always move to attack), or when holding a choke point or great defensive position with a reinforcing army on Attack Battle Plan 1 hex away. Units with high defense such as heavy spearmen do best in this Battle Plan and in addition to the +10% defensive bonus, heavy spearmen get 4x bonus vs cavalry when in Defend which means that heavy spearmen can actually defeat equal numbers of Noble cavalry when holding a hill and in Defend Battle Plan.
Usually infantry can only defeat Noble cavalry on steep hills, in marshes or forests and even then it is not guaranteed as Noble cavalry fighting at -50% effectiveness still have better stats than most infantry.
- Ambush, this is very limited use Battle Plan as it requires forest terrain, ALL units in an army to be on the Ambush Battle Plan, and to correctly guess which hex the enemy army will try to move into. If the enemy army moves into an adjacent hex, the Ambush is discovered and your army fights with ranged being in Harass Battle Plan and infantry on Support Battle Plan.
I have only successfully used Ambush very early in a campaign when fighting a single army with a small ‘bait’ army in the hex directly behind the hex the army is Ambushing in.
It seemed to give some type of bonus when the Ambush was successful but this Battle Plan has extremely limited utility in most situations. It seems most useful for hiding the full number of armies you have on a front.
- Withdraw, this Battle Plan will rarely be used until wars with many armies begin. When a front holds 20 friendly and 20 enemy armies for a total of 40 hexes filled with armies it can be very difficult to withdraw the armies in the hexes nearest the enemy to replenish and regain efficiency but every unit wiped out in battle usually costs 7x as much to replace due to the logistics of marching from the recruitment area to the front and you will want to Withdraw armies and replace them with fresh armies.
The other main reason than saving money to Withdraw armies is units that gain experience can fight with up to +40% efficiency. The more powerful the unit, the greater this bonus is. Noble cavalry fighting at +40% efficiency can defeat 4-5 full armies of infantry and will defeat other Noble cavalry that do not have battle experience with light losses and can stay on a battle front engaging in repeated battles for several turns before needing to Withdraw to replenish and regain efficiency.
To clear enemy armies from around a city to make safe for a siege train,, 2-3 armies of Noble cavalry with full battle experience is something that the enemy has to devote heavy resources to defeat and the AI even on the highest difficulty rarely has an answer to such an army, let alone 2-3 in the same battle.
Withdraw has units march to the edge of battlefield to escape untouched so long as they are not engaged before half of the battle timer runs out. Withdrawing units fight at -50%
Ranks, Facing, Battle Efficiency, Characters, and Unit Experience
Ranks
The game allows you to put an army into up to 4 ranks but units have different widths so it is impossible to put 8 infantry into a single rank, the game will default put 8 infantry into 2 ranks with the ranks color coded as Rank 1 Yellow, Rank 2 Red, Rank 3 Blue, Rank 4 Green.
Chariots have the most width and only 3 Chariots can fit into a single Rank.
Cavalry has the narrowest width and 5 Cavalry can fit into a single Rank.
Infantry and Artillery have medium width and 4 units can fit into a single Rank.
Ranks work in conjunction with Battle Plans and the front Rank Yellow moves into battle first IF it is Facing the enemy.
Here an army is divided into 4 Ranks, an archer and defending heavy spearmen in the 1st and 2nd Rank, then 2 Noble cavalry in the 3rd and 4th Ranks.
Most battles it is best to use only two Ranks as it reduces the time for most of the units in your army to engage the enemy and support each other.
During larger battles where there are enemy armies in 3 hexes facing one of your armies which has 2 friendly reinforcing armies in the nearby hexes, it can sometimes make sense to put your army into more than two Ranks to protect artillery, protect a character, allow some units to attempt to Withdraw, or to organize Defend when fighting more than 1 direction.
When using the Outflank Battle Plan, the units which attempt to Outflank are sent out by Rank so 3 Chariots using an Outflank Battle Plan, the left and right Chariot in the front Rank will move to Outflank the enemy while the middle Chariot will proceed to Attack.
If you want your Chariot or Cavalry to arrive in a stronger sequence to the battle, putting the units in Outflank in the 2nd Rank can often be better if the front Rank is infantry using a Charge or Attack Battle Plan.
The screenshot below shows a 4 Rank army which about to be in a very large battle 4,000+ on each side where this army was in the hex nearest the enemy armies and I wanted the archers to Harass, then skirmish behind the heavy spearmen who would move to protect the archers if engaged in melee but otherwise would Defend while the Noble cavalry using the Attack Battle Plan would move forward to attack in pairs which gives them more of a chance to react to enemy units movements vs committing early and being overwhelmed by enemy units entering the battle on the flanks.
Additionally, having to maneuver around the units in the 1st and 2nd Rank forces the Noble cavalry to engage the enemy more slowly which allows my armies in the hex behind to join the battle to fight in a stronger battle line vs the enemy armies also joining the battle from the hexes behind the front line.
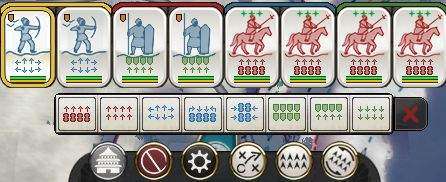
Efficiency
Efficiency is how well units fight to match their stats. Units at 100% efficiency will fight at their given stats. Halberds will Attack at 6, heavy spearmen will Defend at 16, etc.
Those same units at 82% efficiency after fighting a battle and having no time to recover or having marched in non-friendly territory during winter or ended a turn in sand terrain (desert attrition) would fight at 4.9 for the halberds and 13.1 for the heavy spearmen, still viable but more likely to lose a battle vs fresh enemy units fighting at 100% efficiency.
Most units become nearly useless in a battle once they are below 50% efficiency. The only exceptions seem to be artillery and cavalry. Chariots lose efficiency extremely quickly and will simply turn and run away when entering battle with 0 efficiency and take few loses unless the enemy has equally fast units to pursue the chariots.
Most cavalry in this game have strong stats to reflect the importance and eventual dominance of cavalry on most of the battlefields of the central and northern plains which constituted the majority of the important dynasties of ancient China.
Noble cavalry fighting at 50% efficiency will still have better stats than most other units and are likely to win battles in clear terrain. When fighting at less than 80% efficiency in unfavorable terrain such as forests, marshes, or hills, Noble cavalry may lose unless the enemy is mostly infantry archers.
Efficiency bonuses can stack, every chevron of experience a unit gains is +10% efficiency up to +40% that stacks on top of the +35% efficiency given by a general with 5 Qi.
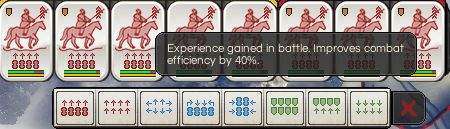
Noble cavalry with full experience with a General at full Qi in Charge Battle Plan will enter melee with 23.9 melee attack stat and with 1.5x attack bonus vs infantry that melee attack stat becomes 35.8 vs infantry.
Basically- Noble cavalry counter infantry in most situations, even unfavorable terrain efficiency penalty rarely reduces Noble cavalry attack stat vs infantry enough for the infantry to win.
The main problem in larger battles is protecting the General as the Noble cavalry will charge ahead slaughtering the enemy in the first army but if a 2nd enemy army enters the battle from a different direction, the general may be cutoff and surrounded but if the General is set to Charge he is possibly in more danger when it comes time to Withdraw that army from the front line.
Facing
The direction your army is Facing matter for which Ranks enter battle first depending upon the Battle Plans assigned.
Basically, if you want your Battle Plans to work as expected, try to have your army Facing where you expect to engage the enemy.
Armies end up Facing the direction of their last move so if you march an army from the south up 4 hexes to the front line near an enemy approaching from the east, your army will end their move facing north and leaving their right flank Facing the enemy to the east.
Set the Facing of how you want your army to end its move using the button below the Battle Plans for each army.
Simple to do but easy to forget and can cost extra casualties in large battles and cause a loss in smaller battles if you used complicated Battle Plans.
Characters and Qi
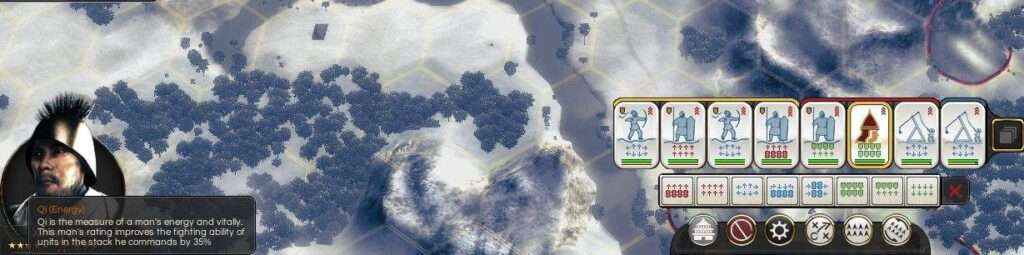
Qi adds +7% efficiency bonus per Qi with maxium of 5 Qi for +35% efficiency to ALL units in the SAME battle in the hexes around a General, FL, or Heir.
Shi put into battle give a boost ONLY to morale, Shi do NOT increase battle efficiency or any stat other than morale. Useful for a last ditch defense but Generals, the FL, or Heir are the best characters to use for battles except putting your FL into battle may cause unrest problems if he dies so… I personally rarely find the risk worth it unless I have spare Authority which is mostly only in the first 100 turns.
You can take more risks with Heirs as they are replaced in a few turns if they die in battle and gaining extra Authority from battles is incredibly useful for the last 100 turns of a campaign.
Characters gain Qi over time and by experience. Fighting in more battles is more likely to increase Qi while Ren is more likely to increase when governing cities but it does seem somewhat random, I have had Shi gain Qi while siting in a city and Heirs gain Ren after fighting several battles.
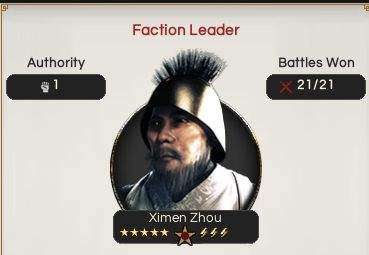
Faction Leaders and Heirs only gain Authority if fighting a battle with 25% of all military units in the faction which only happens early in a campaign, or when involved in large battles or capturing a city above 40 population.
Large battles are those with at least 12 units on each side. The Faction Leader above with 21 battle victories fought most of his battles as Heir defending a choke point with a single army where relatively few enemy armies could enter the battle at once, at some point I sent an army to reinforce and this army joined a battle the Heir was commanding which gave that 1 Authority.
The Character’s army has to be the one which enters the city on capture to gain Authority.
Sieges
Laying siege is one of the things in Oriental Empires that could be fairly easy except that it is often impossible to lay siege from more than 1 or 2 directions which means making the best use of the limited armies that can attack a city during each turn’s siege battle is very important.
Archers are the only units which can set city structures on fire, crossbows can not and crossbows really only function well in set piece battles on open terrain while defended by heavy spearmen.
This is an army designed to lay siege with a limited selection of units. Of the basic units, halberds have the best attack because they halve the armor of the defending unit, both heavy spearmen and halberds have 6 melee attack but the halberds tend to outperform in sieges due to the extra damage vs armor despite having lower morale than the Trained heavy spearmen.
Picked Swordsmen, Noble axemen, Qin Mixed Foot, or several other units with a high melee attack or armor piercing or both are the best units to assault the breaches during sieges.
Halberds will take damage from the enemy towers on approach if in the front Rank so before this siege begins I would move the halberds to the 2nd Rank so Trained archers and the heavy spearmen take most of the arrows while the halberds are in Charge Battle Plan for the +5% melee attack bonus which stacks with the +40% battle efficiency from experience and the +35% battle efficiency being in a hex next to the General commanding the battle.
Walls
Cities without walls can be immediately assaulted from all sides and are easily captured, nearly automatically if the city has less than an 8 unit garrison, the first unit that reaches the central plaza captures the city.
Cities with Wooden Palisade Walls can be breached by archers using flaming arrows on all sides and are relatively easy to capture.
Cities with Rammed Earth Walls can only be breached at the gates and thus are only vulnerable to attack from 4 directions and the attackers have to defeat 2 units if the garrison has 8 before reaching the central plaza.
It takes 2-3 archers depending on techs researched to set a single section of Wall, Gate or a Tower on fire.
Cities can repair 2 wall/gate/tower sections per turn so if an army lays siege with only 2 archers, the walls and gates will be repaired every single turn and the towers will continue to damage the units laying siege every turn extending the length of the siege nearly indefinitely with the besieging army taking continuous casualties and losing efficiency.
Walls that are built tougher and higher have more hit points and eventually require siege artillery to damage in a reasonable amount of time.
To lay siege to a city with a High Earth Wall (300 hit points) will require at least Crouching Tiger siege artillery and at least 4 to create breaches in less than 3 turns. Then the besieging army still has to defeat the garrison inside so late campaign sieges can last 3-6 turns even with somewhat prepared siege armies.
If you want to capture well defended cities as fast as possible you’ll need at least 6 siege artillery and 2-4 high quality melee infantry such as Tiger Guards, Qin Mixed Foot, Picked Swordsmen or similar. Tiger Guards and Qin Mixed Foot have 8 melee attack and halve enemy armor while Picked Swordsmen have 9 melee attack and 4 morale vs the 3 morale of most infantry but lack the armor piercing which only really makes a big difference when fighting high quality units.
Attacking from more directions with archers and or siege artillery and up to 8 melee infantry if a city can be attacked from all directions is the fastest way to win a siege but normally it takes 2-3 turns to move units into position to siege from all sides so the fastest a well defended city can be captured is 3 turns while lesser walled cities can be captured in 2 turns and unwalled or wooden palisades can be captured in a single turn.
Most garrisons will only have at most a handful of high quality units defending so if you can attack from a direction one of those units is not defending the breach, you can still easily win the siege with lower quality units.
Terrain
Armies laying siege can not attack from water, hills, forest, or mountains which can sometimes hugely limit the directions a city can be sieged from.
For example, the pathing around this city seems clear but is actually full of gentle hills terraced into farms and forces an army attempting to siege from a 2nd direction into several turns march around the city. If the single army that can lay siege lacks siege artillery or has less than 6 archers it is pointless to start the siege until the 2nd army moves into position.
When planning fails or circumstances change the next most important aspect is knowing how to adapt and which units contribute the most to winning sieges and capturing or destroying cities.
If you expect your cities to be sieged by the enemy, stronger walls and a garrison of all heavy spearmen is probably the best you can do if limited only to that cities resources unless that city has a Palace and can recruit higher morale units, loss of morale wins or loses the fight at a breach as much as the Attack or Defense stats.
Ideally you will move reinforcing armies into position, even if you can not defeat the 12-40 armies that arrived on your border, you might be able to defeat the nearest 6 armies and destroy their siege artillery or kill many of the enemy archers giving your city extra time to wait for reinforcements before getting captured.
Buildings
Most buildings are fairly self explanatory but there are a few which can be discussed further for deeper insight into the game.
- Bazaars, needed to sell trade goods produced in the city to nearby cities within 12 hexes. Cities that do not have a trade good to sell, are not connected by roads to nearby cities, or the nearby cities have small populations usually should not build bazaars.
- Caravansary, necessary to sell trade goods imported from neighboring cities to other cities in the your cities trade network. The value of the goods is lower than the city which produced them but for valuable trade goods such as Jade, Silk, Copper, and some other luxury goods, the upkeep cost may be worthwhile.
- Markets, the upgrade of bazaars, allow trade goods to be sold to other cities over land trade routes up to 18 hexes away.
- Temples & Schools
There are 5 main types of buildings in this category;
- Legalism schools, -peasant unrest +taxes +power research for -thought research and upkeep cost
- Mohist schools, +peasant happiness, +craft research for -thought research, -power research, and upkeep cost
- Taoist temples, +peasant happiness, +thought research for +noble unrest and upkeep cost
- Confucian temples, +peasant happiness, +noble happiness for -thought research and -knowledge research
- Buddhist temples, +peasant happiness, +noble happiness, +thought research for upkeep cost
Every level of these buildings stack their effects so while +5% taxes does not seem like much, it can add up to 20% or more.
Same thing with the -research, 5% might be only 2 turns on a 32 turn tech but -20% on top of a factions -20% research can turn a 32 turn tech into 46 turns.
The bonus or penalty applied to research is based on total population devoted to specific teachings so if you build 1 of each type in your largest cities they basically can cancel the negative research penalties while giving the bonuses to those cities.
This is a valid strategy but probably only worth the effort for extreme min/max players as capturing enemy cities is a such a big part of the end campaign for most victory types in this game, and these new cities might any of the buildings requiring nearly constant juggling.
Theoretically if you carefully manage the these buildings you can increase or decrease any type of research other than knowledge (which lacks a +knowledge building) by building a certain one in every city but in my opinion it is not worth the costs until late campaign when Legalism schools or Buddhist temples provide valuable boosts.
Legalism because it adds income from taxes, -peasant unrest (slightly better than +peasant happiness) and +power research as power has several important techs in the Imperial era.
Buddhist because it has no downside other than a minimal cost which is less important late in the campaign when Buddhism is researched in the Imperial era and the thought research boost is important because the thought tech Lineage Groups is quite long and required to unlock the final 3 power techs which are quite strong.
- Ports/Docks, allow water trade routes of up to cities up to 50 hexes away, navigable rivers with many cities or along the coast of northern China Ports are usually worthwhile 200-300 turns into a campaign but not necessarily for every single city, examine the trade goods in that cities current network and what trade resources are available to cities within the given distance.
Often you will find Quays are not worthwhile as they don’t provide enough distance to reach several high value trade goods while Ports can be worthwhile.
- Palaces, required for barracks which is the most important building to recruit Trained units from and makes available special Palace or Guard units which can be valuable for laying siege or attacking enemy economies due to higher movement/morale/stats. .
- Monasteries & Shrines, required for Pilgrim trade and most cities with more than 150 population will need some happiness buildings- these buildings are external structures and thus do not use the limited internal buildings slots that are better spent for civic or military buildings rather than theaters.
Be the first to comment