
A set of flowcharts that serve as a guide for plaything through Root Double -Before Crime * After Days- Xtend Edition. This guide is split into 4 pages: Route √After, Route √Before, the remaining path to the True Ending, and the unlockable Xtend Episode.
This guide contains nearly every single choice and split in the game, describing how each branch actually occurs and the necessary flags/conditions to trigger them. The guide contains all information necessary for 100% internal completion, which includes all TIPS, all scenes with unique names, and all the conditions needed to unlock the 6 Epilogue scenes.
Table of Contents
Introductions
Note: Credit goes to Lord Thantus
Welcome to my Root Double -Before Crime * After Days- Xtend Edition flowcharts. Here, you will be able to play along to the game by following these flowcharts and making the appropriate choices at the specific junctures provided in the images.
This chart is split into 4 sections: Route √After, Route √Before, the path to the True Ending (which is littered with spoilers), and the Xtend Episode. It is highly recommended that you first play Route √After, instead of Route √Before, regardless of what the names imply.
In addition to route order, it is highly recommended that you go after all 6 character “paths”, 3 in √After and 3 in √Before. These paths provide extra story that ties to the events of the main narrative, and in doing these paths you unlock Epilogues once you reach the True Ending.
Route √After Flowchart
The following is an image of the Route √After flowchart:

This route contains character paths for Kazami, Jun and Ena. During the events of Chapters 1-3, you can obtain all the scenes necessary for each character; 3 for Jun and Ena, and 4 for Kazami. However, during the events of Chapter 4, you are forced to take a 3-way split with one of the characters, essentially forcing you down a path. Kazami is our most recommended character, but you’re free to engage with whoever you prefer when selecting the paths.
However, it is HIGHLY RECOMMENDED that you do all 3 of these paths before proceeding into Route √Before. Obtain all the character scenes in Chapters 1-3, then prepare a special save once you reach the scene titled “9-3” in Chapter 4. With this save, you’ll be able to reload at any time and pursue the other character scenes you may have missed.
In addition, Route √After splits once more in Chapter 6, leading to either the Normal Ending or the Good Ending. It is recommended that you pursue the Normal Ending first before attempting the Good Ending. Do note that, since you shouldn’t have played Route √Before yet, you shouldn’t have unlocked the special choice that avoids the +6 minute flag, so one more mistake (+3 mins) will lead you directly into the Normal Ending (requires 9 minutes to reach).
And finally, the character Yuuri has her own point system you can engage with throughout the route. By getting these points, you can unlock extra dialogue with her, especially near the end of Chapter 3, where she fleshes out an conversation you could miss out on without her points. These don’t matter whatsoever, but they’re nice to have.
Route √Before Flowchart
The following is an image of the Route √Before flowchart:
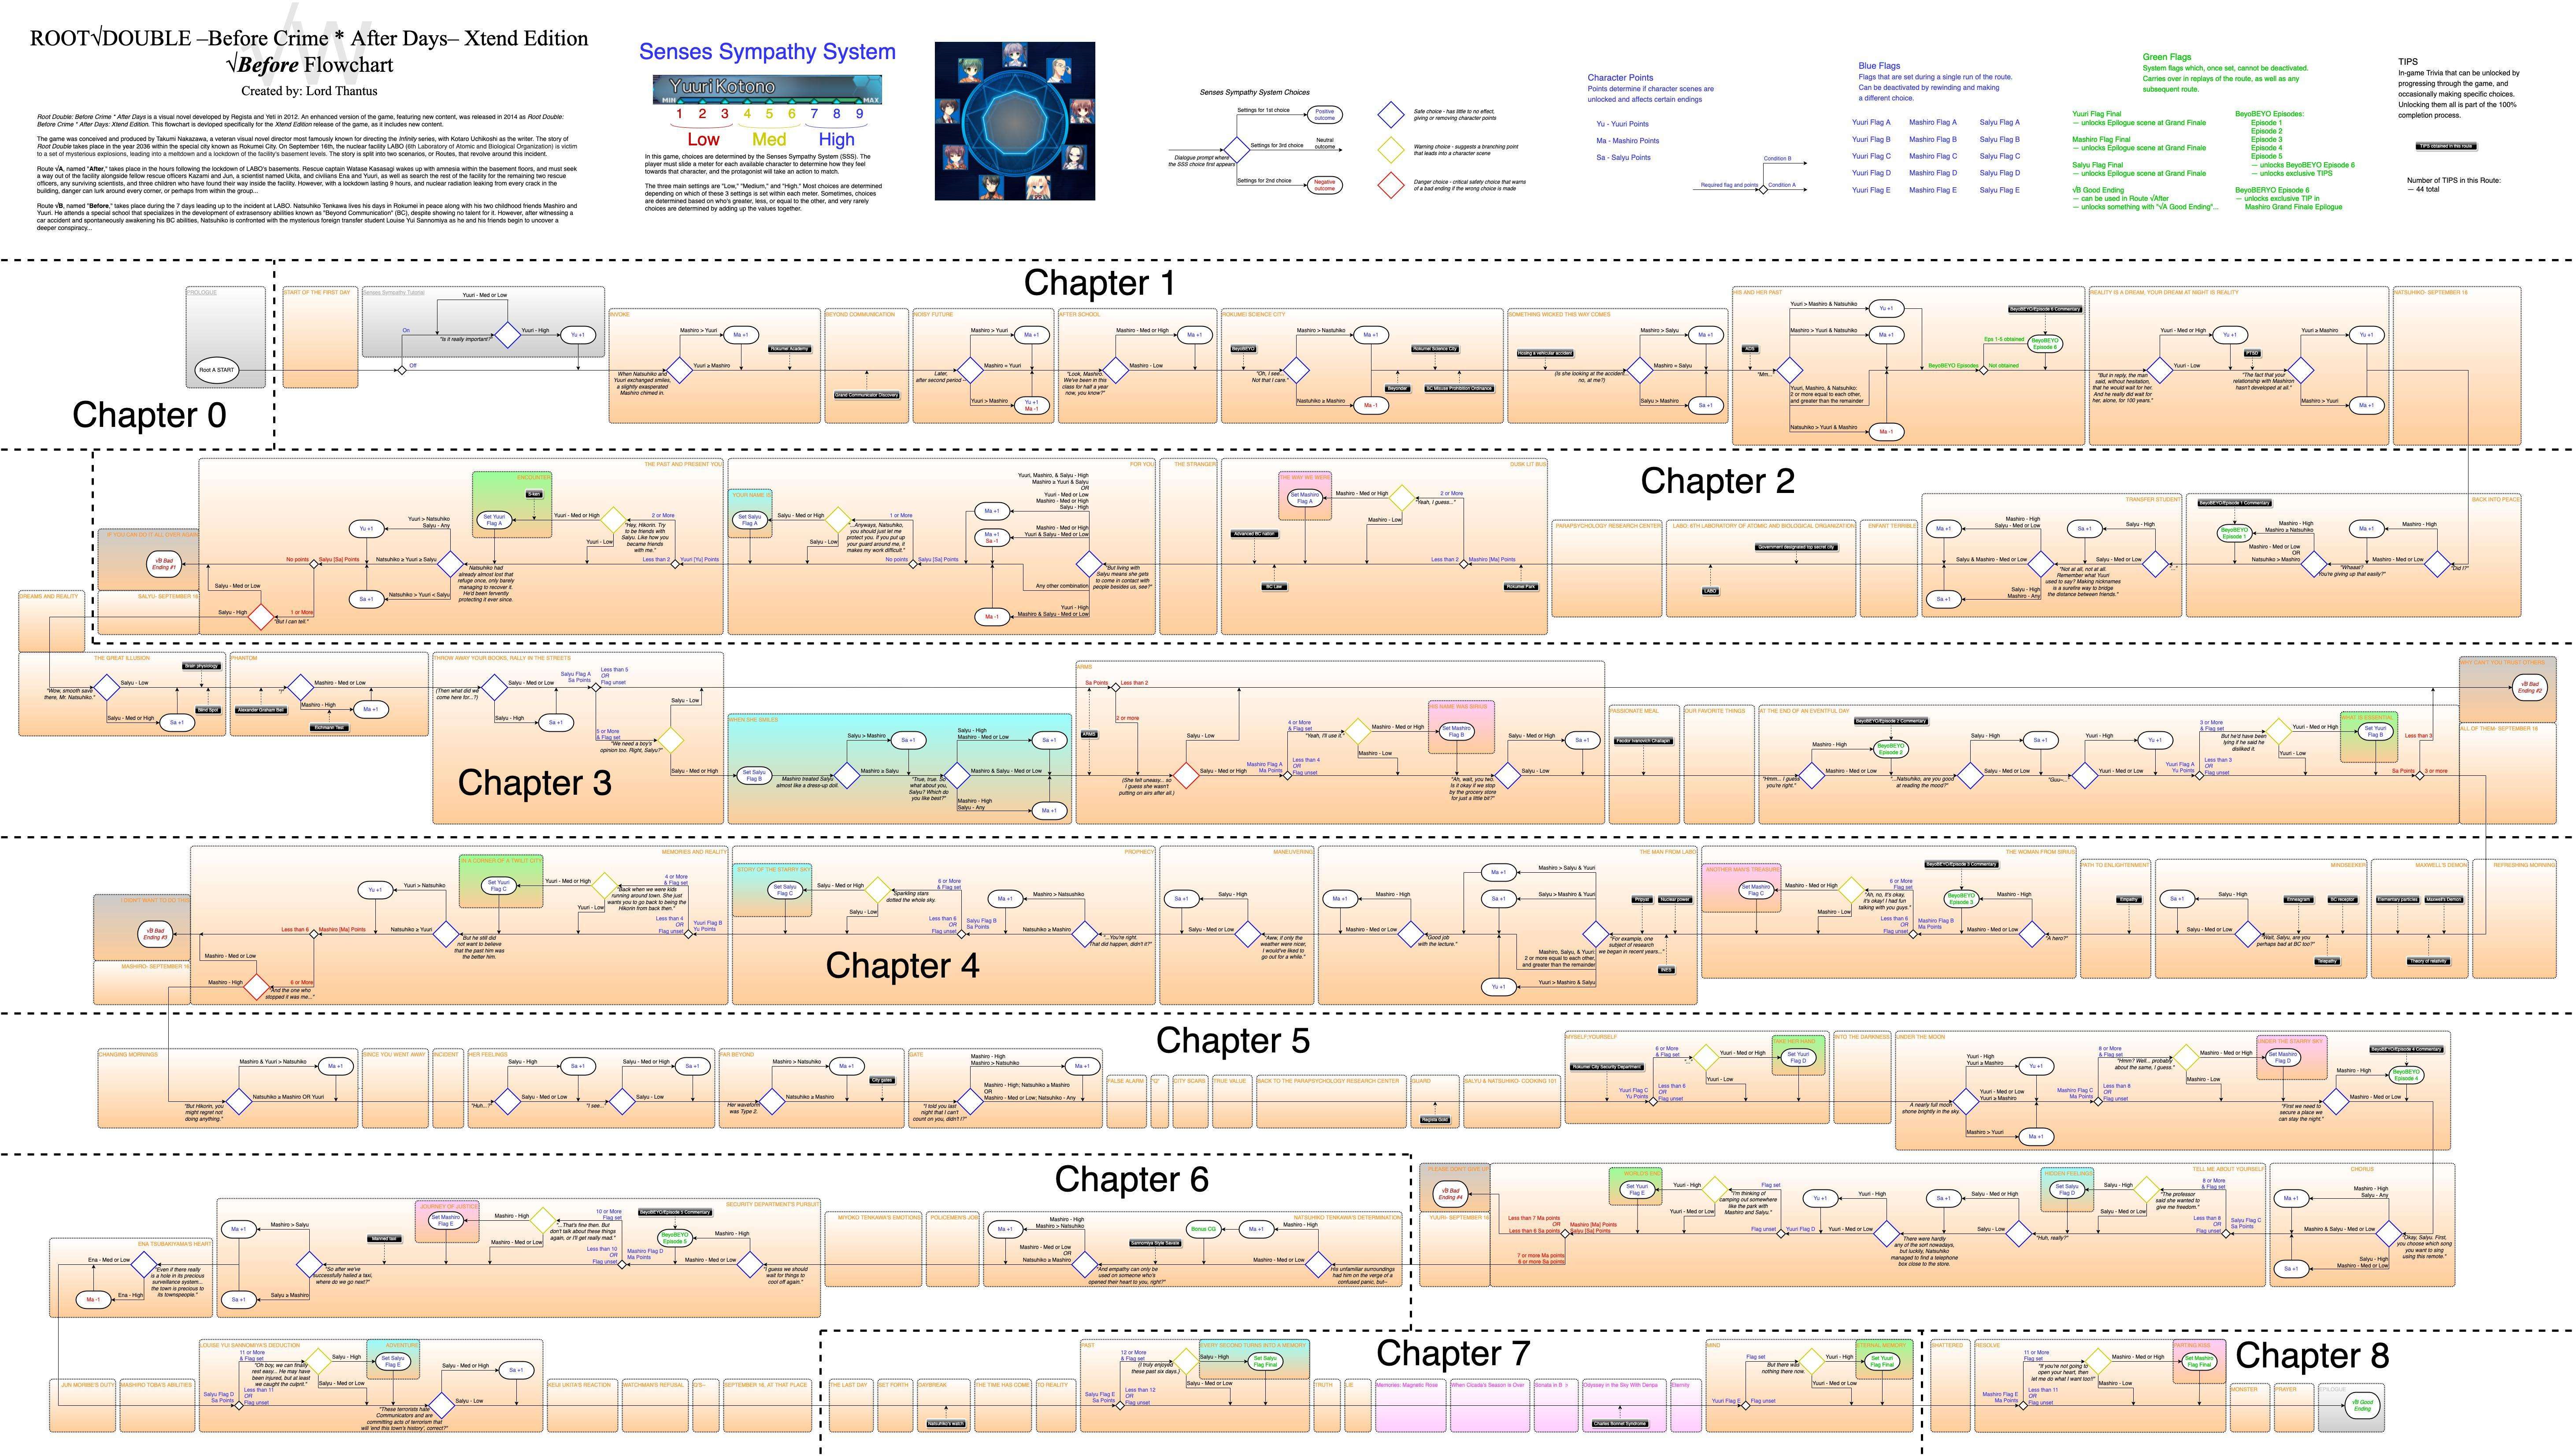
This route contains character paths for Yuuri, Mashiro, and Salyu. You are able to obtain the scenes necessary for all 3 paths in a single playthrough, but it requires precise point distribution. With Yuuri in particular, her points are more limited than the others, and she’s easy to miss. To avoid missing her path, turn on the Tutorial in your settings, as the Yuuri point you acquire during the tutorial carries over into the rest of the route.
In addition, there are 6 collectible TIPS available based around the in-universe anime BeyoBEYO. You can collect the first 5 TIPS by selecting the correct option over the course of Route √Before, and once all 5 have been obtained, you can obtain the 6th TIP by replaying Chapter 1 and reaching a new branching point. Please Note: If you “Scene Jump” your way to the TIP, you will pass over the text that triggers the TIP, and so ultimately miss out on it.
Flowchart for the True Ending
Warning: This flowchart contains SPOILERS for the game if you haven’t beaten Route √After and Route √Before.
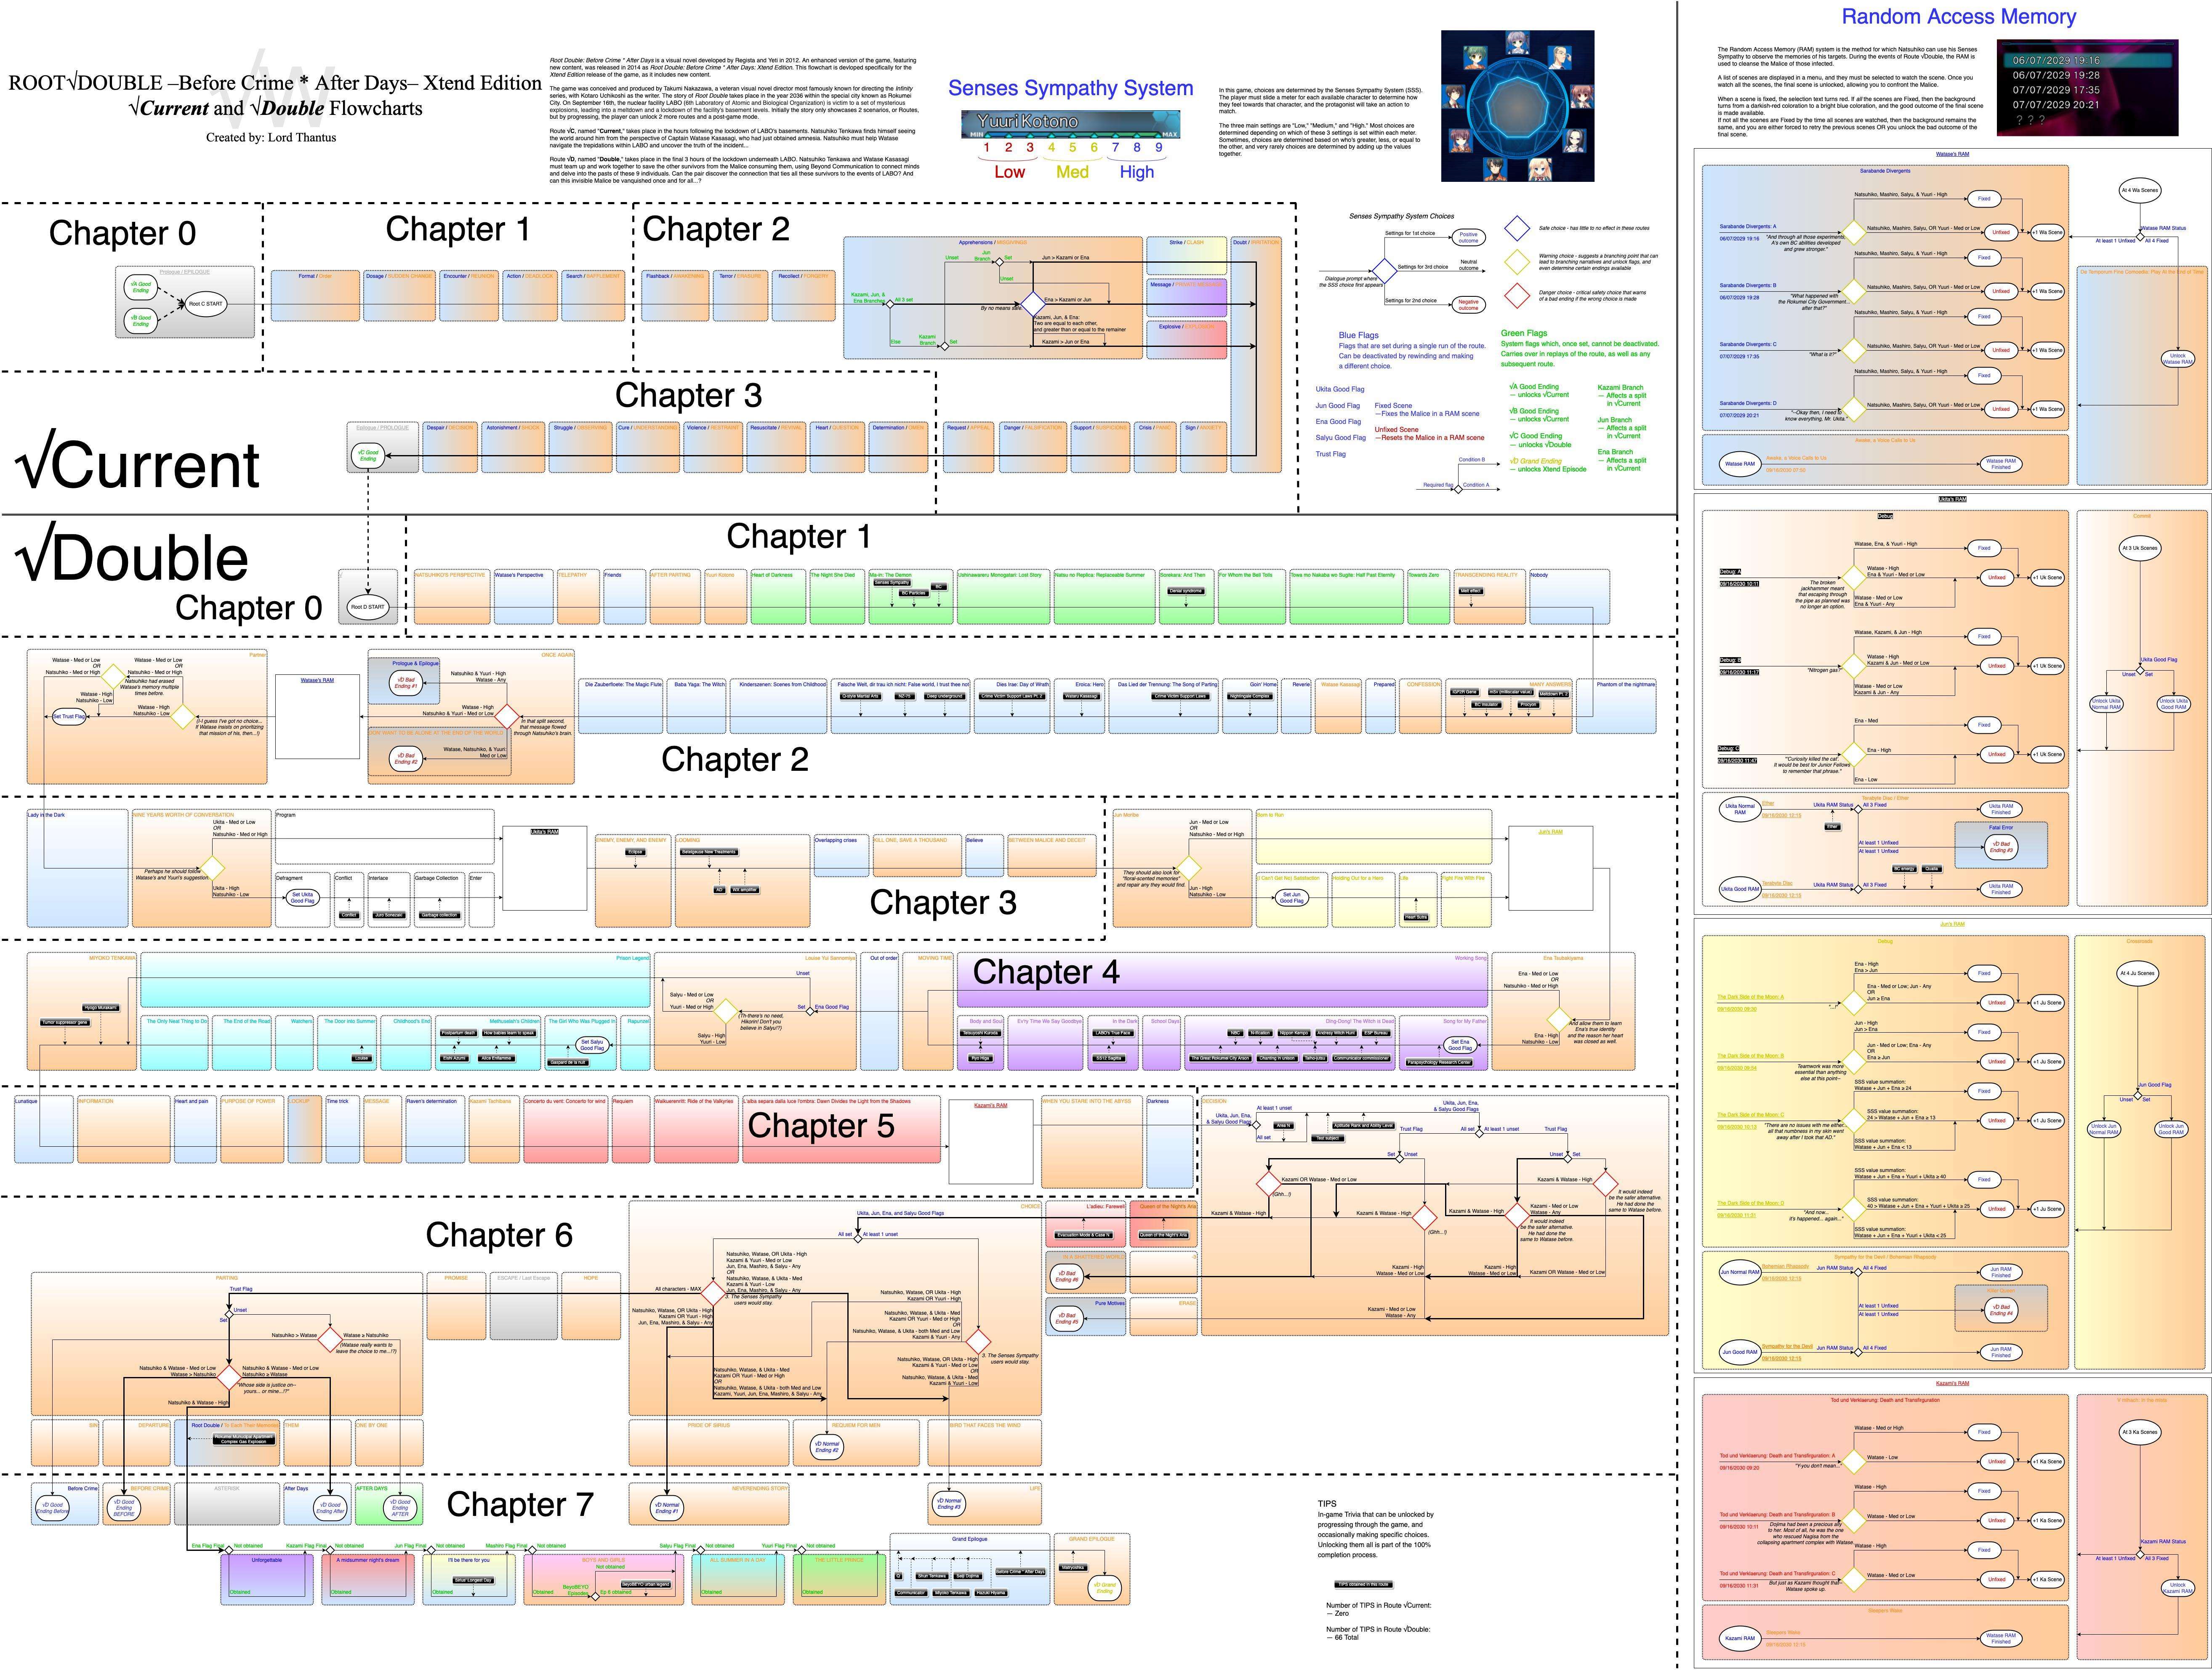
This image is for the flowcharts of Route √Current and Route √Double, as well as the 4 RAM segments found within.
Route √Current contains no TIPS or special choices. However, it does contain 3 scenes that can variate depending on the flags you’ve triggered in previous routes. Prepare a special save on the scene “Apprehensions / MISGIVINGS” in order to be able to reload and get the other 2 scenes.
Meanwhile, Route √Double contains many elements needed to be juggled around. First off, the end of Chapter 2 provides a choice that triggers a special “Trust Flag”, which changes small dialogue throughout the route as well as provide access to special endings.
When the Trust Flag is exclusively unset (as in, you haven’t triggered it), the final endings available at the end of the route are √D Good Ending Before and √D Good Ending AFTER, and the special √D Bad Ending #5 is available in the scene “DECISION”. It is recommended that you play through the game with the Trust Flag unset on your first playthrough and to obtain at least the two Good Endings available here.
The route contains small branches that determines how much content you see and which scenes are available to you. To collect all scenes, a replay will be needed where you choose a different option at the spots before these branches. However, in your first playthroughs you should trigger all the characters’ Good Flags and gain access to the Good Endings at the end. Make special save files before each split to ensure you’re able to retry and get the missing scenes. Note that, for Ukita and Jun, the choice also adds a new scene at the end of their RAM that you can’t get otherwise.
During the RAM segments, only one of the choices at the splits can unlock further progress, but if the split has a 3rd option they are worth checking out thanks to some humorous dialogue.
If you happen to miss a TIP throughout the route, for whatever reason, do not use Scene Jump on a replay to obtain it, as the Scene Jump will skip over the text that triggers the ability to obtain the TIP.
Xtend Episode Flowcharts
The following is an image of the Xtend Episode flowchart:

Xtend Episode is available after clearing √D Grand Ending, and it allows you to play through the memories of all 9 main characters in any order. Some of the memories are locked behind others, and you must play through them to unlock them all.
Most of the scenes are carried over from Route √Double, and the ones for Mashiro come from Route √Before. If you want to clear the game 100%, you must play through all these scenes, even if you’ve already played them in previous routes. If you’re not interested in 100%, the flowchart still marks which scenes in the lists are brand new. Simply find the giant “NEW!” text that will indicate the exclusive content.
You can tackle any of the characters in whichever order you want. However, we highly recommend leaving Natsuhiko’s scenes for last, as these scenes essentially close off the entire story.
Be the first to comment