
Table of Contents
Misc. Info
Note: Credit goes to chessjumpbowl
- Short list of items I like to repair- Nelke’s Staff*, Blessed Tincture, Strength Jolt, Phylarsk*, Edelstern*, Impetus Staff.
- Save frequently and in different slots. With this many save slots, it’d be nonsensical to not cycle through them.
- Terrain listed in parentheses is impassable. So, you can walk through a Forest tile but not a (Forest) tile.
- Capturable enemies are designated with a * next to their name. I.e. Castore*, Porruck*, Karajan*
Chapter 1
- View the ??? Skeleton at (7, 12) with someone right before Zade finishes the map to obtain the Divine Sword without having to deal with the repercussions.
Chapter 2
- The boss will spawn at the bottom of the map when Zade reaches the uppermost section of the map, so only send Zade to the top when everything else is settled.
- Make sure that when Zade investigates the lever in the top left that you actually pull it. If you “Leave it be”, Zade will not be given the choice to pull the lever again which will necessitate a reset (it’s dumb that this is still in the game).
Chapter 3
- Visit the village at (12, 19) with a unit you like. This gives them the untradeable The Art of War, which slightly boosts all growths, including mobility. If the unit you like is Baymonk or Drake, save this village for them until after they’re recruited.
- You can safely get the three capture targets under 10 hp by weakening them with the Rusted Sword from the prior chapter.
- Don’t fight the dragon; it’s helping you. It will bring the Siurian Thaumite from the top left island to the top right beach on turn 21 for you to pick up. Thank you, nice dragon!
Chapter 4
- Send Castore and/or Porruck to obtain the Siurian Thaumite at (26, 2) immediately. There is an enemy that’s going to take it away, so beat him to the punch. Sending one of them is fine but they will be safer together. If there’s a stronger unit near the shore, they can lure the enemy towards them. Regardless make sure they can heal somehow (i.e. Tisane, Octavo Herbs, Karajan etc.)
- Have Zade near the bottom left for turn 11. Two recruitable enemy cavalry, Alexander & Hestion, will appear on turn 11 enemy phase, and Zade can recruit them both by talking to one of them. Just make sure that you don’t kill them, and they don’t kill you before Zade reaches out!
Chapter 5
- At the start of the map, the enemy commander will announce 1 of 5 tactics, which determines the enemy reinforcements for the chapter. The easiest one is when he ignores tactics and will just win through sheer numbers. The hardest one is the Heavy Phalanx variation, which also drops a strong dark tome Karajan or Accorte can use. If you want a certain tactic, reset back to the preparations screen, and start again.
- Have Castore or Porrucke visit the ??? lily pad at (17, 12). I recommend sending Castore and choosing the Maiden’s Favor since doing so unlocks a conversation with Phoeve.
- Visit the green house at (4, 9) on a late turn (i.e., turn 12-15) and pay for Bertoullia. You can do this earlier, but that runs the risk of her getting killed as a green unit as she’ll eventually drift towards the dangerous enemy formation on the right.
- If the nearest city is unoccupied, the enemies from that section will try to seize it, causing a game over. If a player unit is standing on it, they will instead attempt to attack the nearest player unit, with the exception of the enemies on the left which will just go downwards until they escape the map.
Chapter 6
- Open the doors at (8, 6), (8, 7), and (8, 19) with a combination of Drake, Nelke’s Staff, and Roleck. Drake is very nice to have with Double March. If Drake is not present, Slayne can snipe the stationary Scorpion archers from afar, and/or you can make use of the extra door keys.
- Defeat the Necromancer at (2, 2) for Quopri, but also because he revives the Scorpion archers if you killed them.
- Bertoullia can obtain the Shamshir on the right and then exit the map with the Dragonip.
Chapter 7
- If Laffine and Amlute are both alive, the two of them and the pair of Alexander & Hestion will go to Ch. 7x instead of this chapter. Prepare their inventories now. On top of what the four of them want, there will be a new character that joins at the beginning of 7x who can make good use out of a Longbow, Elixir, Defense Jolt, and the Strength Jolt should you so choose.
- Defeat Paulos at (2, 12) with Phoeve’s Phylarsk* to finish the map early and obtain the powerful Adept Sword. You can bust through the bottom formation with a group spearheaded by a trained Phoeve using Phylarsk* with Abrahm’s support. Alternatively, just hide in the fort the whole time.
- Karajan, Drake, Claude, Lucion, and Abrahm will all be deployed in Ch. 8, which does not have a preparations screen. They don’t need anything particularly special; this is just a heads up about their inventories.
Chapter 7x
- This chapter will be skipped if one or both of Laffine and Amlute were killed prior to Ch. 7. If you were to pick one to intentionally kill off in chapter 5 or 6, it should be Laffine as Amlute gets you a useful item later.
- Trade any extra items to Ouron at the beginning of the chapter. His mobility and ability to climb cliffs is incredible here, but he gets weighed down quite a bit by the Technical Bow he joins with, so it’s good to expand his options in particular.
- You can block the reinforcements from the left by keeping units on those tiles at (1, 19) and (1, 18).
- Capture the Convoy Guard* with Ouron to obtain the Haggling for Fools manual. This teaches the unit who reads it the Haggler skill that Jonathan has. Save it for someone who goes to Ch. 16 (my favorites are Ashram, Baymonk, or Drake). As you can get a bunch of money anyway and Jonathan already has Haggler, you can skip this and still buy a bunch without missing a beat if you find the capture to be troublesome.
- Send important items you would want the main army to have for the upcoming chapters to the convoy by having a full inventory when defeating the wagons or picking up other items (i.e. Liquid Mobility, Strength Jolt).
Chapter 8
- If Fauve is the one to visit the village at (13, 7), he will get his very powerful Champion’s Axe* in addition to the NPCs & Enemies spawning.
- Defeat the boss at (1, 21) for the Ambush Tome. I prefer giving it to Phoeve, but it’s still useful on other characters with weapons that strike twice in a row.
- Note that the turn-based reinforcements will stop at Turn 20, so you can technically wait them out and obtain a Gale Axe as an item drop. If you seriously hope to take on all of the reinforcements, I suggest beefing up Haldyn early at the Azure Paddock at (22, 14) and using his unbreakable Corpse Slasher.
- If Haldyn dies in this chapter, it’s fine, as you get a permanent replacement at the start of the next map he’s usable in.
Chapter 9
- A use of the Blessed Tincture you received during the chapter introduction can be very useful here, mainly if you want to win by defeating Baruke instead of his knights. Aslanne can claim victory quickly with it, the Strength Jolt, and the Adept Sword.
Chapter 10
- Make sure that someone besides Sujata in the group leaving can cure her Berserk status if her, Haldyn, and Ashram are all alive (Karajan’s Staff of Waking* or a Bellflower Leaf).
- Capture Geoffreid* so he can go help Eddard in Norden Civil War! Oh right, and to take his Dreizack weapon.
- The structures in this map are a good chance to have Barzelphen earn some money.
- Vaughes will move to attack once you destroy a fence in the middle layer (Y level 9).
- Kill Lazeria. Doing so will prevent an annoying group of enemies from appearing in Ch. 17.
Chapter 11
- If Sujata, Haldyn, & Ashram are alive and you somehow have a capped magic Sujata and a Nelke with 17 or 18 HP, Sujata will kill Nelke with the Prayer Knife* before you can do anything. So uh, don’t rig your levels like that.
- If Penelope and Zayid are alive, Penelope will become a red unit and attack Zayid. If Sheela is also alive, do not kill Penelope. Have Zayid sit there patiently and heal him when necessary until she arrives. If Sheela is dead, have Zayid just kill Penelope as Sheela is needed to re-recruit Penelope.
- Kill the Primeval Dragon with Ashram to cure his terminal illness. The Dragonslayer is the intended way, but you can also do lots of damage with the Adept Sword. If Ashram doesn’t kill the Primeval Dragon, he will be stuck with the terminal illness for the rest of the game.
- Make sure the Primeval Dragon is dead before opening the door at (19, 11). Otherwise, there’s a good chance it will kill the children.
- Standing at (1, 20), (1, 19), (7, 22), (8, 22), and (17, 22) will block the reinforcements and make the escape much easier. Vacate the tiles once the children pass them, as the reinforcements won’t catch up with their 4 movement.
Chapter 12
- Visit the house at (5, 6) with Bennette to obtain the Ward Ring. This is helpful for her overall effectiveness in the map.
Chapter 13
- Use Slayne with Penelope’s Longbow and Karajan with Nocturne* to deal with some of the troublesome enemies before opening the door. You can also use Leech if you grabbed it. Nelke’s Staff is helpful for advancing. After opening the door, they can still deal heavy damage to the bosses and even kill them.
Chapter 14
- Visit the ??? Flower at (1, 22) for a Liquid Magic. I find this is usually most useful on Bertoullia due to her low magic and Multistrike.
- Visit the ??? Scarecrow at (12, 11) for the Tough Love and You manual, which teaches Taskmaster. I find this is most useful on Zade as he has the most objectives to reach.
- Visiting the red house at (22, 11) will cause the Savage Chief and co. to appear. The unit that defeats the Savage Chief will be saddled with the Blighted Tome for the rest of the game. This untradeable item confers the Imbecile skill, which debuffs nearby allies. I prefer defeating this enemy with Barzelphen as he’s not great to begin with and already debuffs allies. Defeating the Savage Chief also causes four Icewyrms to spawn, one of which drops the Caphenic Totem. The Caphenic Totem is pretty useful as it gives the unit holding it +6 res and an immunity to sleep. I suggest visiting this house last as it’s easiest if you kill the Chief and the one Icewyrm with the totem and then finish the map immediately to avoid fighting the other 3 dragons.
- Zade, Zayid, Sheela, Claude, Lucion, Abrahm, Amlute, Laffine, Accorte, & Lilia will all be thrust into Ch. 15 without access to the preparations screen, so equip them now. Weapons that deal effective damage to armors and cavalry such as the Thunderlight Sword and Zephyr Sword are particularly useful in Ch. 15.
Chapter 15
- The enemies are stupid and will continue attacking a unit that used the Blessed Tincture they think they can kill but can’t. It’s not necessary to use the Blessed Tincture to survive the immediate onslaught, it’s just easier to explain.
- Hang on until turn 11, which is when you will finally be able to attack Baruke who appears at (13, 13).
- Baruke will not be able to be killed until you either deal a lot of damage to him or break his weapon, the Nightmare (he will dodge fatal blows and has a life-stealing effect so save your best 1 range attacker until after the dialogue plays). Once he talks and switches to the Savager, you can kill him for real. Zade’s Edelstern* and Zayid’s Deathseeker* are pretty useful against him.
Chapter 16
- Visit the shop at (1, 16) and buy a ton of Impetus staves. If you have Haggler access, then that’s great since you can buy even more. Having so many units be able to refresh other units and each other is incredibly powerful, so this is the best place to spend a lot of gold.
- Visit the red house at (10, 24) with Bennette within 20 turns to rescue Phoeve. If this is not done, Phoeve will permanently leave the party! Only occurs if both Phoeve and Fauve are alive.
- The guards will attempt to alert Conrad and his Roseport Mercenaries about your presence rather than battle you (they will attack however if their path to him is blocked off). The rest of the members in a group of guards will start moving together once you get in range of 1 of them and/or fight them. Once Conrad is alerted, all of the enemies on the map will become aggressive. If you want to avoid fighting the mercenaries, make sure none of the enemies reach Conrad so they remain stationary. Alternatively, you can try to take them all on with something like Ashram with a Knight’s Brand or someone with the Blessed Tincture.
Chapter 17
- Claude, Lucion, Abrahm, Phoeve, Fauve Amlute, Laffine, and Ouron will be reinforcements in Chapter 18, so make sure they’re equipped before this map is completed. They won’t need anything special though.
- Zade can now mount and dismount his horse, Verula, similar to the Celestral Amulet. Zade’s horse is like Ouron’s and can climb cliffs, which is immediately amazing here.
- As you now have access to Nelke’s Staff, Taskmaster, and Impetus, it’s possible to rush this map and future ones very quickly. If you do, most of these tips won’t matter as much.
- Since we killed Lazeria, the 4 northern ballista don’t even spawn. This makes the map much easier.
- Defeat the Bashers repairing the upper left bridges before turn 8 to prevent Culevent’s knights from crossing so you don’t have to fight them.
- Have Sujata approach Marlene and Beorn. There will be a dialogue and the three of them will leave the map once Marlene and Sujata are adjacent. This conversation improves Sujata’s performance and gets her and Ashram good new unique weapons.
- Visit the village at (1, 23) to free the farmers. The farmers will then revolt against the trainer, and once he is killed the fence will open up at (3, 21) and (7, 15). Doing so if you also didn’t kill any of the enemy farmers will also get you a growth boosting accolade. Note: Only bother if you’re doing a prolonged siege, since this doesn’t help with assaulting the main lair, it’s just annoying to fight so many farmers.
- The pirate ships are bulky but can be defeated with the Hammer or Fire-type attacks.
- Visit the Manor at (36, 2) and pay 1000D to assassinate Belgar and make attacking the lair much easier.
- The Verminus enemy in the center will not do anything until turn 20, when he becomes aggressive.
- Once Rohan is defeated and Zade seizes the throne, Conrad will appear on a horse at the center gate at (20, 19). He no longer has Sugma’s Totem, so he can be defeated by magic.
Chapter 18
- Alexander and Hestion will be forced into Chapter 20 with the equipment they have at the end of this map, so make sure they’ll be ready. They won’t need anything special though.
- Feel free to use Ashram’s new Bathoras* liberally, as he gets a partial repair for it from a conversation with Baymonk in Ch. 20.
- Claude, Lucion, Abrahm, Phoeve, Fauve, Amlute, Laffine, and Ouron will arrive in groups to reinforce you through the chapter, with the horses arriving on turn 8. DO NOT clear the chapter before turn 8, as doing so will permanently prevent any reinforcing characters that haven’t arrived yet from rejoining the party.
- Visit the church at (34, 28) and pay 600D to get the Power of Love status for 5 turns. This can be a big help to Zade as he seizes the nearby forts with the invulnerability.
Chapter 19
- You will be given a choice to send Bennette away or keep her in the party. Gameplay-wise, sending her away will have her return in Ch. 25 with Roleck. If you keep Bennette, you can continue using her like a normal unit. As Ch. 25 can be trivialized without Roleck, I suggest keeping her around for another Impetus user with good combat and skills to boot.
- You can clear this map by just deploying a strong flier like Aslanne and 1 other combat unit (I prefer Fauve) with Arielle. Defeat the boat with the combat unit and have them stay with Arielle on the left. Once the Phoros Knights appear, have the combat unit defeat the one enemy directly in front of Phoros so Arielle can talk to Phoros and make them allies. Meanwhile, the flier can hit and run repeatedly against the transport wagons (and eventually Neilmaisen) as they come by hiding behind the trees on the lake. Note- This strategy was originally detailed by Kaga on his blog, I don’t have a link as of now though.
Chapter 20
- Stock up on supplies! Notable ones that aren’t just weapons include Royal Jellies, Herb Salads, and 2 or 3 All Healing Staffs.
- The trigger for the enemies rushing the city is when 2 or more walls have been destroyed. So, if you only let 1 wall be destroyed and then block off the rest, the bulk of the army will never attack you. You can kill multiple bombers from behind the wall by refreshing Slayne continuously as he attacks with Penelope’s Longbow.
- Alternatively, should you have viewed the dialogue between Sujata and Marlene, she’ll be able to distract a bunch of enemies coming from the left wall while the rest of your army deals with the stragglers that come near Roswell.
- Avoid pulling the left lever at (29, 36), as it will lower the bridge, allowing more enemies into the city. Sure, those ballista will probably kill the old man, but it’s a small price to pay.
- To make recruiting Ravinia easier, if Ashram has Bathoras have him fight her, so she gets the Power of Love status effect. This will make it so Haldyn doesn’t accidentally kill her.
- Make sure none of the farmers are killed (they’re allowed to retreat). Doing so will get you the Cordean Accolade. It improves growths and is tradeable like the other Accolades, but this one is the best one as it also confers the Weaponguard skill upon the holder.
- The accolade from having Accorte do all of the citizen’s tasks in the city only confers Potential, so it’s pretty worthless. Don’t bother with them.
- Kill Accorte before the map is over. Accorte will leave the party after this chapter, and Slayne will go with her. If Accorte is dead, Slayne will remain in the party.
- Optional- Kill Drake before the map is over. Killing Drake will make the next chapter easier, but it makes Ch. 24 harder. Ultimately, it’s your call.
Chapter 21
- Give someone in the party for this map the Cordean Accolade; it’s much more useful here than in the Ch. 22 group. Notable combos with Weaponguard include: Phylarsk*/Nocturne* vs. the Primeval Dragon & Masudian Brand/Sinagur*/Crested Sanctblade* vs. the enemies in the sealed chamber.
- If Drake is dead – Merely have a group rush the lever while the temporary replacement unit goes towards the prisoners. You won’t have to fight any of the strong enemies in this version of the map.
Chapter 22
- If you did the sequence with Amlute in Ch. 18 & talked to Phoros in Ch. 19, he will be playable here with the Taskmaster ability. Together with Taskmaster Zade they can move long distances to help boost Zade towards the end.
- Reinforcements will spawn nearby when defeating the bridge destroying units at (15, 17) and (38, 12), so be careful.
Chapter 23
- Do not kill the third enemy that attacks Troy until you are ready to open his cell. This will prevent Lea from coming out and attacking Troy. He’ll be fine against the Hatchet thanks to the Healing Ring.
- The trigger for the final door opening and the reinforcements spawning is the defeat of the Estoc boss. To time this to your favor, you can have Troy sit in place at the door chokepoint until the Estoc boss breaks his weapon on Troy. Then you can leisurely take out the other enemies and get all of your other units near the door ready to escape before Troy or Lea defeat the now weaponless boss and set everything in motion.
- Have Lea escape last. If she escapes last, she will remain in the party and can be used in both remaining chapters. Note that she will still be designated as a guest unit, which means her death will cause a game over.
Chapter 24
Here is a map showing which lever unlocks what, and where the warp tiles send each unit:
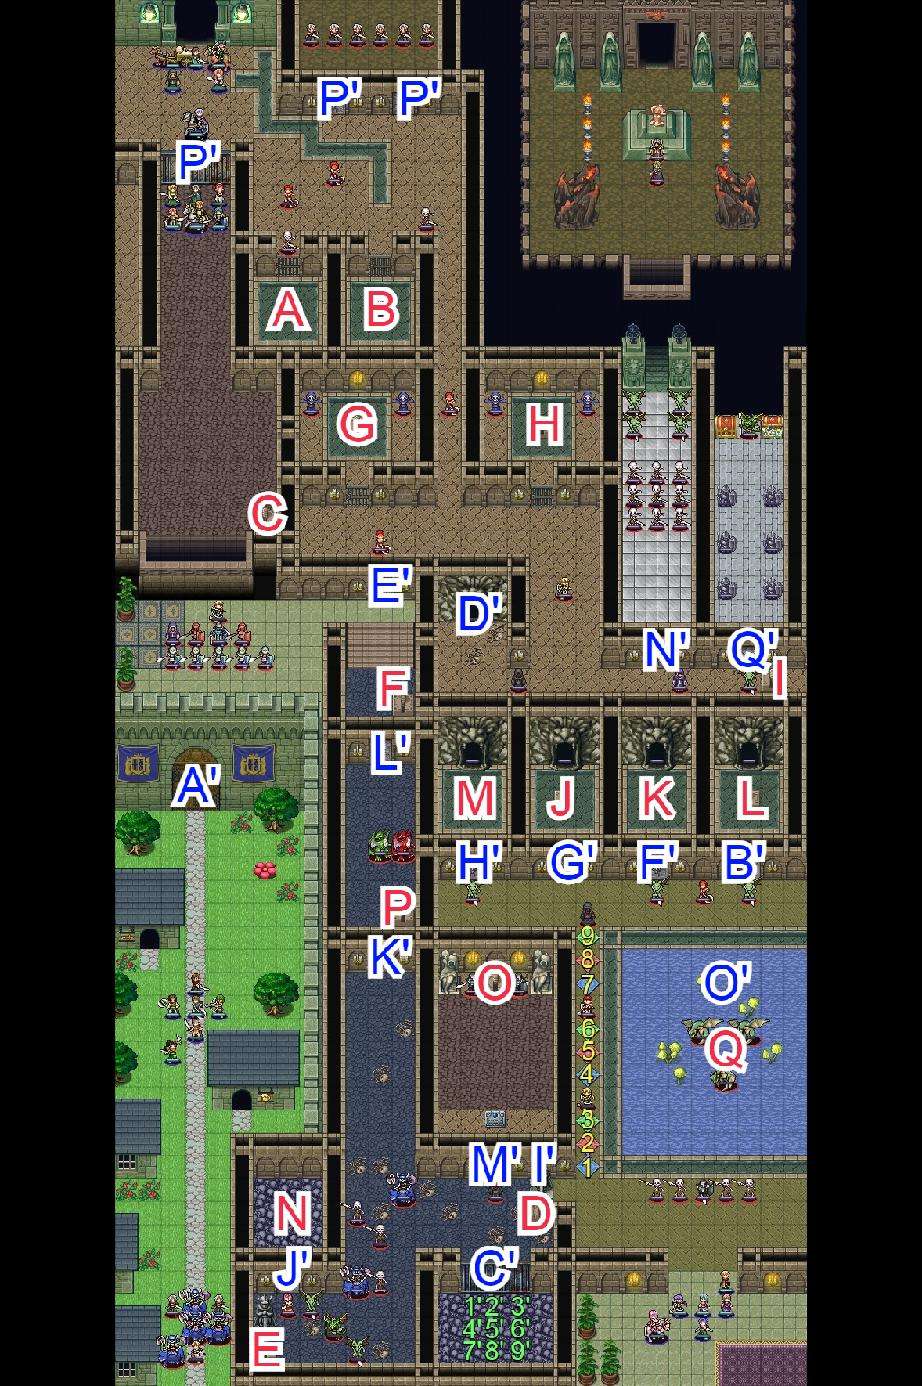
As you can see, you don’t need to deploy anybody in the outdoor area if you don’t want to.
- You can prevent units from getting warped to the prison section by having another unit stand where they would be warped to.
- Slayne and Lea can be deployed in both Ch. 24 and Ch. 25 instead of one or the other.
- The Cordean Accolade is better used here than in Ch. 25.
- Don’t forget to have Zade talk with Garlan!
- Once Tasha, Troy, and co. are freed, if you have a Taskmaster unit nearby you can technically just have them refresh each other to oblivion to do almost the entire rest of the map without the enemies getting a turn.
Chapter 25
- Hold on until Turn 10 when Zade and Tasha show up, spam Taskmaster/Tasha’s Spur, and have Zade climb to the boss’s head and defeat it with Silvanister. You can improve your odds, if necessary, with Res/Str boosts such as the Ward Ring, Caphenic Totem, Resistance Jolt, Royal Jelly, Strength Jolt, Azure Paddock, Phalanx Lance etc.
Be the first to comment