
Table of Contents
Guide to Sects
Note: Credit goes to Shadowcrane
The Sects
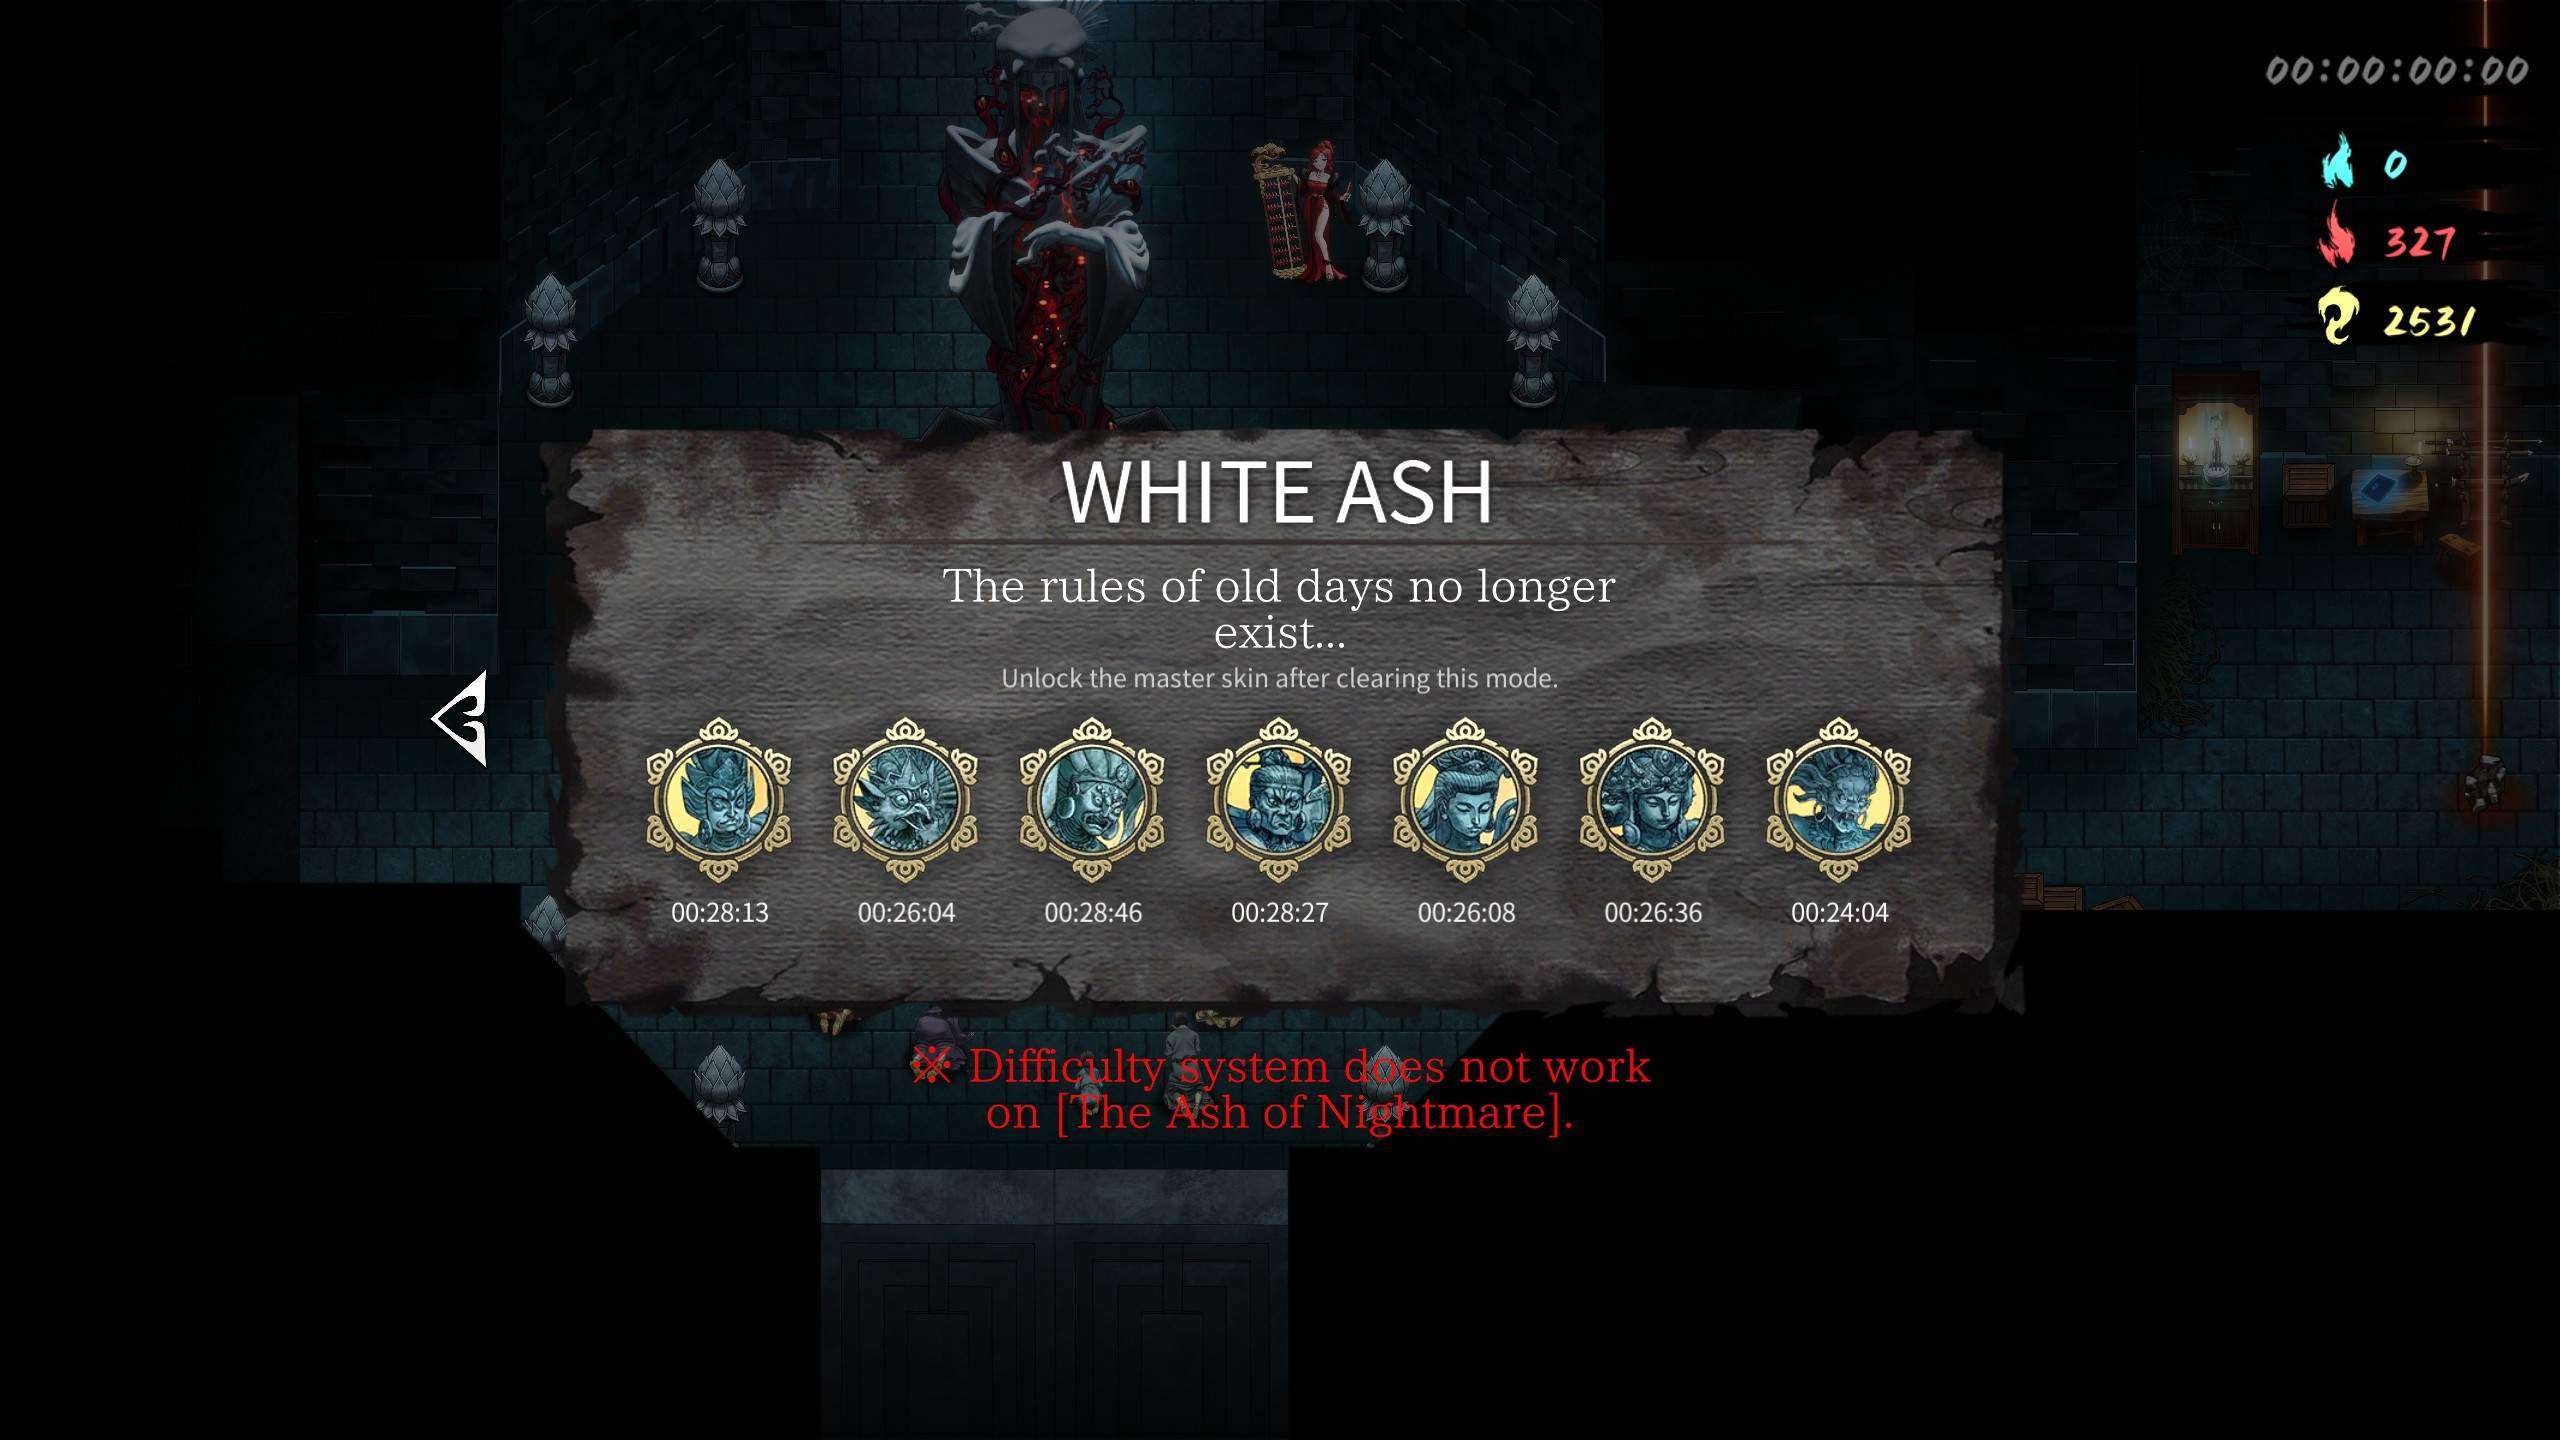
The sects are the seven statues at the starting location. The first is unlocked at the start the game, four are unlocked after beating a chapter boss, another is unlocked by killing book faces, and the last is unlocked by spending red souls. This guide assumes all vendors are unlocked, the skill tree is maxed out, relic rarity is legendary, and the difficult is White Ash. That being said, I definitely recommend this guide for new players as it describes how each sect plays and how to build them.
Finally, a well built sect should finish the game in around 30 minutes, assuming decent luck with relics.
Seven Sword Shura
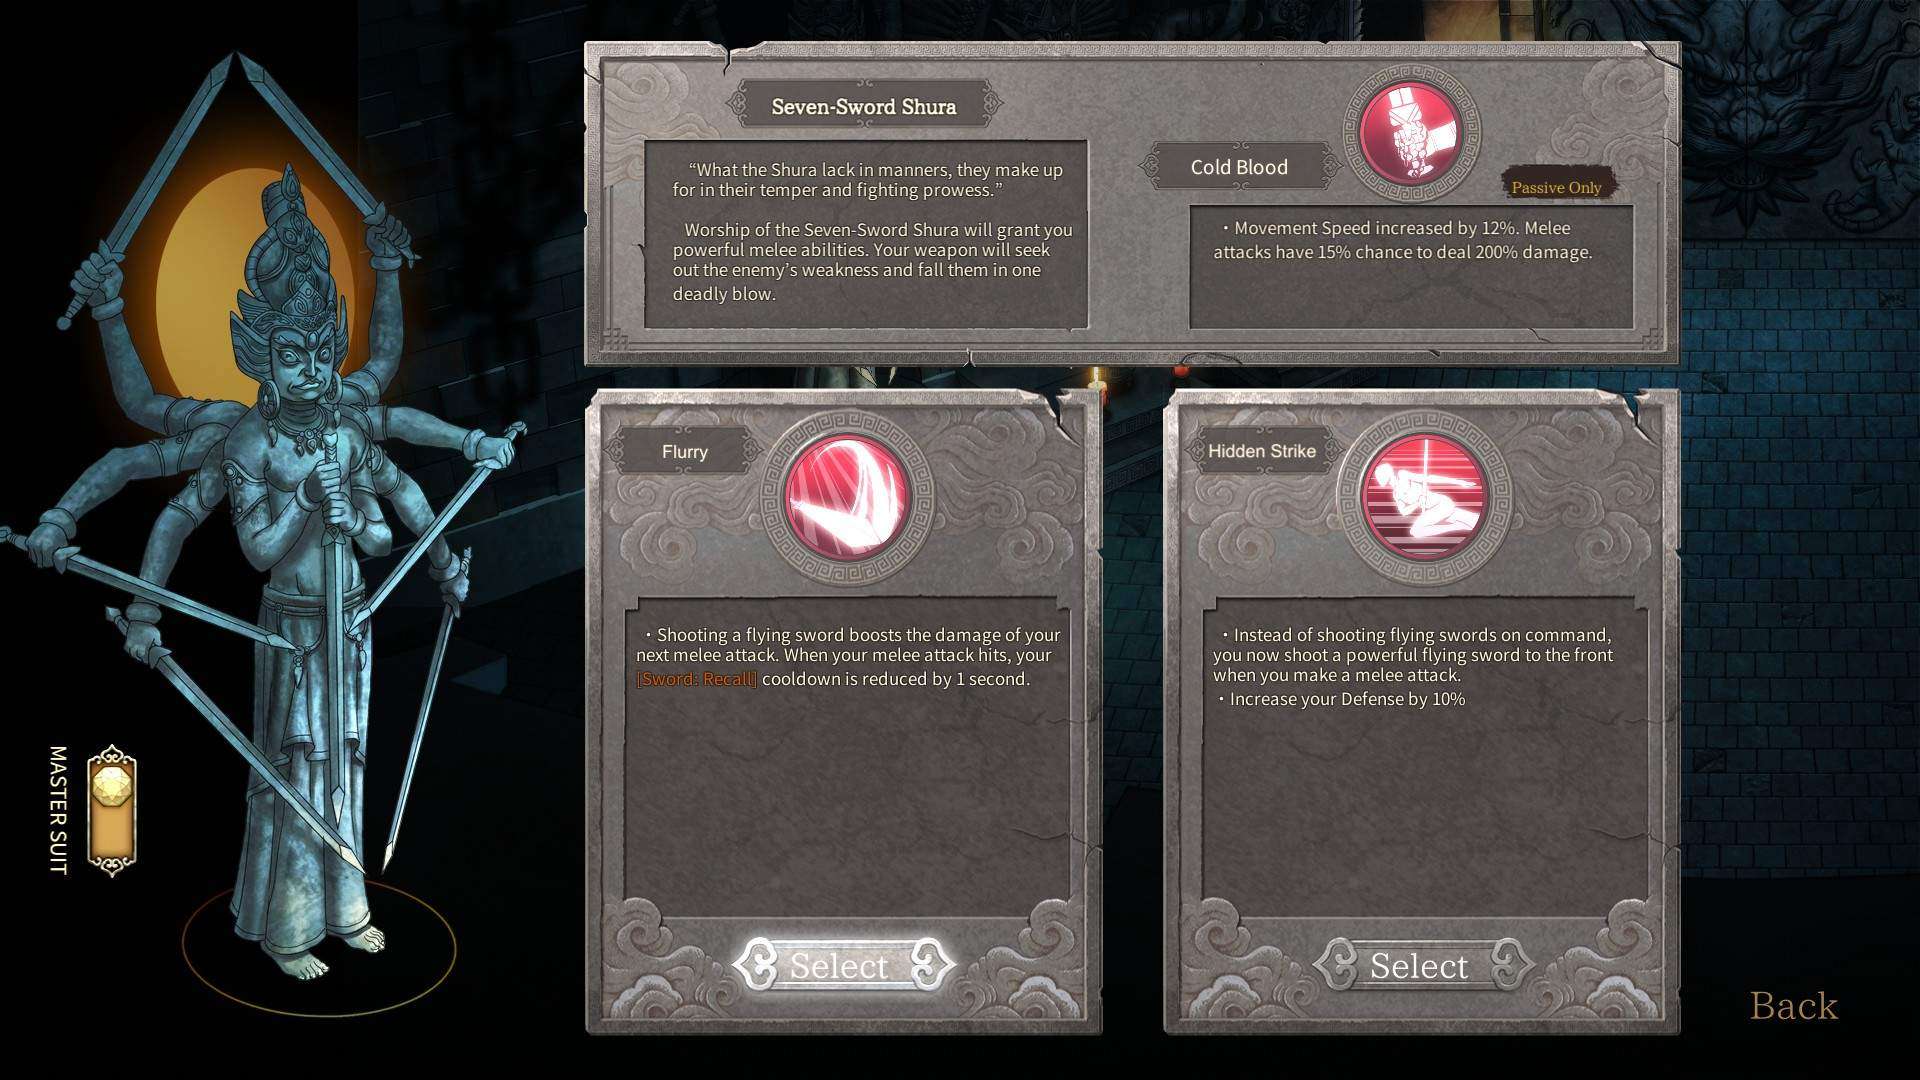
Intro
Seven Sword Shura is unlocked at the beginning of the game and specializes in melee damage and attack speed. It’s passive gives a 12% movement speed buff and gives melee attacks a 15% chance to deal 200% damage. It is the sect with the least ability text but is not worse then the other sects.
Branches
Seven Sword has two branches, Flurry and Hidden Strike. In Flurry, every melee hit reduces the cooldown of recall by 1 second. Also each flying sword shot causes the next melee attack to deal 200% damage. Note: The flying sword shot does not have to hit anything for the melee attack buff to apply. Furthermore, if the buffed melee attack misses, the double damage buff is wasted.
Hidden strike gives a 10% defense boost and removes the ability to shoot flying swords on command. Instead a flying sword dealing 150% flying sword damage is shot on every melee hit.
Of the two branches I recommend Flurry over Hidden Strike. Flurry’s sheath reduction on melee hit is one of the best abilities in the game. Meanwhile, Hidden Blade’s defense bonus is trivial, it can’t manually shoot swords, and bonus flying sword damage is worse then bonus melee attack in a sect that focuses on melee damage and attack speed.
Build
Because Seven Sword prioritizes attack speed, melee attack, and has bad AOE compared to the other sects; Tiger’s Mark in the power slot is critical. Always start with this item. Aside from that, the sect is very flexible. Just remember to prioritize melee attack and attack speed.
Carousing Acalantha
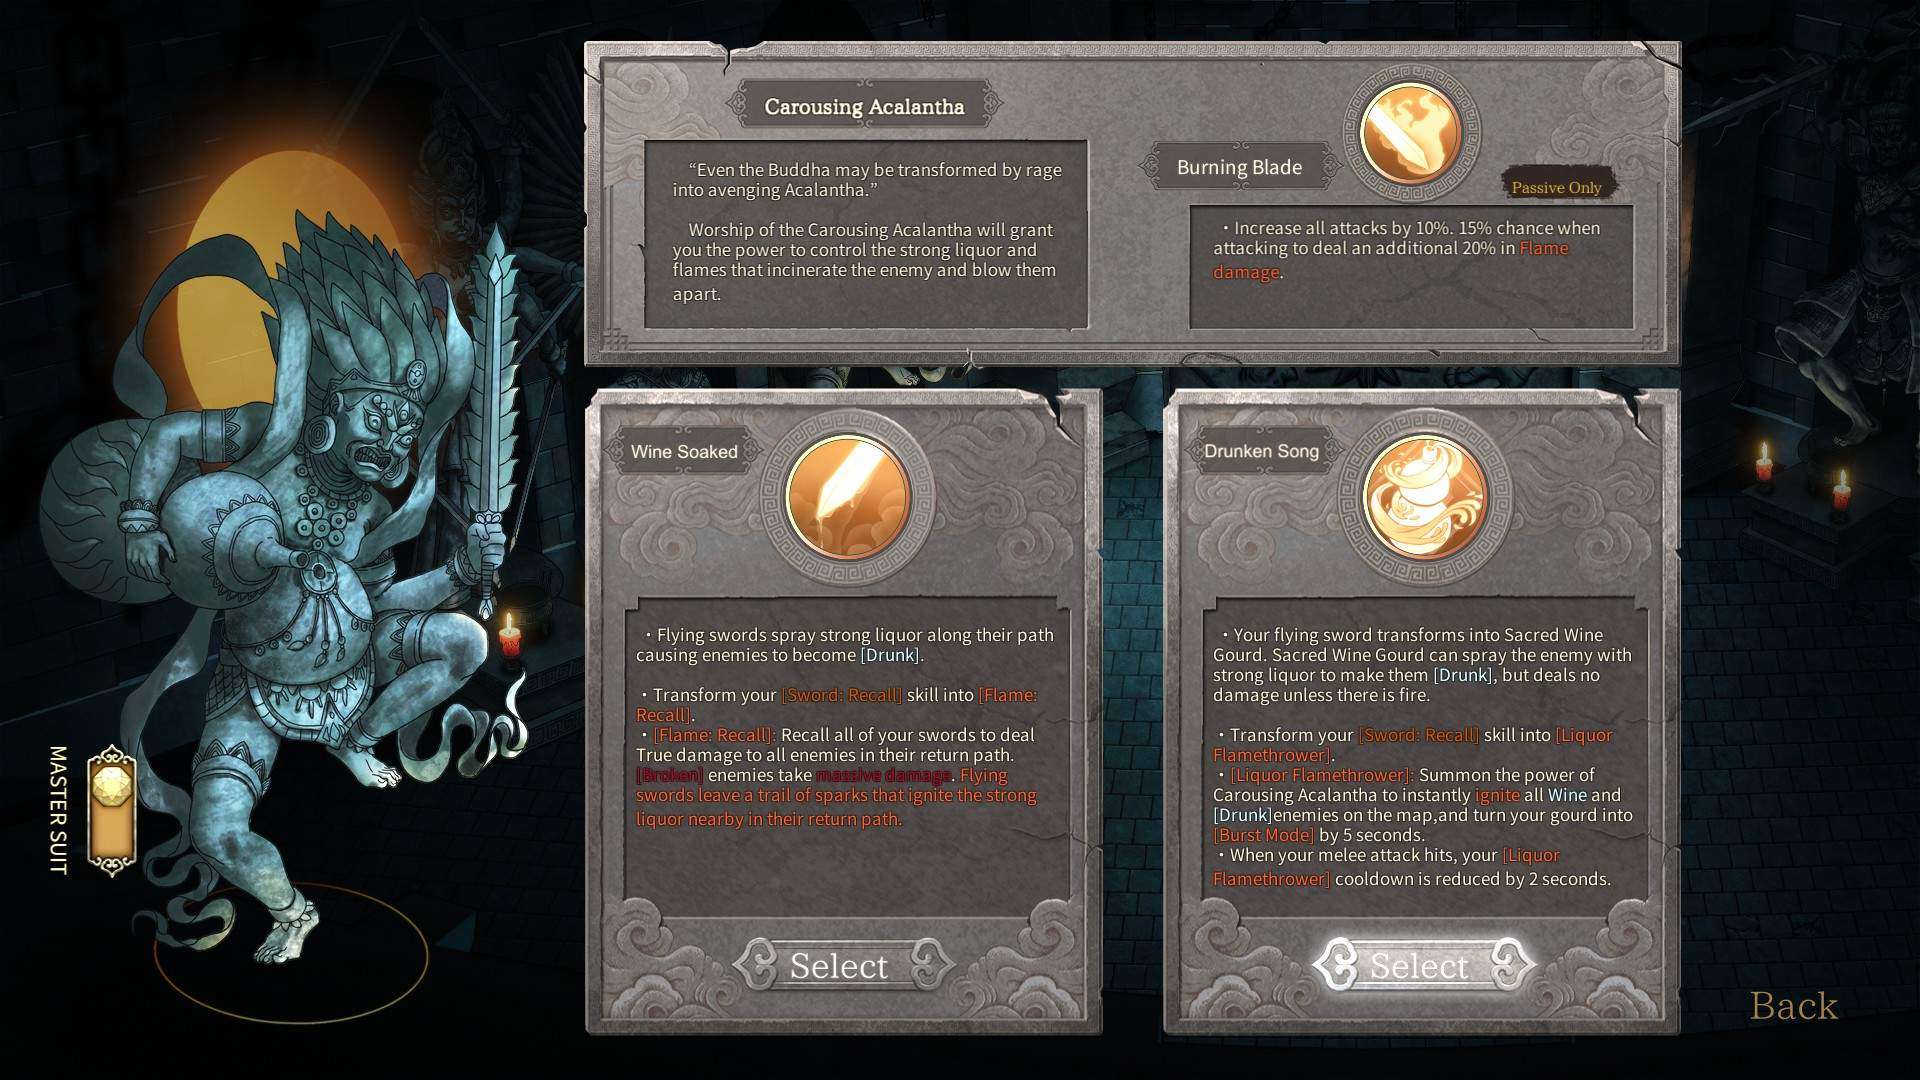
Intro
Carousing Acalantha is unlocked by beating the Pig Boss in chapter 1 and specializes in fire and wine. It’s passive increases all damage by 10% and gives a 15% chance when melee attacking to deal an additional 20% in flame damage. Notably, wine does not do damage unless ignited and the only way to do that without relics is melee attacking or sheath.
Carousing’s first branch: Wine Soaked plays like Seven Sword Flurry except: 1. Flying swords spray wine when thrown and gives hit enemies [Drunk]: which decreases their movement and attack speed. 2. Recalled swords ignite wine and [Drunk] enemies when returning. 3. Unlike Flurry, Wine Soaked does not come with built in CDR..
It’s second branch, Drunken Song gives the player a gourd that sprays wine at enemies. The wine itself does no damage unless it hits an enemy that is burning but can be sprayed without restriction. Recall is replaced with Flamethrower which ignites all wine and drunk enemies and causes the gourd to shoot fire balls that are treated like flying swords. Lastly, sheath cooldown is reduced by two seconds for every melee hit.
Of these two branches, I recommend Drunken Song over Wine Soaked. Having built in CDR is massive and later on, enemies are always on fire so the wine will always do damage when shot.
The Split
Carousing has two mutually exclusive sect tomes: Serpent Wine, and Dragon Wine. Serpent Wine upgrades [Burning] into [Toxic Flame], which does damage equal to 4% of the target’s max HP (not exceeding 350% of the player’s attack) every second: the same as [Poison]. However, [Toxic Flame] is still considered [Burning] for triggering effects and like [Burning] can ignite wine. [Toxic Flame] also stacks separately from [Poison] and does not trigger [Poison] based effects. Furthermore, [Toxic Flame] has an upgrade that increases the damage to 6% of the target’s max health.
Dragon Wine upgrades [Burning] into [True Flame] which doubles the damage and converts it to true damage. Aside from that it acts the same as [Burning], and both flames still receive burning and fire damage related buffs.
Build
Because of the split, there are two separate builds for this sect:, a Fire/Poison build, and a pure fire build. For both builds, the first priority is a relic that can reliably ignite wine like Ink Fire Crystal or Fiery Saltpeter. What to get next depends on the build.
Toxic Flame
[Toxic Flame] deals damage equal to 4% (or 6% if upgraded) of the target’s max HP regardless of attack. Getting an item that can inflict [Toxic] such as Realgar is recommend as [Toxic] does 8% max health damage (not exceeding 350% of the player’s attack) per a second. Combine that’s 14% max health damage per a second not including burning or fire damage related buffs. Does this mean all bosses will die in ten seconds? No. [Poison], [Toxic], and [Toxic Flame] do damage equal to a percentage of the target’s max health but are still reduced by armor.
True Flame
Before we get into the details of the build, let’s go over some stats first. There are two attack stats in the game, melee and flying sword. The stats are stored and interacted with separately. Melee attacks use melee, and flying swords use flying sword. However, [Burning] deals damage equal to the average of flying sword and melee attack. What the sect skill Dragon Fire does is convert the damage from the average of the two attacks to the sum and gives it 100% armor piercing. This means buffs that give All Damage Boosts are applied twice to [True Flame]. It also means stacking attack stats is very important for this build to increase it’s damage.
Mother Trinity
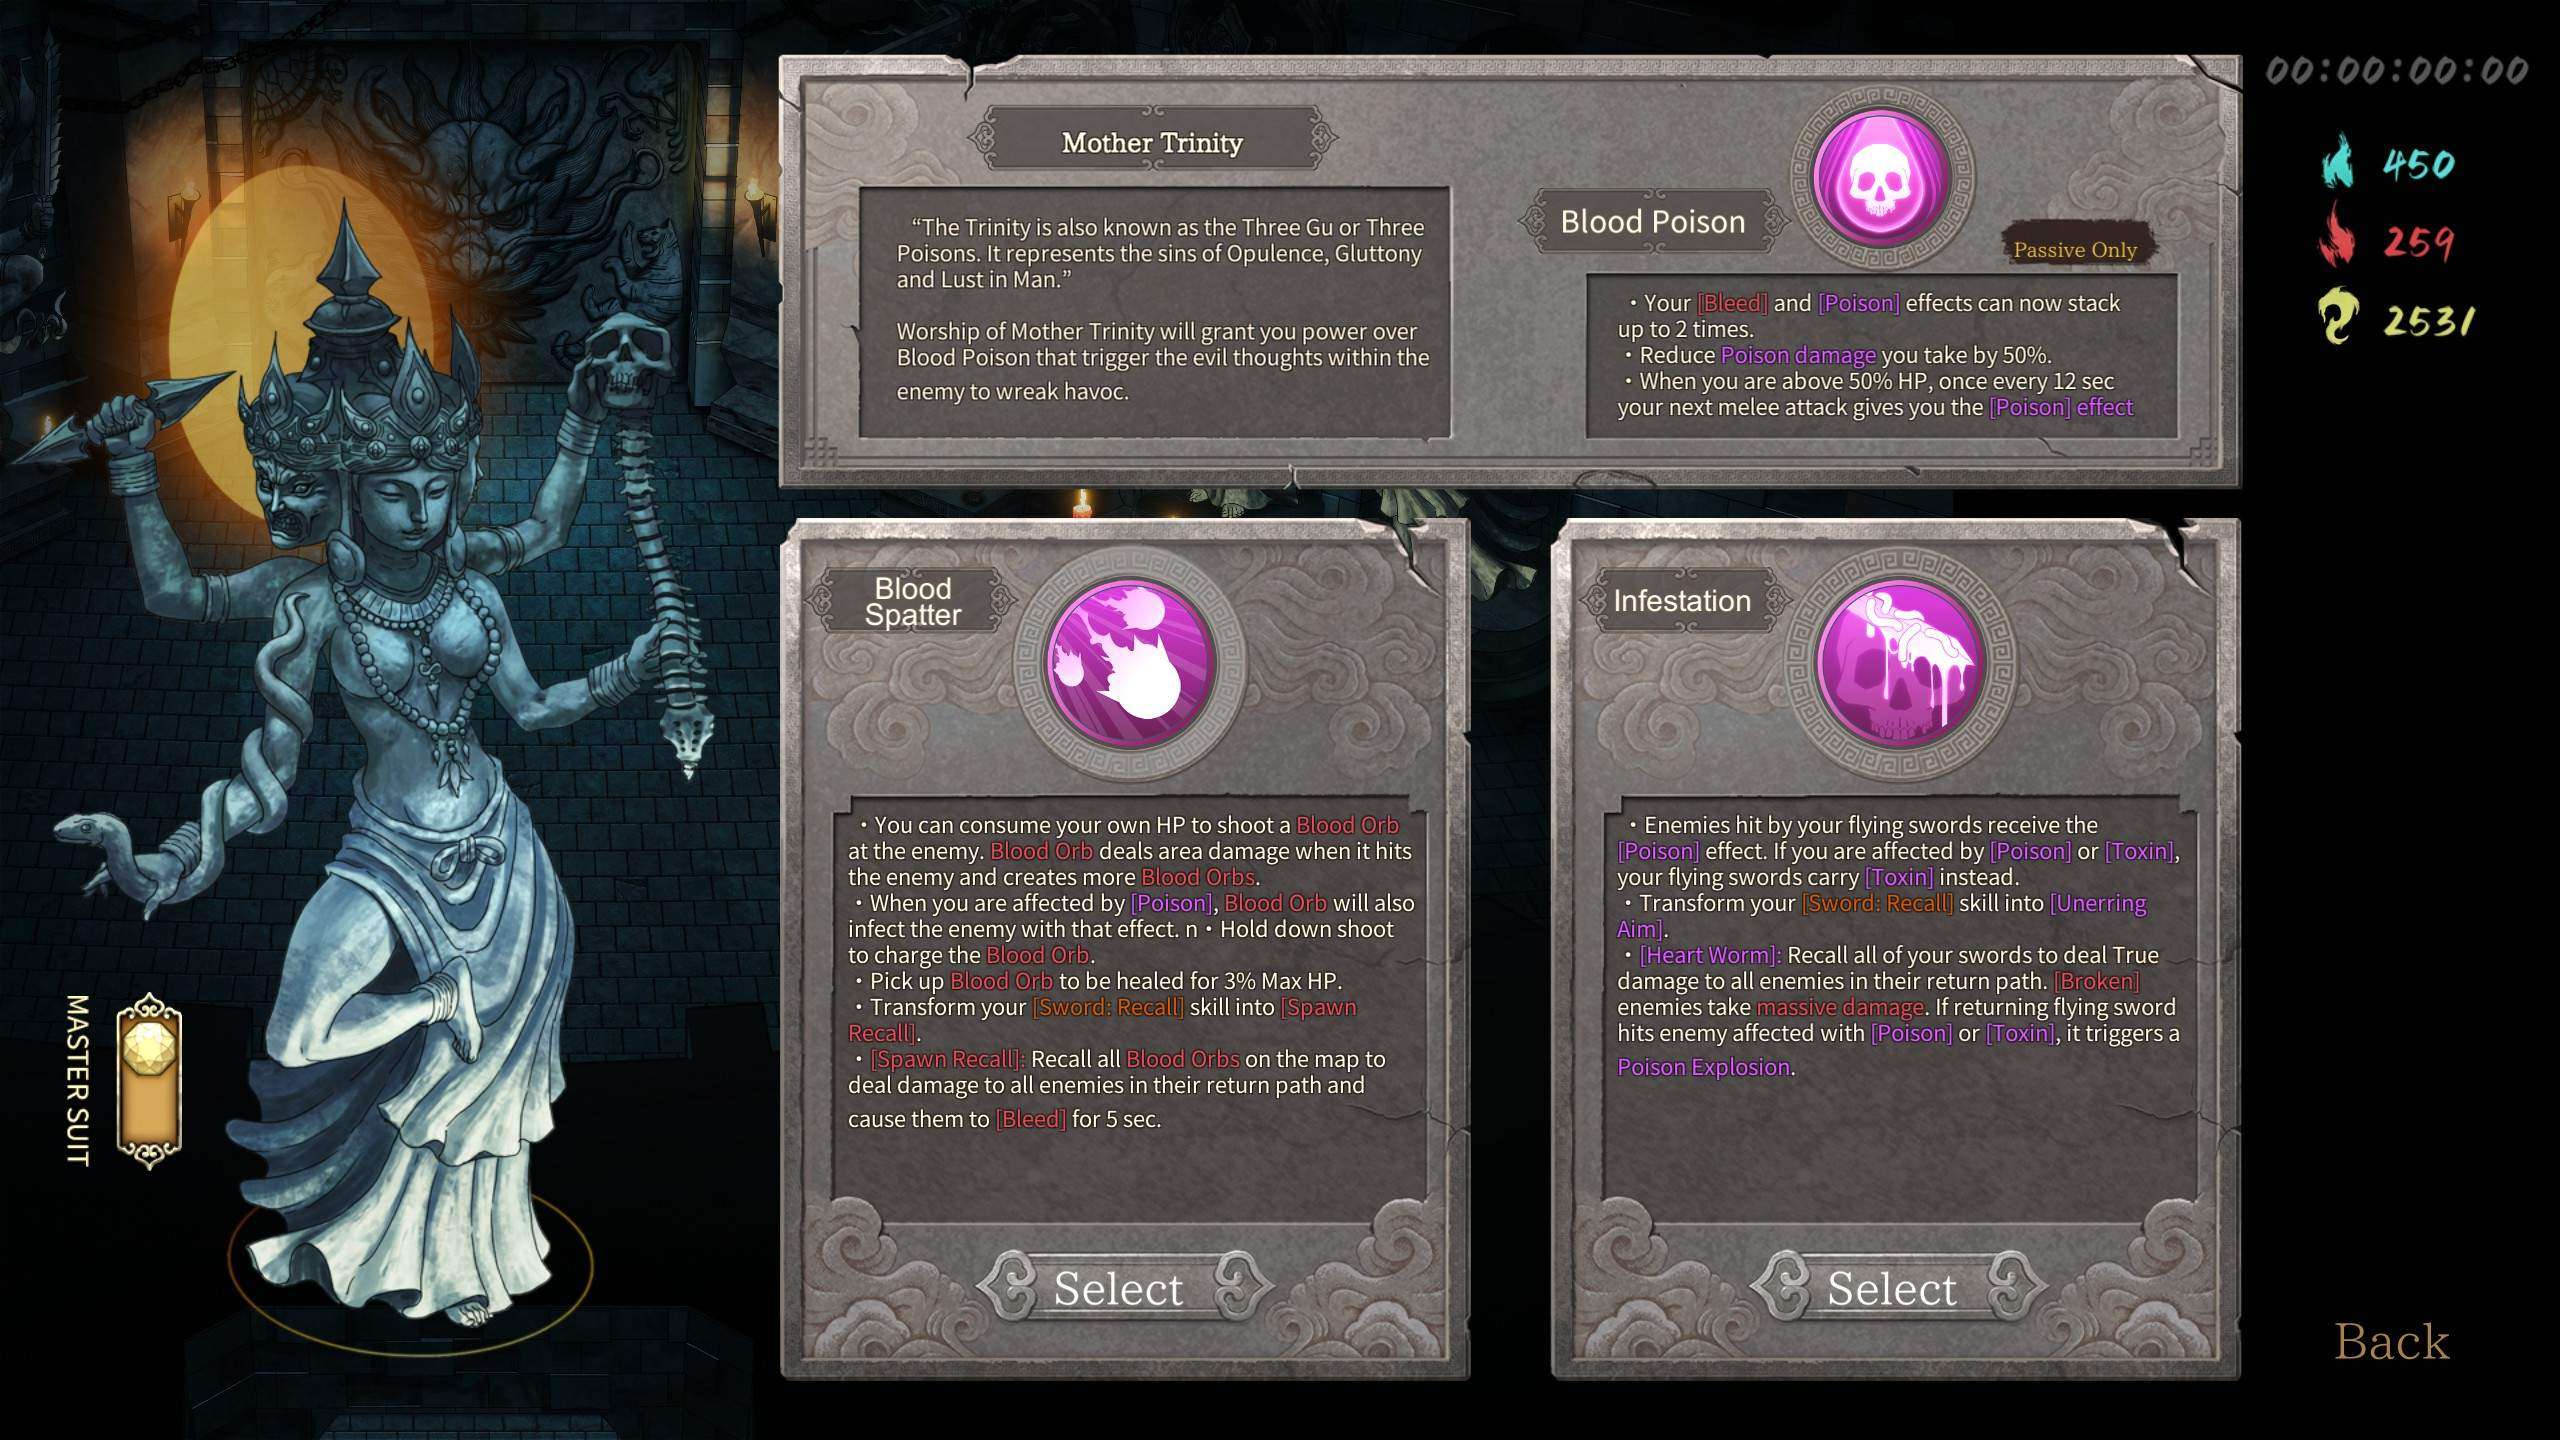
Intro
Mother Trinity is unlocked by killing Bookfaces and specializes in bleed and poison. It has three passives:
- Allows [Bleed] and [Poison] to stack twice. Note, when two stacks of the same status is applied, two numbers do not appear every second, instead one number appears that’s twice the value. The duration of each stack is counted separately. More on this later.
- Reduces poison damage you take by 50%. Combine with the sect skill Toxic Corpse; it gives 100% poison damage reduction.
- When above 50% HP every 12 seconds you are poisoned for 4 seconds, for a total of 8% max health damage over four seconds. A trivial ability because of the long cooldown, HP requirement, and passive two.
Poison, Bleed, and Toxic Stacks
Passive 1 allows [Bleed] to go from 5% max health to 10% max health damage per a second, [Poison] to go from 4% max health to 8% max health per a second, and [Toxic] to go from 8% max health damage to 16% max health damage per a second. [Bleed], [Poison], and [Toxic] damage cannot exceed 350% of the player’s attack and is reduced by armor.
Furthermore, [Toxic] is an upgraded version of [Poison]; it benefits from any buffs that interact with [Poison], triggers abilities that rely on a target being poisoned, but cannot stack with [Poison]. However, this is not a handicap because two stacks of [Bleed] plus two stacks of [Toxic] equals 26% max health damage per a second before armor. However, two stacks of the same status share the same cap per a second. If one stack of [Toxic] damage deals 350% of the player’s attack, adding a second stack of [Toxic] will deal no additional damage per a second. [Bleed] however, can still do an additional 350% player attack damage because it’s cap is calculated separately. Thus, White Ash bosses do not die 4 seconds after bleed and toxic are stacked twice.
Branches
Mother Trinity has two branches: Blood Splatter and Infestation.
Infestation plays like Flurry from Seven Swords except for three things. 1. Flying swords gives [Poison] to enemies when thrown. If you are affected by [Poison] or [Toxic], it give [Toxic] instead. 2. When recalled, if it hits a poisoned enemy it triggers a poison explosion. 3. It does not have CDR on melee hit..
Blood Splatter removes flying swords and replaces them with blood orbs which cost 3% of your current HP but can be fired infinitely, do area damage, and can be picked up or recalled to restore 3% of your max HP. This makes Mother Trinity the only sect to have built in healing. Furthermore, if you are affected by [Poison] or [Toxic] enemies hit by blood orb also gain that effect. When recalled, enemies hit by returning blood orbs gain [Bleed] for 4 seconds. Blood orbs can also be charged but I always rapid fire them to maximized the amount of orbs that drop.
Of the two sects, I recommend Blood Splatter. Not having CDR while using Flurry’s playstyle is massive, and Infestation does not have a good way to apply [Bleed]. Also, once the sect skill Corpse Body is unlocked, Blood Splatter applies poison better then Infestation does.
Build
First priority is to get relics that can consistently apply [Bleed], and [Poison] or [Toxic]. [Toxic] is preferred over [Poison]. For [Bleed]: Sharp Fang has a 25% chance of causing [Bleed] on a melee attack., Mutant Limb has 35% upon dealing any type of damage and White Wolf Mane causes the next melee attack to apply [Bleed] after a flicker. Remember to only get 1 relic as applying [Bleed] stacks past two is pointless.
For [Poison], your three options are Zombie Finger, Poison Sac, and Hydragyrum but once the sect skill Corpse Body is unlocked a [Poison] applying relic will no longer be needed. Thus I recommend Poison Sac and Hydragyrum since they have useful [Poison] and [Toxic] buffs when swapped to a different slot.
I strongly recommend against putting Mutant Limb or Zombie Finger in the Skill slot. Four stacks of [Bleed] or [Toxic] equals 20% max HP or 32% max HP which on a White Ash boss is almost always over the 350% of attack cap leading to a ton of wasted damage. Two stacks of each is plenty.
Bitter River Bodhi
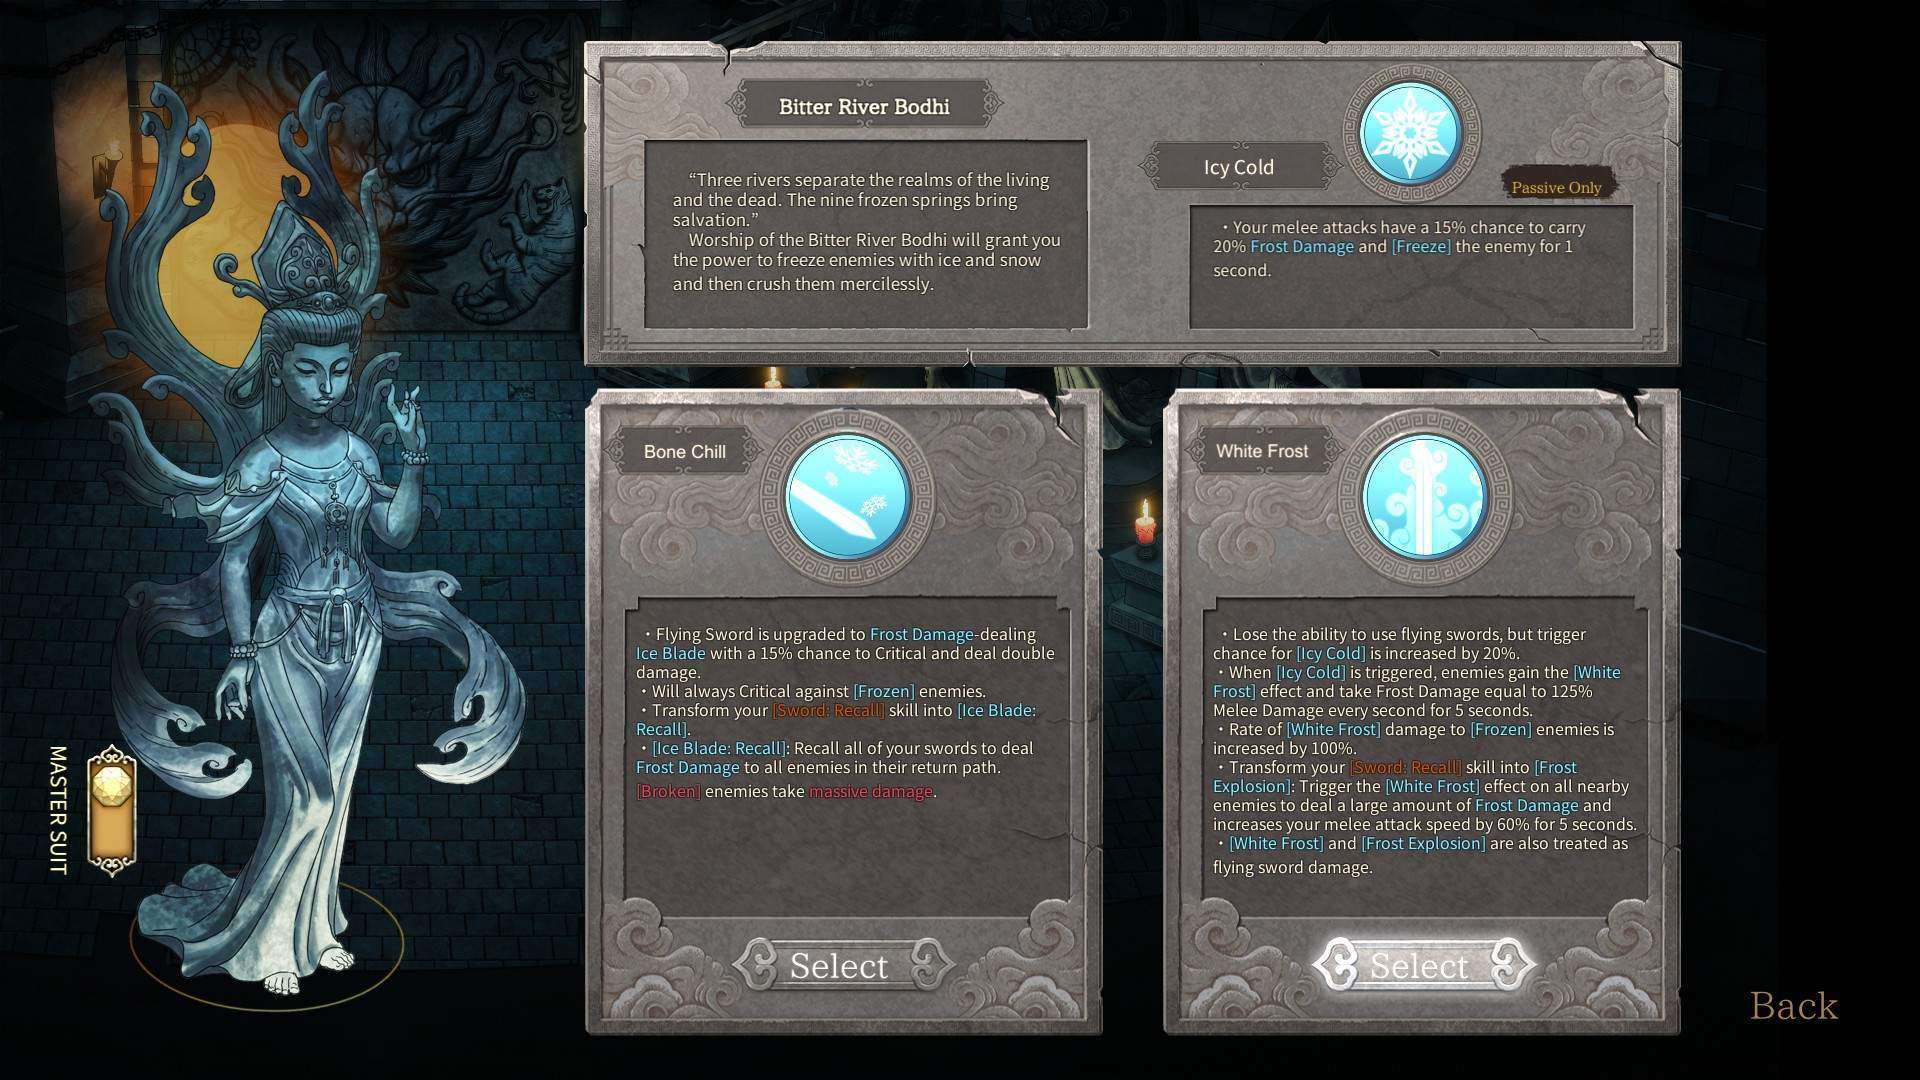
Intro
Bitter River is unlocked by beating the turtle boss in chapter 3. and specializes on frost damage and [Freeze]. It’s passive gives melee attacks a 15% chance to deal 20% additional frost damage and [Freeze] hit enemies for 1 second. Bosses and large enemies can still move and attack while having [Frozen].
Branches
It’s two branches are Bone Chill and White Frost. Bone Chill is the more conventional of the two and like the previous sects, plays like Flurry except 1. Flying swords deal frost damage and have a 15% chance of dealing double damage. 2. Flying swords will always critical against [Frozen] enemies. 3. Unlike Flurry, Bone Chill does not have built in CDR. And like the previous sects I recommend White Frost instead.
White Frost removes flying swords but increases the trigger chance of Icy Cold (the passive) from 15% to 35%. When Icy Cold is triggered, enemies gain [White Frost] and take frost damage equal to 125% melee damage every second for five seconds. [White Frost] also deals double damage to [Frozen] enemies, making it’s damage 250% melee damage a second if the target has [Frozen]. Sword Recall is replaced with Frost Explosion which triggers [White Frost] on nearby enemies and increases attack speed by 60% for 5 seconds. Notably, Frost Explosion does not apply [White Frost] to enemies. Instead enemies with [White Frost] have the status consumed to cause a Frost Explosion. Also, White Frost and Frost Explosion are treated as Flying Sword damage, but scale off melee attack. What does this mean? It means when an enemy is damaged by White Frost or Frost Explosion, it triggers “upon dealing flying sword damage” effects such as Yellow Charm’s Skill ability. White Frost’s cooldown is significantly shorter then recall’s cooldown.
Build
There are two builds which I call Conductive Frost and Pure Ice. Both should heavily prioritize Northwind Bloom because it boosts frost damage by 25% and can freeze enemies, essential for increasing [White Frost]/[Frost Explosion] damage. The two diverge from there.
Conductive Frost
As previously mentioned, [White Frost] and [Frost Explosion] can trigger Yellow Charm’s skill ability which shoots lightning damage charms at enemies. Conductive Frost uses this with Lightning Lock, which boosts all lightning damage by 25% and runs Tricolor Crystal in the core slot. When Frost, Lightning, or Flame damage is dealt, Tricolor crystal give a 99% damage buff for 3 seconds to the other two types. Tricolor Crystal’s effect does not stack with itself. Doing lightning and frost damage will not increase flame damage 198%. However, multiple damage types can be buffed 99% simultaneously.
With Tricolor Crystal, Lightning Lock, and Northwind Bloom, frost and lightning are buffed by a total of 124%.
Pure Ice
Instead of running Yellow Charm in the skill slot, Pure Ice runs Icebreaker Stone, increasing all damage to [Frozen] enemies by 100% and gives a 5% chance for [Frozen] enemies to be killed instantly when they take damage. Instant kill does not work on bosses.. Include Millennium Ice for more [Freeze] and frost damage.
Thunderfury Vajra
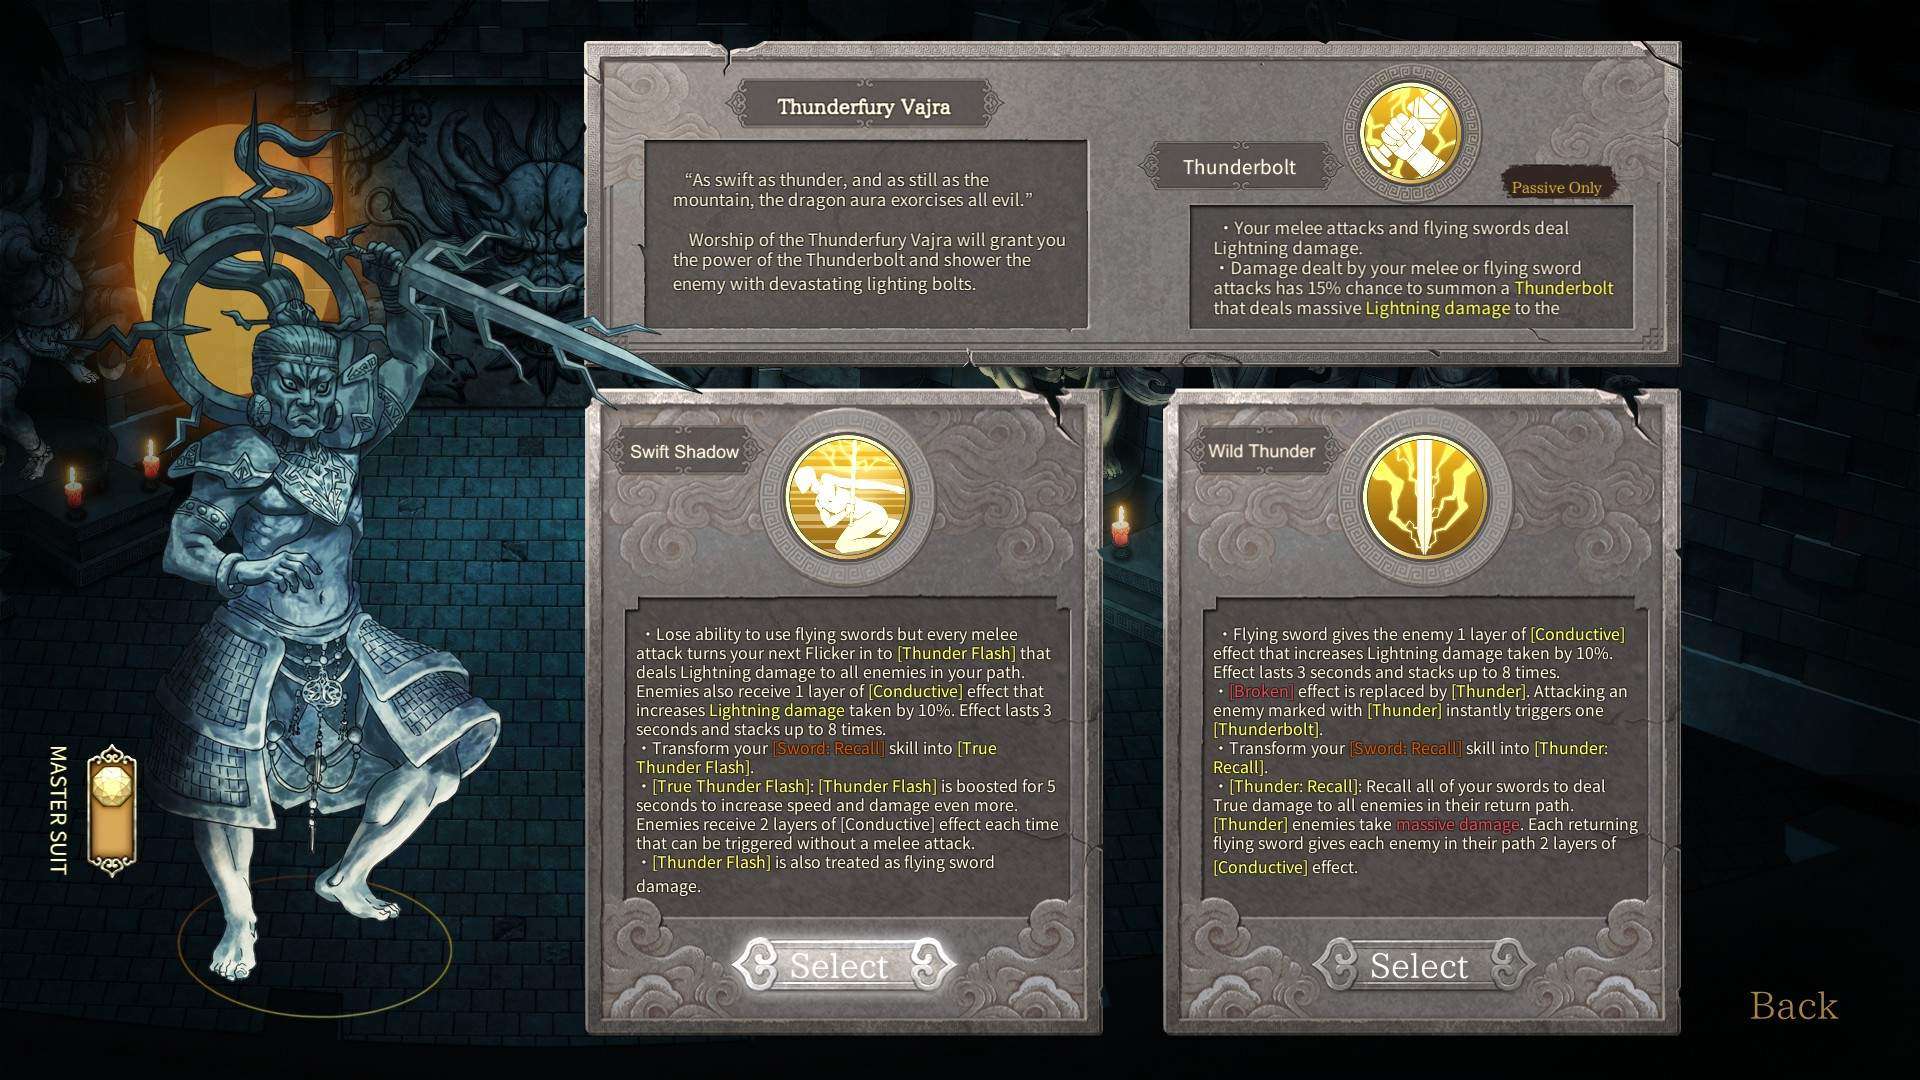
Intro
Thunderfury is unlocked by beating the tiger boss in chapter 4 and focuses on lightning damage and flicker. It’s passive causes all melee attack and flying sword attacks to do lightning damage. Damage dealt by melee and flying sword attacks has a 15% chance of summoning a thunderbolt that deals lightning damage to the target. Thunderfury’s two branches are Swift Shadow and Wild Thunder. Wild Thunder is the more convential of the two and plays like Flurry from Seven Swords with 3 major differences. 1. Flying swords now give hit enemies [Conductive] which increases the lightning damage they take by 10% for 3 seconds stacking up to 8 times. 2. Recalled sword deal true damage and apply two stacks of conductive when returning. 3. Wild Thunder does not come with built in CDR. As always, I recommend the more unique of the two branches.
Swift Shadow removes flying swords but every melee attack turns the next flicker into [Thunder Flash] which deals damage equal to the sum of your melee and flying sword attack. enemies hit also get a layer of [Conductive]. Recall is replaced with [True Thunder Flash] which increases [Thunder Flash] speed and damage, and causes it to apply two stacks of [Conductive] instead of 1, and removes the melee attack requirement for 5 seconds. [Thunder Flash] is treated as flying sword damage, but still scales off both melee and flying sword attack. It will trigger “Upon dealing flying sword damage” effects, not “Upon dealing melee damage” effects.
Build
Like Bitter River, there are two builds for this sect which I call Frozen Lightning and Pure Thunder. Both builds prioritize Lightning Lock for it’s bonus lightning damage and I recommend putting it the skill slot because it’s bonus lightning damage is 50% instead of 25%. The recall requirement isn’t a problem because the cooldown of [True Thunder Flash] is much shorter then [Recall].
Frozen Lightning
As previously mentioned, [True Thunder Flash] greatly increases the speed of flicker. This allows for more flickers per a second, and which greatly increases the power of Yellow Charm’s agility slot which drops a [Disrupt Charm] upon flicker that explodes after 1 second, dealing AOE frost damage and slows hit enemies. Upon sheath, for the next 5 seconds the Charm will [Freeze] the enemy. Millennium Ice is put into the core slot because [Ice Burst] deals double damage to [Frozen] enemies and [Thunder Flash] can trigger it. Thunder Stone is then put into the skill slot, and Lightning Lock in the Power slot, for increased lightning damage.
True Thunder
True Thunder runs Lightning Lock in the skill slot, and Thunder Stone in either the core slot or agility slot. Avoid “Final blow in melee attack” relics because the majority of damage comes from [Thunder Flash], and melee attacks are only used to trigger it. And since Thunder Flash scales equally off both flying sword and melee attack, but only triggers “On Flying Sword” effects, its more worthwhile to build flying sword relics than melee relics.
Infinite Arhat
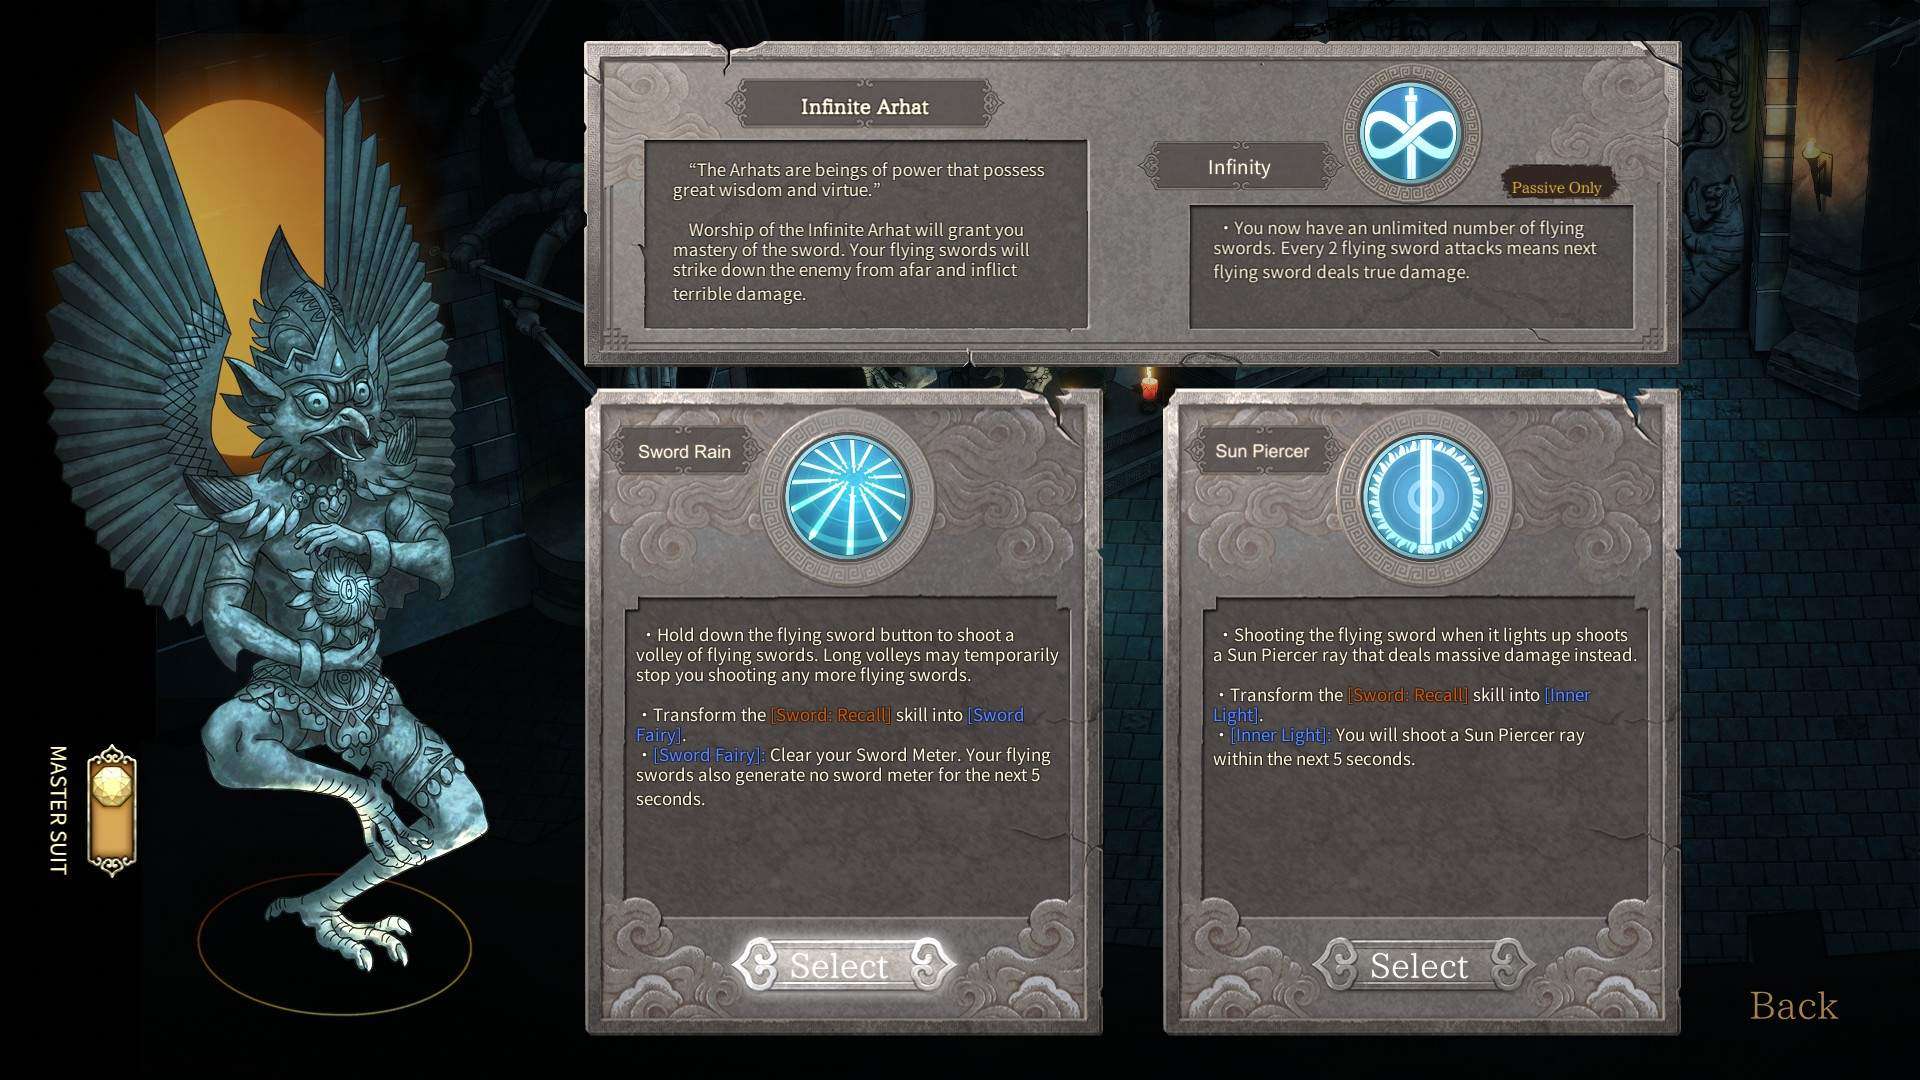
Intro
Infinite Arhat is unlocked after defeating Sima Ying in chapter 2 and focuses on flying sword damage. It’s passive gives every third flying sword attack true damage. It also removes the player’s standard flying sword and replaces it with either infinite swords, or one sword. Unlike the previously mentioned sects, Infinite Arhat does not have a conventional and unique branch. Both of them are unique.
Branches
In the Sword Rain branch, the player is given infinite flying swords that can be fired so long as the player’s sword meter is not full. The recall ability is replaced with Sword Fairy (fairy is a bad translation of the character 仙, which is pronounced Xian) which clears the sword meter and causes flying swords to generate no meter for 5 seconds. In Sun Piercer, the player is given one sword which shoots Sun Piercer rays that can pierce enemies. Sheath is replaced with Inner Light which allows Sun Piercer rays to fire without charging.
Of the two, I recommend Sun Piercer over Sword Rain. While having infinite swords sounds nice, each sword does less damage then a normal sword and more importantly cannot pierce enemies without the branch’s dedicated sword. This means in a group of around ten enemies only two to three will be hit while the majority of the enemies remain unharmed. Meanwhile dashing into the middle of an enemy group and melee attacking hits around four to five, and Sun Piercer can hit around 6 to 8, assuming no upgrades for all scenarios.
Build
By far the most important relic is Windchaser herb in the agility slot which reduces sheath cooldown by 1 second every flicker, and has a 15% chance of automatically triggering Inner Light after each trigger. With enough cooldown reduction, you can have 100% uptime on Inner Light. After that, get items that boost flying sword damage such as Blue Dragon Spirit and Spirit Jade and once you have enough sheath CDR you can swap out Windchaser herb for another flying sword damage booster.
Playstyle
Stay away from enemies and fire Sun Piercer. Dash constantly for Windchaser herb’s effects. This sect one of the safest sects, if not the safest sect in the game because most enemies can’t hurt you unless you’re next to them and Sun Piercer’s AOE mean most enemies are blown away before they can get close.
Supreme Bodhi

Intro
Supreme Bodhi is unlocked using red souls and focuses on non elemental damage. It’s passive prevents you from receiving attack speed or sheath cooldown reduction bonuses but 100% of it is converted to flying sword and melee attack damage. Using Sheath summons a [Breath of the Moment] which lasts 1.5 seconds. When the [Breath] is hit by [Divine Walk] or [Blade Dance] it puts Bi’an (The character) into [Sheath Mode] or gives a Blade Dance Counter depending on the branch selected.
Branches
Bodhi’s two branches are Divine Walk which focuses on melee damage and No Trace which focuses on flying sword damage. Divine Walk replaces flying swords with [Parry]. When hit by an enemy attack while using [Parry], damage is greatly reduced, you are not knocked down, and Bi’an (The character) enters [Sheath Mode]. [Sheath Mode] has no time limit and even carries over scene transitions. When in [Sheath Mode] the next melee attack becomes [Divine Flash] which deals true damage equal to 700% the sum of flying sword and melee attack. Sword Recall is replaced with Blade Heart, which causes your next melee attack to become a Divine Walk without needing a successful parry. Blade Heart’s cooldown is 30 seconds. [Divine Flash] is treated as both melee and flying sword damage. It can trigger both on melee and on flying sword effects.
Bodhi’s second branch is No Trace. No Trace replaces flying swords with Blade Dance and gives you two Blade Dance counters. Blade Dance deals damage equal to 75% of your flying sword damage and consumes one Blade Dance counter. Casting flicker with .5 seconds of a melee hit shoots a Phantom Blade at the nearest enemy dealing 70% flying sword damage and giving [Crack of Time] to the hit enemy. If Blade Dance hits an enemy with [Crack of Time] is causes a [Time Explosion] which deals true damage equal to 600% of the sum of melee and flying sword attack. Sword Recall is replaced with Blade Dance Upgrade, which gives an Enhanced Blade Dance counter. Enhanced Blade Dance Counters are counted separately from normal Blade Dance Counter but shares it’s max. Enhanced Blade Dance has a larger AOE and does damage equal to 150% of a normal Blade Dance. [Blade Dance] has a cooldown of 30 seconds and is treated as flying sword damage.
Of the two branches I recommend No Trace. Both branches can achieve high damage values but Divine Walk is heavily reliant on enemy attacks for damage and does very little damage compared to other sects when taking initiative. However, Divine Walk builds completely differently from No Trace so I will cover it in the build section anyways.
Build
The branch selected is the biggest determiner of Bodhi’s builds. For Divine Walk builds almost identically to Seven Sword. Tiger’s Mark should be heavily prioritized in the power slot because of the 30% melee attack bonus, and the 30% all damage bonus because of Bodhi’s passive. It also gives AOE, which Divine Walk struggles with since the attack area is so narrow. Avoid effects that say “final blow” in melee attack because most of the branch’s damage will come through Divine Walk. Also avoid flicker abilities such as Windchaser Herb’s ability slot. In Divine Walk, flicker should only be used to move, not for I frames. Instead, attacks should be parried whenever possible.
For No Trace the opposite is true. Phantom Blade and Blade Dance scale exclusively off flying sword damage and No Trace builds almost identically to Infinite Arhat because of it. Windchaser herb is the agility slot is a core item as No Trace flickers constantly for Phantom Blade. Windchaser herb can stack Enhanced Blade Dance counters even further boosting damage. Aside from that, Blue Dragon Spirit in the ability slot is highly recommend because it boosts flying sword attack by 15% and all damage by 25% because of Bodhi’s passive.
Playstyle
Divine Walk relies very heavily on parry for damage. Because of this, stay in melee as much as possible since most enemies can’t attack you without also being in melee. Also, some enemies attack so slowly that you’re better off attacking normally instead of trying to get the parry in. It’s because of this, and the downtime between parries that Divine Walk prioritizes melee over ranged relics.
To play No Trace melee attack once, dash away to throw Phantom Blade, and Blade Dance into the enemy with [Crack of Time]. If you have enough counters, you can Blade Dance in to melee range, melee attack, phantom blade, and then blade dance back in again. For both branches try to hit the [Breath] if possible since that gives another [Sword Dance] or [Divine Flash].
Be the first to comment