
Tips, maps, weapons and more in my favorite multiplayer Landfall Archives game.
Table of Contents
Basic
Premise
You’ll always play only against 1 guy. Your task is to throw this guy into the water present on each map, you can’t kill them with just bullets. It’s more of a sumo kind of game than a FPS kind of game. If they fall, you get a crown and a new round begins on a random map. If you fall, you get a 🙁 face.
Stats
You’ll see 3 things at the bottom:
- Shield – A shield icon with a 😀 face. The 😀 face indicates it’s ready to be deployed with right-click. It then shows you the cooldown. The shield is explained lower in the guide.
- Hurt – A % that gets redder the higher it is. Can be gained from bullets or explosive damage. It’s not damage in the usual sense, think of it like the % in Smash Bros – the higher it is, the more knockback you take from the enemy’s bullets, and you can’t make it lower (it resets only when a new round starts). Therefore it can go over 100%, you’ll just take more knockback.
- Energy – A yellow bar that shows you your energy. It regens over time and you lose it from sprinting (shift) or flying (space). You’ll ideally want to conserve it, like not over-fly to places you’re trying to go (your character can always kinda climb up walls). It’s always good to have some spare around to save your ass in tight situations, or when you get blown away by the enemy. Only fly long-distance (where you’ll drain all energy) when you’re sure the enemy can’t reach you, otherwise you’ll have no way of flying back to the level if they manage to shoot you.

Tips
- Always use the environment to your advantage! Blow the enemy’s cover apart, use debris as cover, hide in cracks… Your gun is a strong enough tool for almost any situation, you don’t need explosives for this. Sacrificing some bullets to blow the floor below the enemy away, forcing them to fly therefore making them inaccurate can be smarter than just emptying them all on their body.
- Especially with the default revolver, don’t spam your shots! Take your time and tap slowly, always waiting for the crosshair to be perfectly small. This wait time is worth it more than if you were to shoot fast and miss most of those 5 precious bullets. Also, the gun will fly all over the place, potentially shooting you.
- The physics are kinda glitched where if you look down and tap space, you can sometimes jump in the air forever.
- Use your shield when you’re in the direct line of sight of your opponent, even just randomly! Chances are that you might deflect something.
- Low energy or reloading? Hide. There’s no time limit, you can always retreat to muster up some energy and return to battle afterwards. Just beware that the enemy will most probably also have everything filled up as well.
- On the topic of replenishing stuff, you can press R to reload. If your enemy is the one retreating and you know they won’t attack for a while, either unload your remaining bullets into the environment or reload if you want to stay silent.
Weapons and Stuff
The Revolver – Reliable, strong and accurate

What you’ll be rockin’ most of the time. You spawn with it, it’s pretty damn accurate (if you stand still) and powerful. The crosshair expands the less accurate you are, so use it to time your shots in situations where shooting while moving is needed.
It can have 5 bullets loaded at once, reloads take 8 seconds, each bullet does 56% of hurt. The gun is a physical object that tries to point where the crosshair is, but if you’re up against a wall or otherwise stuck, the gun will be pointing elsewhere. Make sure it’s always rougly pointed at your crosshair, otherwise it’s going to shoot willy-nilly. This also applies to looking too much up or down.
The SMG…? – Fast, but more situational and hard to control

This gun spawns on random places all over the map, indicated by tall yellow lights. It has way more bullets, which aren’t strong on their own, but the weapon boasts automatic fire where you’ll empty the gun in 2 seconds (then 8 second reload). This can be powerful at close ranges, BUT I feel like it’s not as reliable as the normal gun.
The recoil on this one is really felt even in short bursts, and therefore isn’t nearly as accurate. Additionally, I feel like it points where you want it to less reliably than the revolver. It’s fun to use, but if you’re not used to it will lead to more frustration. If you pick it up, I don’t think you can take your old one out again that round, so choose carefully.
The Shield – Return to sender

With right-click, you can pull it out for a half-second. It slows you down considerably during that split second, but any bullet hitting you will be deflected back to your opponent, effectively making them hurt themselves. I don’t think the bullet needs to hit the shield, you just need to have it deployed. You then have a 6 second cooldown until you can use it again. It’s kinda crucial and can help you a lot in those raw shootout moments. It’s more effective against the default revolver than the SMG since a deflected revolver bullet does more damage than an SMG one.
Bombs – Mess up the entire map

These explosives can be found on 3 of the maps. They’re extremely good at blowing up even the heaviest of foundations and can and will destroy entire buildings. It’s great for getting an opponent out of their hiding spot or just speeding up the game in general by forcing you both to fight in relatively flat rubble just barely above the water level.
They do deal a pretty good sum of hurt, especially if you manage to explode multiple next to your opponent. A lot of em can send you flying across the map with 2500% hurt. You can also grab and throw them with E, ideally detonating them mid-air after throwing them to explode your opponent or their hiding spot from a distance. Useful on the 2 forts map.
Maps
These map names are what I made up, they’re not official. There’s 5 of em:
Diagonal

There’s 2 spawning platforms diagonally away from each other and a big one in the middle with solid heavy foundations. The middle platform also has 3 bombs in a hole in the middle which have the potential to destroy the whole map. The rest of the elevated platforms are all on white stone legs that break easily.
2 Forts

Each player spawns opposite from each other in their own “fort”. There’s 2 floors and their foundations are pretty solid, altough there’s a lot of weak white pieces. A bunch of bombs spawn on each fort, which you can throw and detonate mid-air as a crappy cannon. A good strategy is to try and get an angle at the enemy’s bombs by blowing a front wall apart, because detonating one in-base will most often lead to the destruction of the entire thing. You’ll either want to get rid of them ASAP, kill the opponent first, or in the worst case fly to the opponent’s base, which you’ll need full energy for.
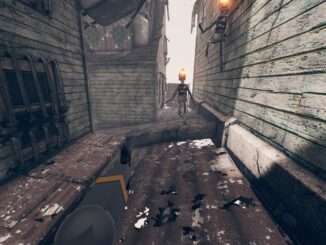
Tunnel

This one is made entirely out of wood and light stone stuff, even the foundations. There’s a lot of potential for using all the debris as dynamic cover. You can flank your opponent by flying up to the elevated floor and jumping off at their side, but I wouldn’t recommend staying on it for too long because it’s easily destroyed.

Spikes

Probably the fastest-paced map in the game. The strategy here is to remove any opportunity for the opponent to land and regain some energy. The “spikes” come down in 1 hit, and if you manage to shoot the one the opponent is currently on, they will probably fly to the next one, which you can also shoot down, and at this point they have no energy mid-air and die.
2 Towers

Two rather solid towers connected with some bridges. You both spawn at the floor just below the roof. You can use the verticality to your advantage to evade the opponent fast. There’s openings for each floor in the towers where you can always slide into. At the very bottom of each tower are some hidden bombs, which can bring an entire tower down if detonated.

Materials
There’s 3 main ones making up each map. There’s also these weird grid boxes on the 2 towers map which seem to have similar properties to the heavy metal blocks. They can’t be destroyed, only blown away into the water.

Wood is, well, wood. You’ll mostly find it used as material for floors in a plank pattern, which can easily be destroyed with a gun.

This white brick/stone looking material is used as the main support material in lighter structures. It can also be rather easily blown away with a gun.

This heavy metal looking material makes up heavy structures and solid foundations. It can still be blown away with a gun when loose, but you’ll have a hard time doing it if it’s stacked on top of each other. Bombs will be your best friend here at blowing metal apart.
That’s it!
Be the first to comment