
A basic guide on selecting a starting party, making your first moves, and discussing how combat works. The guide then goes into a detailed discussion on defensive and offensive combat attributes and tactics. The guide wraps up with a full skill point allocation through level 9/10 for the recommended starting party.
Table of Contents
- About this Guide
- Recommended Starting Party
- Hangar Layout
- First Moves
- Combat Basics
- Important Defensive Attributes and Tactics
- Important Offensive Attributes and Tactics
- Leader Skill Point Allocation with Psyker Specialization
- Scrapper with Tinker Specialization
- Miner with Demolition Specialization
- Bruiser with Demolition Specialization
About this Guide
Note: Credit goes to skywalkerfx
The first parts of this guide were written to give people a better understanding of Deep Sky Derelicts starting tactics and team composition and to get players off to a good start. The second part of the guide provides a more in-depth discussion of defensive and offensive attributes and tactics. Finally the guide wraps up with a full skill point allocation for the recommended starting team through level 10.
I have personally played to the end game twice – once without any DLCs, the second time with just the station keeping DLC, and I currently have a level 9 party on its way to completing the game with both the DLCs up and running.
I have had many hours of enjoyment from the game and I hope you do too.
I would also like to thank the game devs for their efforts in creating this game and its DLCs.
Recommended Starting Party
When you start a new game by selecting Campaign from the start menu, you are taken to a party selection screen. You get to choose the 3 types of characters that will make up your party. I recommend you choose a Leader, Scrapper, and a Miner (available if you have purchased the two DLCs – otherwise choose a Bruiser for the 3rd character slot.
This is shown in the screenshot below.
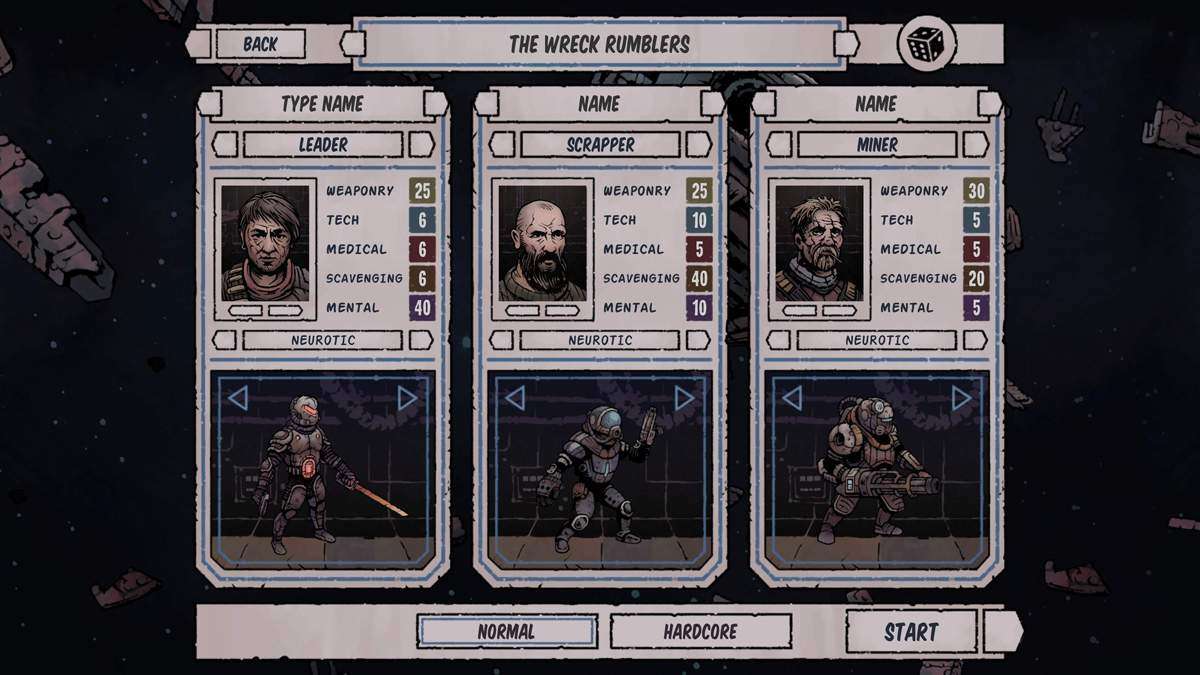
Note that you can change each character’s picture by using the arrows underneath their picture. Below the character’s picture arrows you will see a starting character bonus trait – in this case it is Neurotic for each character. Neurotic gives the character +2 initiative which helps you characters to act first when in combat.
Give each character a name if you don’t like their default name, then pick a name for your party by using the arrows at the stop of the screen. Then go to the bottom of the screen and make sure Normal is selected then choose START when you are ready to begin adventuring.
Hangar Layout
The Sub-Governor
Next you see a screen where you have a chat with the Sub-Governor about why you need to work hard investigating derelict spaceships and to ultimately find the Mothership.
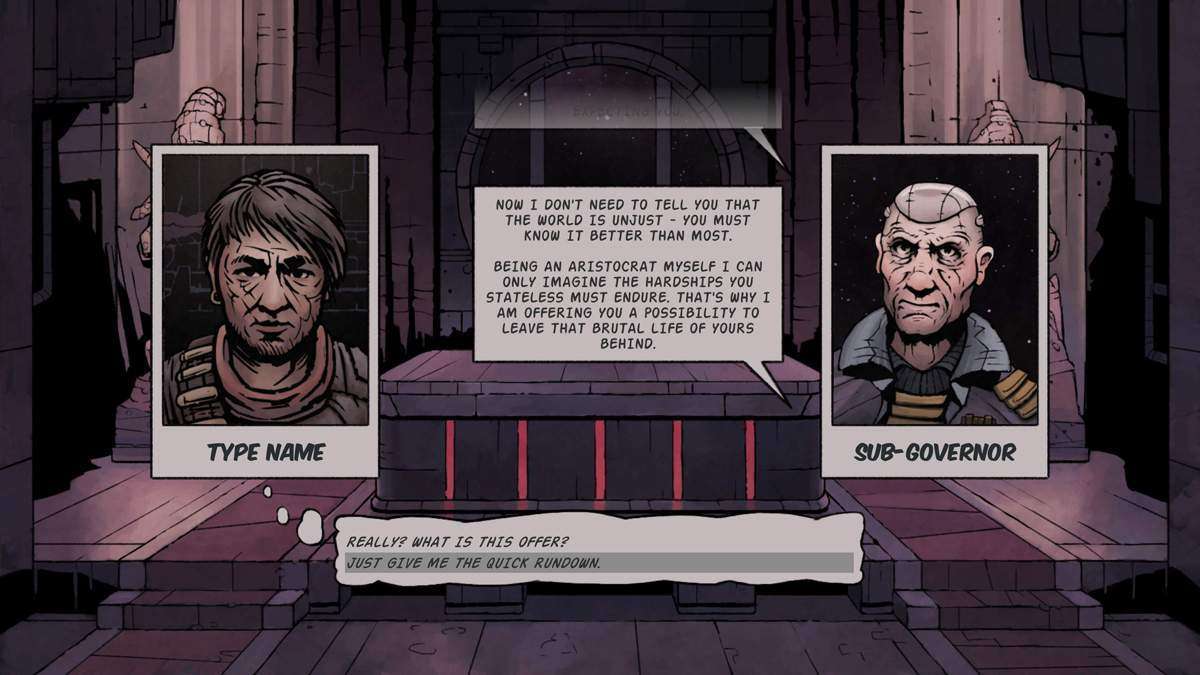
So once you work through this dialog you will be dumped in the hangar. – FYI You can click on any dialog to go to the next text or action if the screen is scrolling to slow for you.
The Hanger
There are Six clickable main areas in the Hanger.
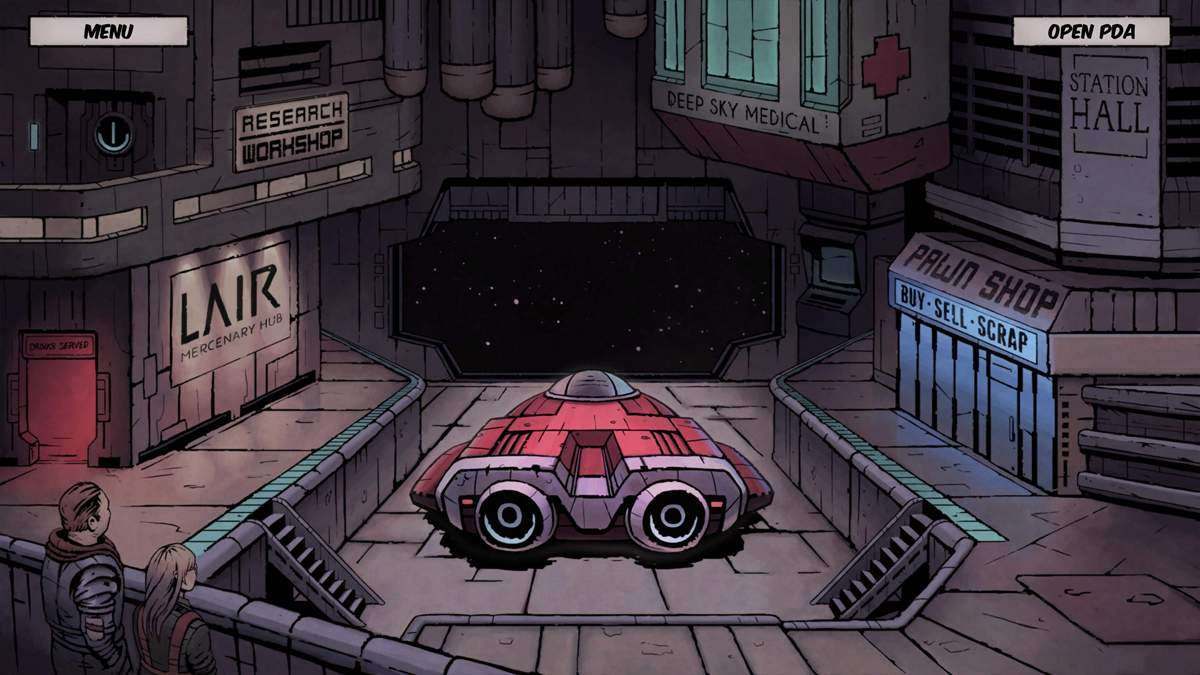
Starting at the top left of the screen.
- Research Workshop – This are contains team movement, scanning, energy, and inventory perks. All of which you must buy with the money you make off of selling loot and completing contracts.
- Lair/Mercenary Hub – This area lets you accept contracts to complete for credits and once you complete them you will come back here to collect your payment. You should check in here often as new contracts are frequently posted. Note you should accept all contracts as your party should be more than capable of completing them. FYI – You can buy new team members here but as you are playing in Normal mode you can always load a saved party if your team is whacked.
HINT – Save often esp. before tough combats.
Top Right of Screen.
- Deep Sky Medical – Where you go to get healed up which of course costs you credits. There is also an Advanced Tab but I will leave that to you to play around with.
- Station Hall – Where the Sub-Governor resides. His only use is to open more wrecks to you as you complete the objectives in others.
- Pawn Shop – Where you buy and sell the loot you find at the wrecks.
Center Screen.
- Your Ship – Clicking on your ship shows the wrecks that are available to visit. NOTE – Wrecks are rated by level – with level one the easiest and ten the hardest. So visit the wrecks in difficulty order.
First Moves
You start the game with 1000 credits and the first thing you should do is spend them in one go.
From the Hanger screen click on the Research Workshop then click on Passive Scanning.
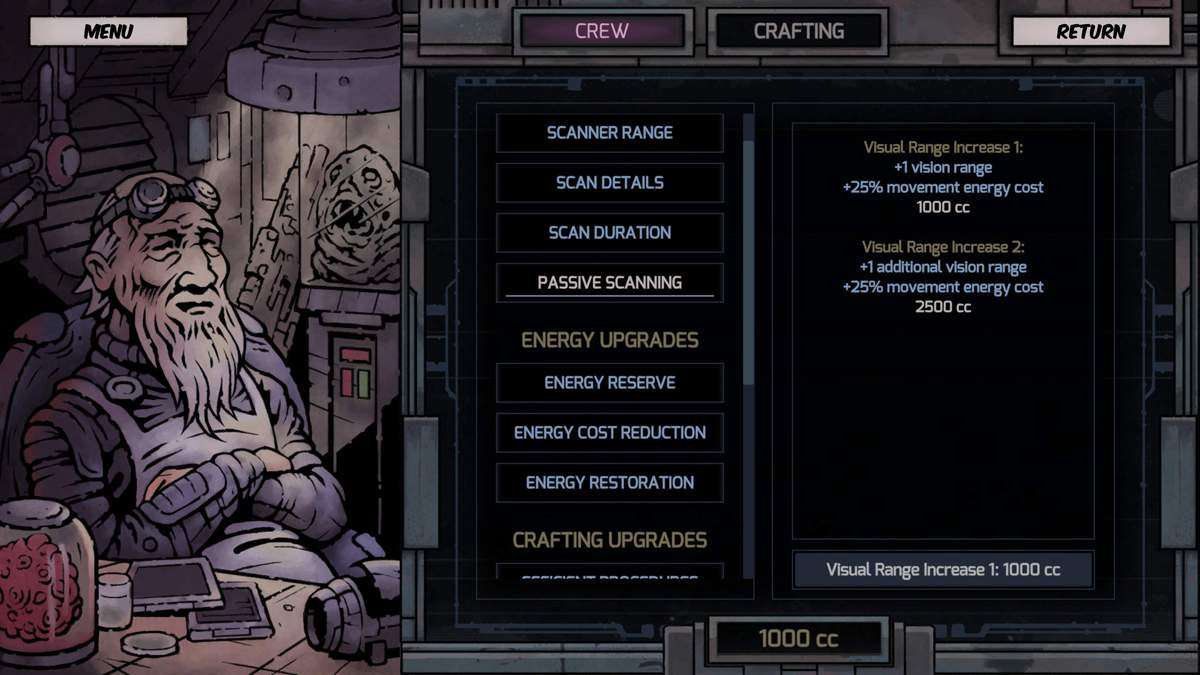
Click on the Visual Range Increase 1 button on the bottom of the screen. There goes all your money!!!
We do this because without having Passive Scanning you can only uncover map squares that you move into. You can see nothing around you unless you use energy to uncover map squares. Using up energy will cause you to go back to the hangar so you can refuel which will cost you creds. Passive scanning will uncover 1 square in all directions of your movement and it will quickly pay for itself in energy costs.
NOTE: It will always cost you creds to refuel at the Hanger. So you need creds for fuel in order to visit the derelict ships. The first trip to the wrecks is free so that is why you can spend all your creds before your first trip. After the first trip you always need to keep a buffer of creds for fuel.
Exit out of the Research Workshop and go back to the Hanger screen. Click on your spaceship.
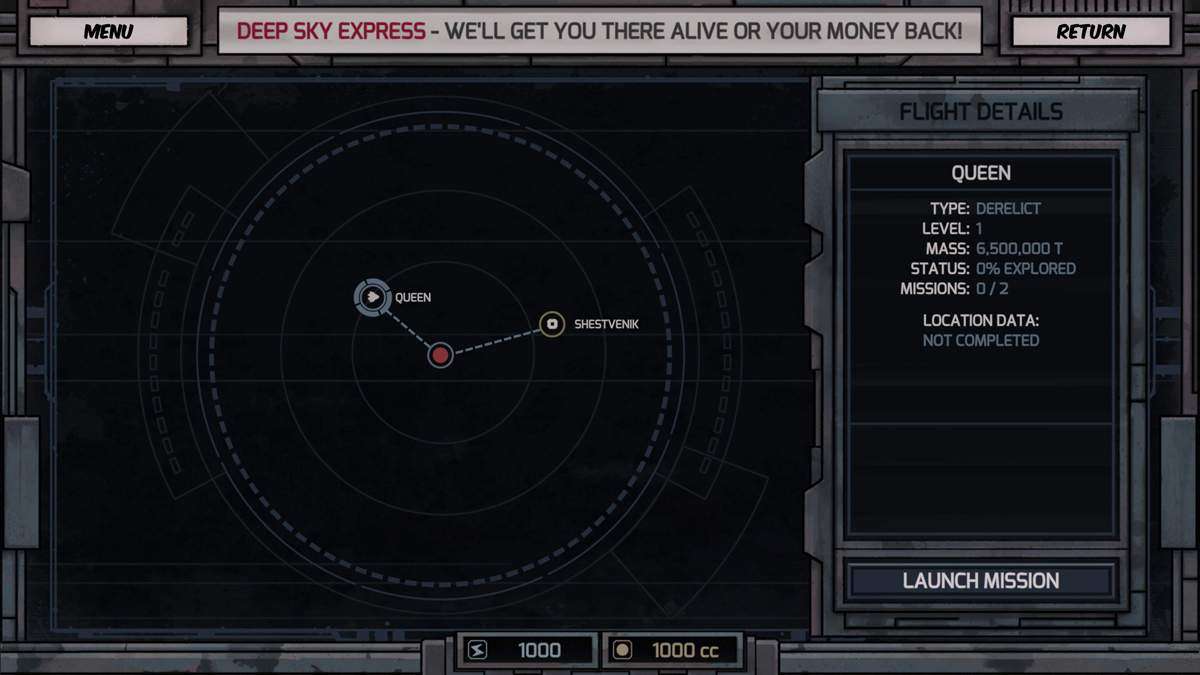
Your Level One Derelict will be selected for you (it will probably have a different name). Notice you have 0 creds and 1000 energy at the bottom of the screen. Also notice you have Missions 0/2 (two uncompleted missions) and the Status is 0% explored. Click on the Launch Mission button at the bottom of the screen to go visit the Derelict.
You arrive at the Derelict and you need to click on Scanner in the upper right corner in order to start moving around the ship.
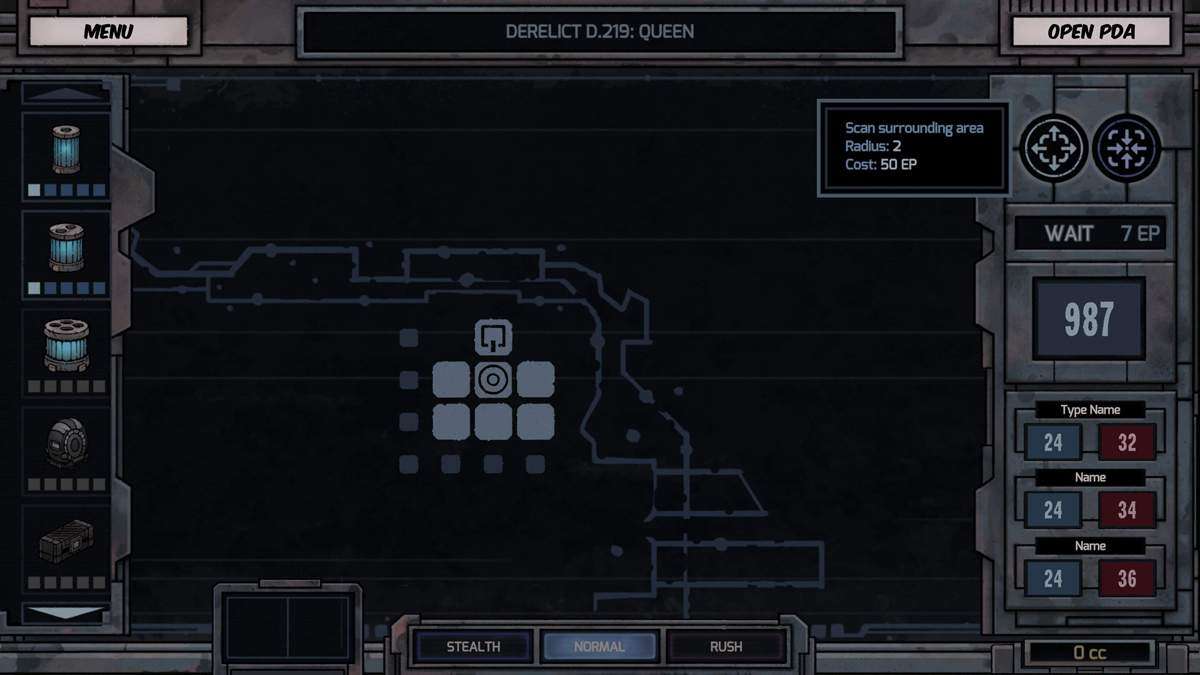
This screen shows one square movement from the drop off point. Notice the lit up squares in white all around the square the party moved into. This is what Passive Scanning does. Without it all those squares would be black/unknown.
Notice that my 1000 movement points of energy went down 13 points by moving one square. It costs energy to move, fight, complete certain quests, and to retreat to the extraction point. You cannot run out of energy or you lose the game. Always keep an eye on your energy and run back to base before it gets to 400. You may be jumped and have to fight on the way to the extraction point so you have to decide to go back to the Hanger often or you can use energy cells (you start the game with two) which you will find in the wrecks, obtain from combats, or buy from vendors.
Looking at the top right of the screen I have moused over the scanning button. This is saying it costs 50 energy to scan a square 2 blocks around where my party is located. I performed the scan to show what it looks like.
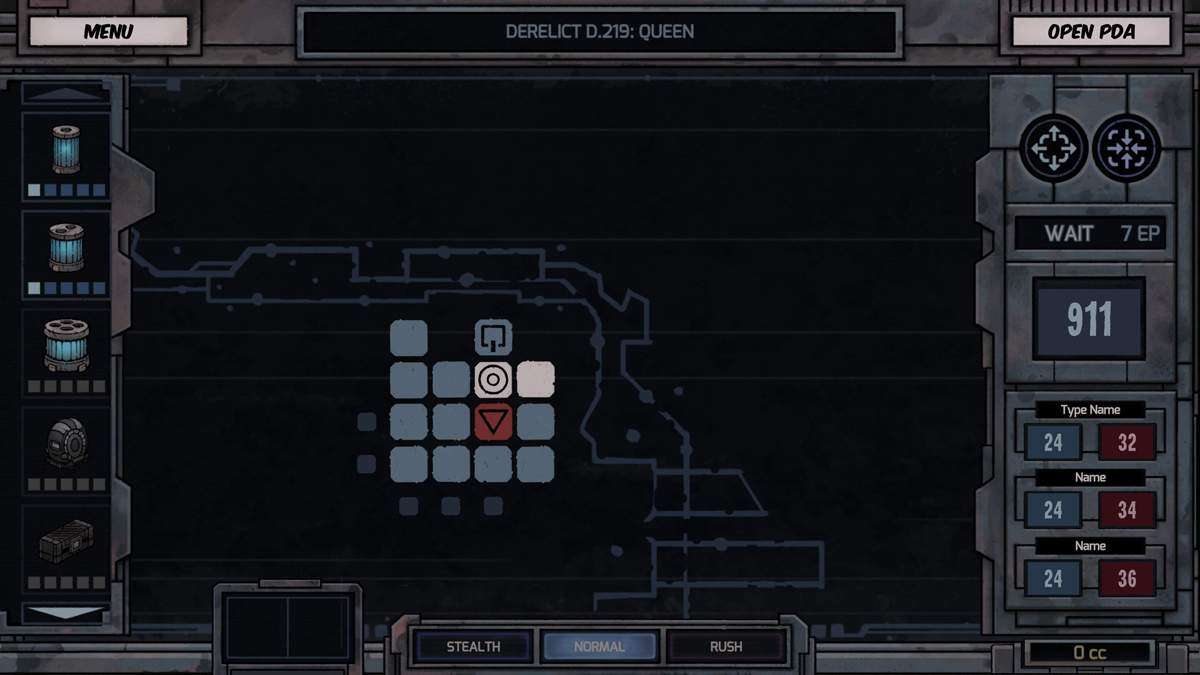
Notice my energy balance has gone down 50 + 26 (I moved twice since I took the screenshot) and now is 911. To the right of the local scan button is what I call the Far Scan button. Basically you can start a scan from the furthest point you have uncovered. This costs more energy (75) but it can be very useful in certain situations.
Below the two scan buttons is a wait button which causes game time to pass and costs you 7 energy. This can be useful if you are waiting for an enemy to leave a square. It costs you nothing to not move or to let the game sit whenever you want to go do something else. That’s one of my favorite features of this game.
Below the wait square is a big huge square showing how much energy is left.
Next you can see the energy shield (Grey) and health (Red) of your characters. Energy shield will usually replenish itself when you move out of a square after combat or when you’ve hit a trap. Health does not replenish unless your character plays certain cards, has replenishing skills, or you have utility items that grant health. Health is hard to keep up and will usually result in you visiting the Hanger’s Clinic and paying creds to get fixed up.
On the left side of the screen you can see you have two energy cells but these should only be used for emergencies and until you build a good stockpile you should not rely on them to save your butt. You can click on the energy cells or other items in this quick bar to use them without opening your inventory screen.
Combat Basics
How it Works
All combat actions take place with cards. Cards are generated by your character’s skill point allocation and from the gear you are using. Cards are not used in any other situation e.g. moving around the map/derelict.
However the game is not as straight forward as that, as the gear you are using and your skill point allocation gives your character inherent energy shield, health, armor, weapon damage, and other numerous offensive and defensive buffs that are not based on cards.
Min-maxxing your gear choices will be a big part of playing this game and will require many decisions between getting good gear buffs versus getting good combat cards.
Here is an simple example of a piece of gear and it’s associated card that was left over loot from a battle.

Here is that same piece of loot compared to the current piece of gear my Scrapper is currently using.
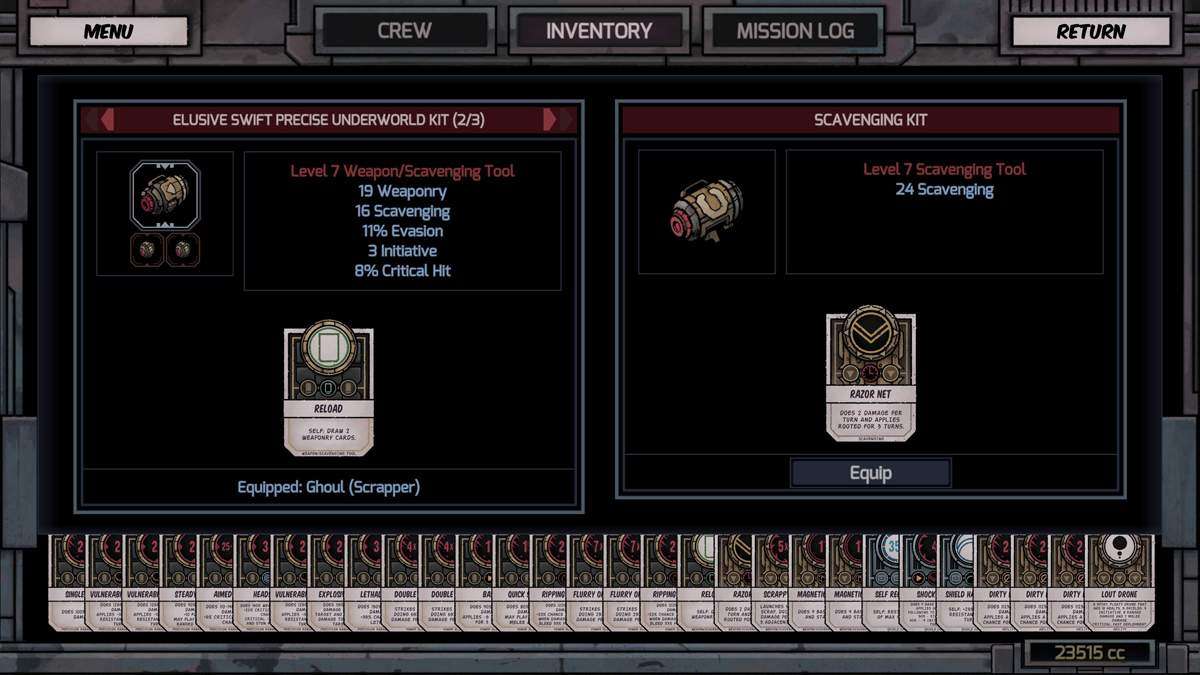
The stats of the gear piece appear under the name of the gear and the associated card from the gear appears below the gear stats. While the card that will be obtained from the Scavenging Kit – Razor Net (which roots the opposing character taking away their evasion and making them easier to hit) is much more useful than the other gear pieces card which uses up a turn to draw two weaponry cards; the stats on the first piece of gear far out weigh the benefits of having the Razor Net card. So I would mark the Scavenging Kit as Junk for a quick choice of Sell Junk at the Hanger Vendor or other NPC roving vendors.
This was just a simple example of making a gear choice, more complicated decisions continuosly occur throughout the game.
Important Defensive Attributes and Tactics
Note: It is very important you understand the concepts in this chapter as your offensive weapon choices will have to counter these defenses to inflict consistent damage on enemy NPCs.
My Level 9 Scrapper’s defensive stats shown in the left hand corner:
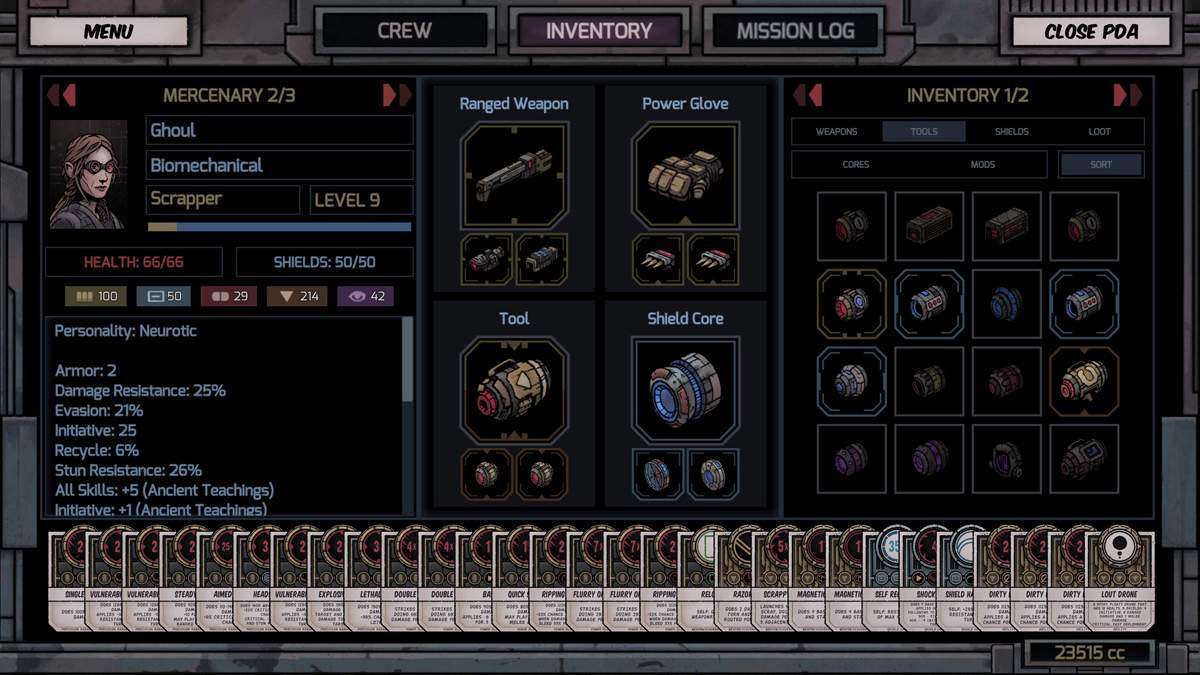
There are five main defensive stats you need to pay attention to:
- Health – Health is increased mostly from leveling up your character. Some vendor items will provide small amounts of health, the Medic character’s skills provide some health, but the Inventor is probably the best at generating health from skills but he has to be good because he is the only character in the game that can’t use a shield. Most characters therefore rely on shields to protect their health pools.
- Shields – Shields provide the main defense for most characters and come in two main flavors – Regular and Replenishing. A regular shield core has a set amount of shielding it provides, while a replenishing shield core has less than half the amount of shielding that a regular shield has but it automatically replenishes itself by a set percentage every turn. Shields can also have evasion and damage resistance which make them very powerful.
In addition to the main shield core, each shield has two mod slots. Shield mods can have all the characteristics shield cores have plus other defensive and offensive attributes.
CAUTION – I typically do not recommend using shield mods that have offensive attributes. If you believe your character is sufficiently beefed up, and a juicy offensive shield mod comes along, then you have a decision to make.
Here’s an offensive shield mod that I’m using on my Level 9 Scrapper – couldn’t pass it up.

- Evasion – Evasion is an attribute that allows your character to avoid being hit. You will become very familiar with evasion because the NPC enemies usually have some and your wonderful planned attacks will wiff by them and not hit anything due to the enemy’s evasion roll. Evasion is found in character traits, combat cards, and gear. Needless to say the more you can get the less your character will take hits.
- Damage Resistance – Damage Resistance (DR) determines how much damage your character takes when hit. If you have 25% DR and you are hit for 20 damage, you will only have 15 points of shield/health reduction. DR can be found in character traits, combat cards, and gear. More is better.
- Armor – Armor is a point for point damage reduction. Player characters have no armor and must accumulate it from character traits, combat cards, and gear. Armor is most effective at mitigating numerous small hits, which some of the NPC enemies will use. Armor for most characters is hard to accumulate, but you will come to understand it’s value when one of your favorite multi-strike skills does no damage to enemy NPCs.
Important Offensive Attributes and Tactics
What to do? What to do?

In addition to your weapons and skills being able to counter shielding, evasion, damage resistance, and armor, the following offensive characteristics are worth focusing on:
- Initiative – To put it simply, initiative allows your characters to attack first. This is very important because it allows your characters to apply stuns, mental effects like confusion, and miss chance to the enemy NPCs which will cause them to not hit your characters or apply the same turn skipping attacks to your team. You might even be able to kill some of them before they even get a shot off.
No matter how much initiative you have the enemy NPCs might have more than you due to skills and card attacks. If your characters are not consistently attacking first you have too little initiative. Prioritize initiative in your characters’ skill selections and gear as needed. - Lethal Hit Chance – This is a weapon trait that shows as a percentage on weapons and weapon core mods e.g. 5% Lethal hit. This attribute is most useful when you have attacks that do multiple hits like automatic fire, wild pummeling, flurry of strikes, scrappy bomb, etc. It is also useful during the Leader’s Psych attacks. It can be very satisfying to take a heavy hitting enemy down in one hit, but if you feel you aren’t getting results then don’t be afraid to replace it for something else.
- Prioritize attacks that cause the enemies to skip a turn or to miss you with their attacks – Stunning, psyching, and applying miss chance are great opening attacks. The most powerful types of these attacks are usually obtained through character skills, for example the Leader with the Psycher Specialization has several attacks that confuse enemies which are good first attacks.
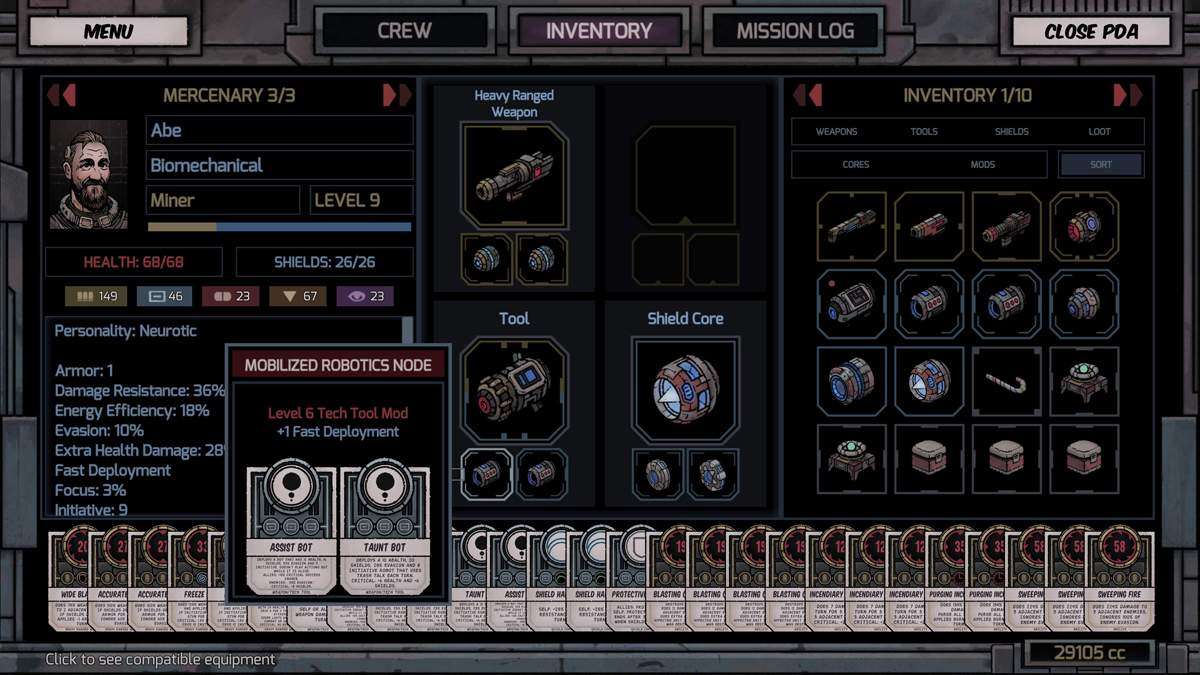
Throwing out a Taunt Bot (if you are using a tech tool) is a good first turn move but remember it will not activate until the second round unless you have the fast deployment skill on your gear or as a character trait, or you get extremely lucky and get a crit when you throw it. Another good bot to throw is an Assist Bot which reduces the enemies evasion by 33%. Bots are most useful in the early to mid game, but if used with fast deployment they can remain useful to the end game.
- Status Attacks – These attacks include elemental attacks, added shield damage, bleeding, acid, dirty/radiation attacks, etc. These attacks are useful for causing Damage Over Time (DOT) effects to enemies. Consider as an additional attribute when choosing a weapon or weapon mod. You can also use grenades or bombs that have many of these effects.
- What not to do !!!! – Generally speaking any action that takes two turns to complete is a bad move unless you have another character throwing a disabling attack in the same attack round. Defensive card play should only be used if a character is in danger of large health loss or dying, again preferably used when another team member is keeping the enemy NPCs restrained or inhibited. Cards that increase offensive or defensive capabilities should also energize the player character so that no turns are lost preparing for something that can only happen on another turn.
Here is a screeny of a level 7 Miner Gun – Note the Stagger (card loss), DR penetration, and the Cryo damage. Stacked multiple damage effects on a weapon are very useful.

Leader Skill Point Allocation with Psyker Specialization
The Leader with Psyker Specialization excels at mental attacks which cannot be evaded and also confuse enemies. Enemies affected by confusion will skip their turn, or attack another enemy in their party, or attack your party (however it does seem like these attacks have a lower hit chance).
As the Psyker can gain up to 7 Initiative with his Firestarter skill, he is very formidable as a first round attacker that can apply confusion to enemies. This makes the Psyker very strong through the late mid game, however moving into the end game his attacks are over-shadowed by other characters’ heavy hitting attack skills.

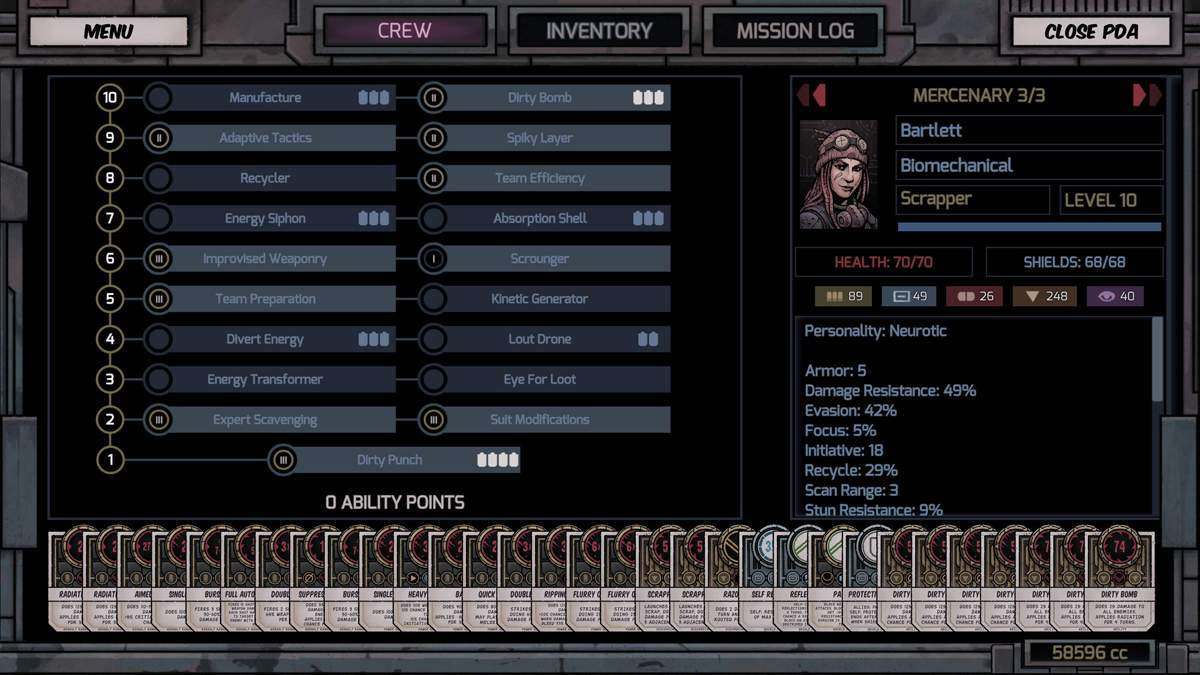
Scrapper with Tinker Specialization
The Scrapper with Tinker Specialization excels at card control for themselves and their teammates. They also have very good defensive skills. Although they are somewhat lacking in offensive skills, they can have some descent attacks if equipped with appropriate gear.
Surprisingly when this character hits level 10 all things change as their dirty bomb skill becomes available. This skill is one of the best attacks in the game and pretty much devastates all enemies.
Miner with Demolition Specialization
The Miner is in my opinion the most devastating character in the game. His attacks can ignore evasion, devastate enemy armor and damage resistance, and his freeze attacks can one shot most enemies in the game.
He also has very good defensive stats, so he is hard to hit and kill. The only problem is to use him you have to purchase the New Horizons DLC. The DLC is reasonably priced and includes other additional content so its a no-brainer purchase.

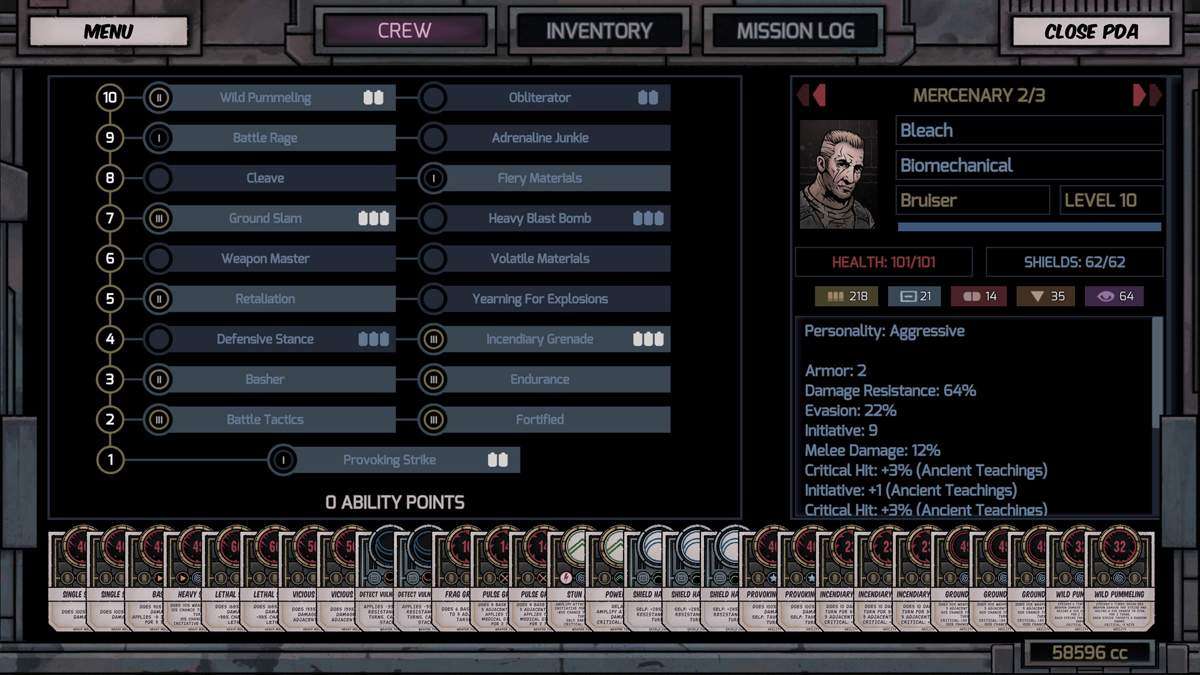
Bruiser with Demolition Specialization
The Bruiser is another very powerful fighter that excels in stunning enemies. It also seems to me that he gets more weapons and mods with the lethal hit attribute than other characters and he can make good use of this with his area attacks.
He is a very good fighter but he doesn’t have as many skill and damage perks as the miner. If you haven’t purchased the New Horizons DLC then you definitely want the Bruiser in your party.
Be the first to comment