
Useful stuff I learned from playing this game from before it was released on Steam.
Tips, Tricks and Life Hacks!
Create a More Beautiful Pirate
When creating a character, the game offers some options of premade pirates. You can press Page Down to receive a new batch of pirates and repeat this until you find the pirate that’s perfect for you. If you’d like to save one of the options you sort-of liked so that you can compare it with future options, press 1 to favorite it and stop it from being replaced by new pirates when you press Page Down.
Game Settings to Adjust
Knowing where all your crewmen are
Make sure that the option “Show Crew Status Tags” (4th option in the Accessibility Options menu) is turned on. Not only you will be able to see where your crew men are at any given time, but small icons will also show what they are doing. This is one of the most useful options in the game!
Stop your enemies from hearing you talk
Turn on the Push To Talk function in the Audio Options menu so that you only speak within the game if you have a certain key pressed (by default, it’s Alt). Never leave your microphone open. It not only bothers other players around you, but gives away your position and allows your enemies to hear all your tactical conversations during a battle!
Grab objects more easily
You normally need to hold the F key to grab an item. However, in the Accessibility Options menu, you can turn on the “Reduce hold to interact” option so that you only need to press and release the F key once to grab an item (sadly, you still need to wait the same amount of time as holding the key; this is just more convenient).
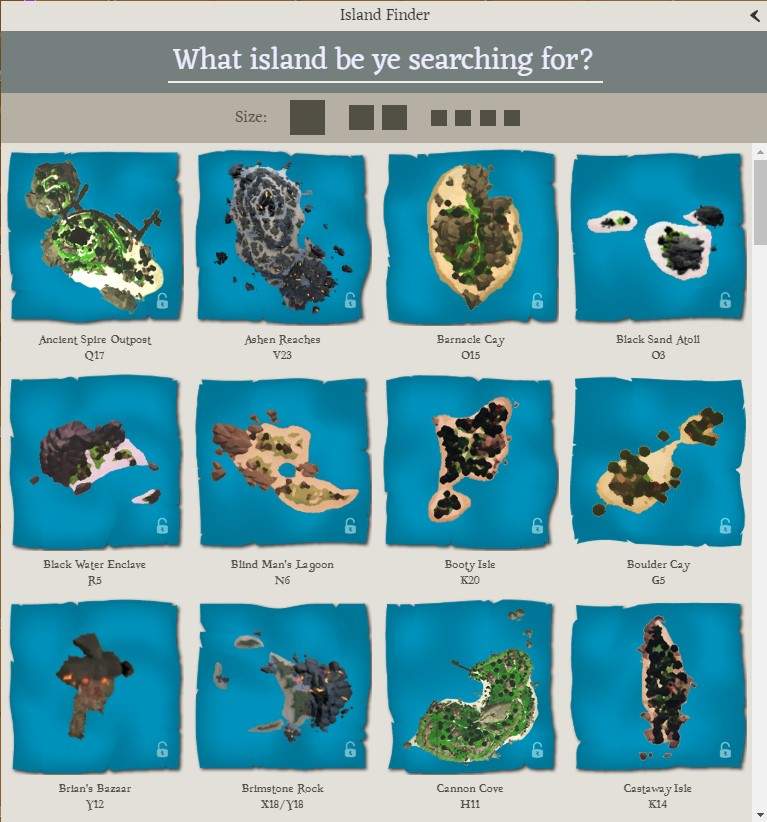
Use the island search function to find a treasure island
Your treasure map tells you to go to Chicken Isle, you’ve already spent 5 minutes looking at the big map in your ship, and you still can’t find that motherhugger? I’ve been in that situation too. Luckily, there is a better way to do this!
- I present to you the Interactive Map!
You just need to type “chicken isle” in the search option and choose it from the results and it will show you where the island is. In case your treasure map consists of just a picture of the island without its name, you can use the islands list (third button in the menu) to find it more easily.
P.S: Rhe map is fan-made. Despite the company being named “Rare Thief”, it has nothing to do with the game’s developer Rare.
Dig much faster with the shovel
When you dig, as soon as the shovel leaves the ground, quickly press X twice and left-click to dig again. This will store the shovel and pull it back up again, canceling the shovel’s normal animation and allowing you to dig again almost instantly. It might take a bit of practice to get used to this technique, but it’s very much worth learning.
Count your steps better during a treasure hunt riddle
Grab your compass and hold the left mouse button to put it against your face. This will allow you to count the number of steps with much more precision.
Move a lot faster through water
With your sword equipped, hold the right mouse button to block with it, walk to the edge of the shoreline (just before you effectively get into the water) and hold the left mouse button why you’re blocking to charge a lunge. If done correctly you will be thrust forward, essentially running on the water’s surface like if you were Jesus when he’s in a hurry. This technique, which I call “sword lunge thrust”, will save you hours of your life during your career in the game, and should be used whenever possible.
The above technique also works in reverse to quickly go from the ship to the beach. Position yourself close to the ship’s edge and do the sword lunge thrust. As soon as the thrust begins, jump. You will jump over the wooden barrier of the ship’s edge and fall into the water, boosting forward like a fish.
Note: To quickly go from the ship to the beach, you can also launch yourself from the cannon.
Get back to the ship faster if you fall from it
The mermaid that teleports you back to your ship only appears if you are a certain distance from the ship. If you fall from your ship and it is getting away from you, swim in the opposite direction so that the mermaid shows up faster.
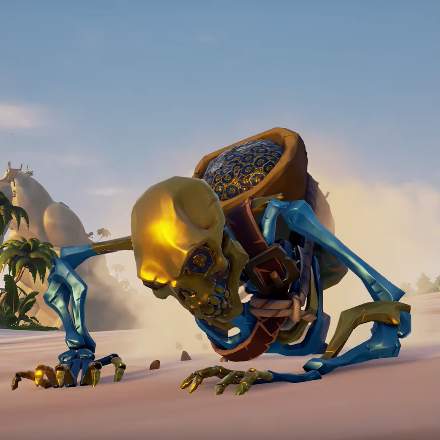
Earn coins bought with real-life money
In case you are on an island and you suddenly hear a noise similar to many coins hitting the ground, get ready to stop everything you’re doing and kill a blue-and-gold skeleton that is going to come out of the ground. Don’t let it escape! By killing it, you will receive Ancient Coins, which normally cost real money and are used to buy exclusive cosmetics.
Extend the maximum distance for speaking with another player through the microphone
When holding Alt, you can talk to other players through your microphone (assuming you followed my guidance for turning on Push To Talk in Game Settings to Adjust and your microphone isn’t open all the time). To extend the maximum distance other players can hear you from, equip the speaking trumpet by holding the E key to bring up the Equipment Radial Menu and changing to the second page with the F key. The trumpet will be in the 12 o’clock position. Hold the left mouse button to put it against your mouth and then hold Alt to speak much farther.
Refill the 50-bullet ammunition boxes
You know those mobile boxes you find on islands which contain 50 bullets? When those 50 bullets are spent, you just need to take the mobile box to any of the fixed/infinite ammo boxes (in your ship for example) and a “press F to refill” prompt will appear while you’re holding the box. Therefore, do not be afraid to take the mobile box whenever you need to kill many skeletons during a mission.
Always have a rowboat
Rowboats can be found on beaches. If it is stuck in the sand, you can push it towards the water by pressing F near its backside. By rowing it to the back of your ship and leaving the oars, a prompt will come up to press F to attach the rowboat to your ship. Try to have a rowboat attached to your ship whenever possible, because it allows you to save your boat in case the ship sinks and protects your crew from shark attacks.
In other words, if your ship sinks, take the rowboat with the loot to the nearest island, hide the loot, take the mermaid to your new ship, and bring the ship back to the island where you left the loot. This way, you will lose nothing!
Save floating objects
Objects floating in the water start to sink within 4 to 5 minutes. To avoid that, grab each object and put it back in the water with the X key to reset the timer.
Save the ship’s resources in case it sinks
Try to put as many consumable resources (wood, cannonballs, food etc.) as possible in Storage Crates (found on beaches), instead of leaving them in the ship’s storage barrels. This way, if your ship is sunk, you can take the crates to a nearby island, or put it in the rowboat, and recover the crate with your new ship, thus avoiding the loss of all your collected resources.
Tip: Take the Storage Crate with you when collecting resources on an island: this way, you can put all the resources in the crate and bring them all back to the ship at once, instead of doing many trips back and forth to the ship.
Sailing faster with the wind against you
If the wind is directly against the ship, putting sails completely straight/perpendicular to the wind (which in a real ship would make it go backwards), in this game it makes it go forwards, and faster than putting the sails completely to one side! Totally counterintuitive. The sloop, particularly, is the fastest ship of all if it is against the wind (assuming that all other ships are also against the wind).
Differences between sails
Many pirates believe that the main sail of the brigantine or galleon is the ship’s most powerful sail. While this is true, scientific testing by Youtuber kiwhen has shown that the other sails are only 20% weaker than the main sail. Thus, the difference is a lot smaller than previously thought.
Avoiding being hit by lightning
Avoid equipping your sword during a storm. This tremendously increases the chance of you being hit by lightning, which is normally bad, but great for trying to do the Fort of the Damned (see the Access the Fort of the Damned more easily tip under ADVANCED TECHNIQUES further down).
Put out a lit powder keg
A powder keg that has been lit (left mouse button) explodes in 6 seconds. A lot of people don’t know this, but in the meantime, you can grab the barrel and click with the right mouse button to put it out!
Move the cannon much faster
Use the WASD keys instead of the mouse to aim the cannon faster.
Launch players with the cannon more accurately
Remember that players are heavier than cannonballs. To shoot a player in a specific place, hit a cannonball there first to test, then aim the cannon a bit upwards (about 4 keypresses of W).
Cripple the enemy ship
Hit two cannonballs on the enemy’s mast and it will fall, greatly reducing the ship’s speed. You can also use a chain shot. It is not only 3 times easier to hit the mast with the chain shot, but it also knocks down the mast in a single blow. Unfortunately, it does almost no damage to the hull.
Note: a fallen mast can be fixed.
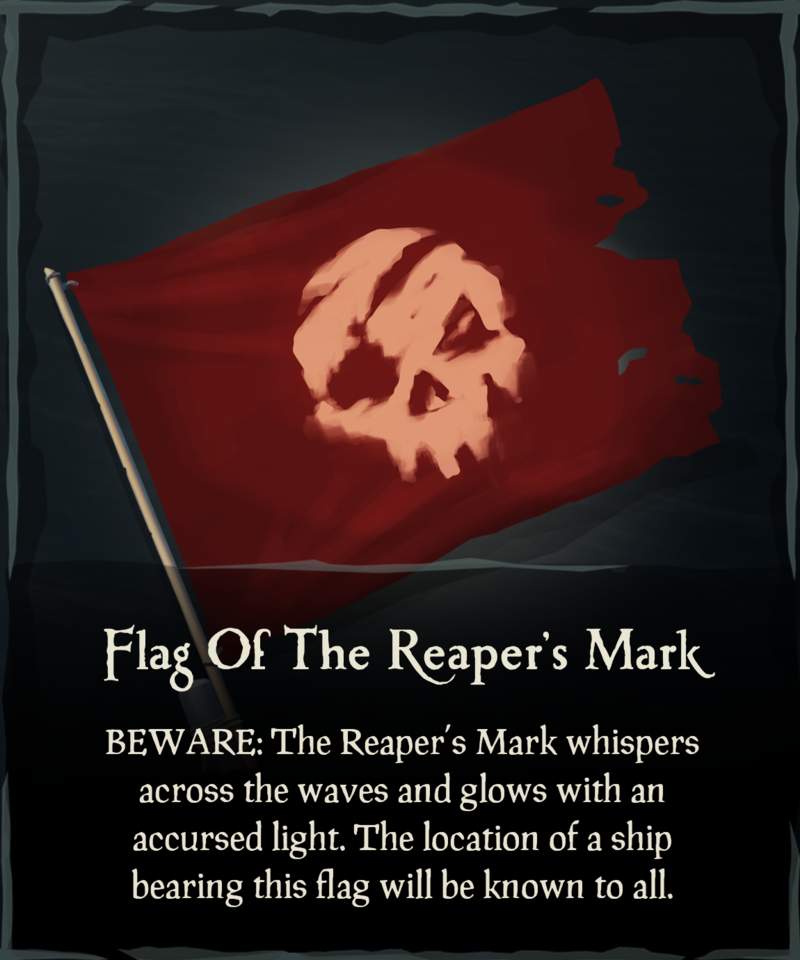
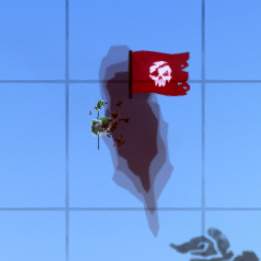
Show up on the map for everyone to see
Use the flag with the red skull. Many new players put this flag on top of the ship’s mast because they think it’s pretty, without realizing they are being revelaed to all other players in the server. Some players use this flag on purpose to show that they are not afraid of PvP, or to provoke other players into attacking them.
Reduce the spread of blunderbuss shots
The blunderbuss is a very powerful shotgun at close range, but it is very inaccurate, since the projectiles spread out a lot. To magically reduce the spread of the shots, make sure to always shoot with the right mouse button (aim) pressed.
Increase the precision of any gun
The above tip for the blunderbuss also applies to the pistol and the Eye of Reach (sniper rifle), which will not have perfect aim unless right-click is held.
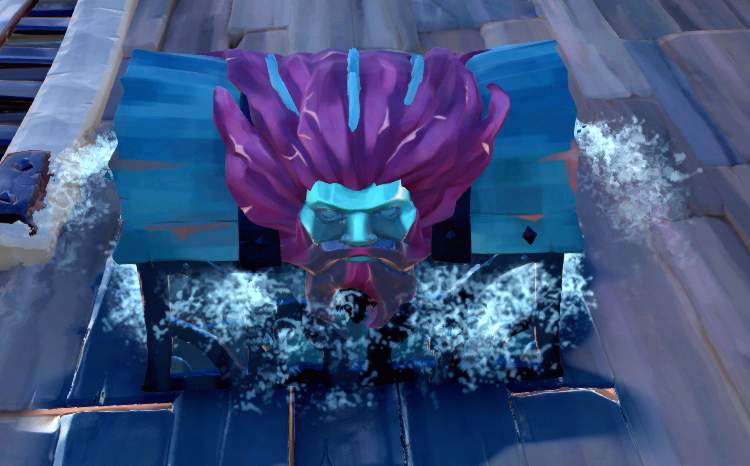
Obtain sapphires, emeralds and rubies
When walking next to beaches, you will sometimes hear an ominous humming sound. Dive in the water and you should find a cursed mermaid statue, which releases a gem when destroyed. However, you need to focus a lot of damage on it, because it quickly regenerates health if it stops being damaged. Also, being close to it causes you to take constant damage.
- Sapphire statue (blue): can easily be destroyed by a single player in good health with a sword.
- Emerald statue (green): can be destroyed by a single player, but it is recommended that they spend 5 aimed blunderbuss shots at point-blank range and finish the statue with a sword, or have food on them in case they’re only using the sword. If using the blunderbuss, get away from the statue as you reload each shot so that you avoid its damage over time.
- Ruby statue (red): Requires at least 2 players with food.
Gems can be sold to any company, selling for 1000, 1500 and 2000 coins, respectively.
Gain reputation in Hunter’s Call
The Hunter’s Call company has representatives only in tiny islands called Trading Posts. Advancing in this company unlocks new skins for your fishing rod and eventually for your ship. It is quite hard to earn reputation in this fishing company, because fish usually sell for little and are time-consuming to obtain. You can significantly boost your progress in this company by selling gems (sapphires emeralds, rubies) to one of its two representatives in Trading Posts (only one of the two will accept them).
Also, make sure to always sell your fish cooked, as it’s worth twice as much that way. Fish is cooked when the eyes turn white.
Get the game’s rarest achievement
In case you find a Meg that is white in color with slightly pink fins, STOP EVERYTHING YOU’RE DOING NO MATTER HOW MUCH LOOT YOU HAVE ON THE SHIP, make sure the ship is far from any island or obstacle, lower your anchor, and murder the sunnaovagun, because you will most likely only have this single opportunity in all your in-game career! Finding it is like winning the lottery, and you will earn one of the game’s most exclusive titles when you defeat it: Hunter of the Shrouded Ghost.
Note: if the Megalodon has a yellow fin, it is not the Shrouded Ghost, but the second rarest Meg: the Ancient Terror. Even then, it is worth killing at least once in your life: you earn 40 doubloons and the title of:

Consider forming an Alliance
When making an Alliance with other ships, your crew still earns the same amount when selling items (100% of the value), but you will also earn 50% of the value of whatever the other crew sells (and they will also earn 50% of the value of whatever you sell, without taking anything away from you). That means that forming an Alliance is usually very beneficial for both parties, as long as you can trust that the other party is not going to betray the Alliance and steal your loot just so that they can earn 100% instead of 50% off it.
To form an alliance, go to your mast and put up the “form alliance” flag. The other crew must do the same and put up the “accept alliance” flag.
Avoid lowering the anchor
“Parking” the ship by using the anchor leaves you very vulnerable in case of a surprise attack and is not recommended by 9 out of 10 experience players. Whenever possible, try to predict when you are going to stop the ship and raise the sails beforehand. The anchor should be used only in specific or emergency cases (quickly stopping by an island to grab something and continue on your way, quickly stopping because you saw loot floating, things like this).
Be careful when harpooning powder kegs
Harpooning powder kegs does not blow them up in and of itself; but any contact between the powder keg and the frontal hull of a moving ship will set it off. This includes if you tilt the harpoon sideways so that the keg accidentally touches the ship hull.
Therefore, to safely harpoon a keg, make sure the harpoon gun is straight and never release the keg back in the sea after harpooning it, grabbing it with your hands instead, without tilting the harpoon gun to the sides.
Pay attention to birds
In case you see a bunch of seagulls flying over an area of the ocean, it means there is Shipwreck there. These are random loot events created by the game itself; it does not mean that a player ship has perished there. Dive where the seagulls are and you will find the shipwreck, which contains random supplies and loot.
Tip: You can often find an air pocket in the shipwrecked galleon’s middle deck or in the Captain’s quarters, saving you from having to go up to the surface again to get air.
Tip when taking loot from the bottom of the sea
When grabbing loot from a shipwreck or a chest buried in the seabed, instead of grabbing it to swim to the surface, release it with X and watch it float itself up there. You can then swim up faster by holding Shift, saving your time.
Beware of the crying chest
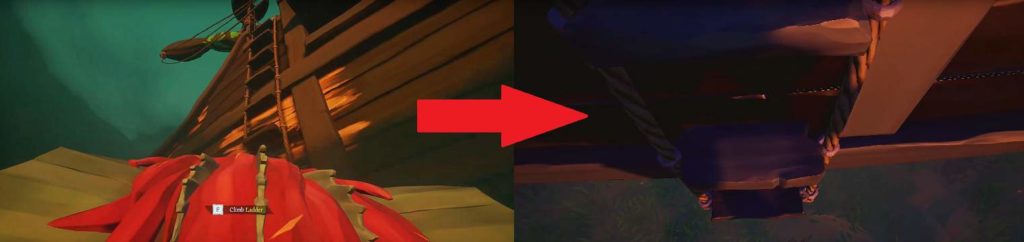
You will occasionally find a Chest of Sorrows on any island, which is relatively valuable (selling for around 3000 coins), but the problem is that it often starts crying, and that quickly fills your ship with water. It is very easy for the crew to get distracted with something else, forget to pay attention to the chest, and it ending up getting your ship sunk (believe me, I learned it the hard way!) To avoid this when it starts crying, ask a crew member to grab the chest and take it to the lower part of the ladder, almost touching the water. In this way the water will fall in the ocean instead of your ship. See the picture. The crew member must remain there with the chest for the duration of its crying spell.
Beware of the fiery chest
Another special chest found on any island is the Chest of Rage. This also worth about 3000 coins, but it continuously builds the heat and sets fire to everything around it if it stays more than 2 minutes without being in contact with water, or if it takes a lot of damage. Therefore, remember to wet it every minute or so with bucket water. In theory, you could leave layer of water in the lower deck and leave the chest there, but then the chest makes the water boil after a while, and it will continue to build up heat. The solution? Leave the layer of water, but put the chest on top of one of the barrels in the lower deck (thanks to Youtuber PhuzzyBond for this tip. Video of the tip in action).
Note: the chest’s blast only sets fire to stuff around it; it does not open holes in the hull directly. Thus, this chest is a lot less dangerous than a powder keg, for instance.
Beware of the stronghold keg
This variation of powder keg, which can be obtained as loot from Fort events, sells for 3000 to 6000 coins, but is extremely dangerous: if it blows up anywhere on your ship, even if it’s at the top of a galleon’s mast, will sink it practically 100% of the time. Think very hard about the risk-benefit ratio of taking this thing on your ship!
It is worth noting that during the Fort Nights event, which is every Friday from 7 PM to 7 AM BST, “Stronghold” items sell for 4 times as much.
This keg is sold to the Merchant Aliance, so having an Emissary level in this company will also increase the sell value by up to 150% more.
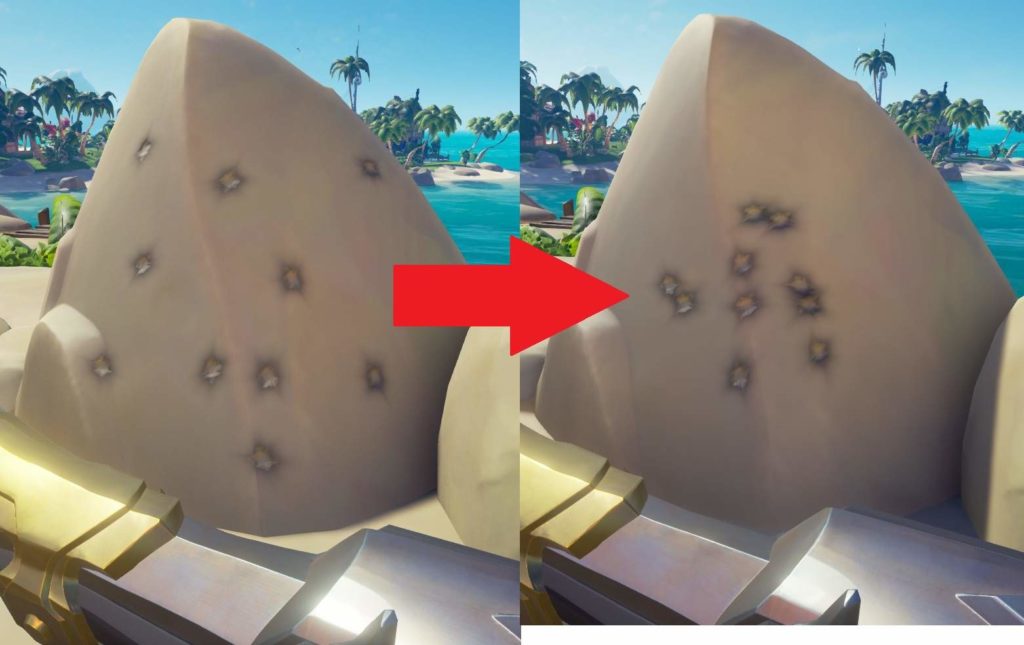
Protect a gunpowder keg from cannonballs
According to a test I’ve done, if you put a powder keg in the middle of a galleon’s lower deck, cannonball hits to the hull will not detonate it. It seems to be a better way to protect Stronghold powder kegs than putting it in the mast, as long as no one invades your ship and goes down to the bottom deck! See image.
Food and Cooking
The order of quality and rarity of fruits is: pineapple >>>> mango > pomegranate > coconut > banana. The pineapple heals you completely and you can bite it twice. The mango cures half of your health, and the banana only 20%.
Cooked meat, besides healing you, also fills up a circular health regeneration bar, which is automatically spent to quickly fill your health up again, as long as you stay a few seconds without taking damage. Cooking can be bothersome, but it’s worth it!
As a general rule, a piece of meat is properly cooked when it is entirely golden, without any pink part visible in the center. The sound of it cooking will also change to the sound of fat grizzling.
Forgetting meat on the grill will set your ship on fire after a few minutes. I recommend that you avoid beginning to cook when the ship is going to stop on an island soon, to avoid the possibility of forgetting the meat cooking, and then the ship sinking well everybody’s busy on the island.
Cooked fish is sold for about twice as much as raw fish. Try cooking fish before selling it to the Hunter’s Call in Trading Posts.
Fish is properly cooked only when its eyes turn white.
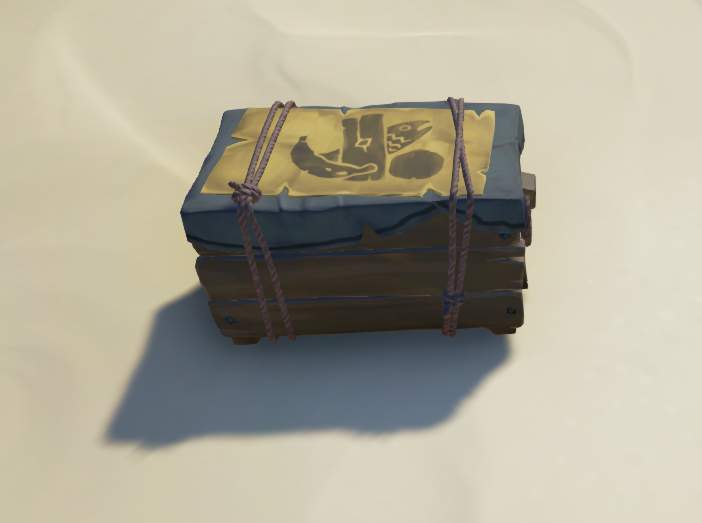
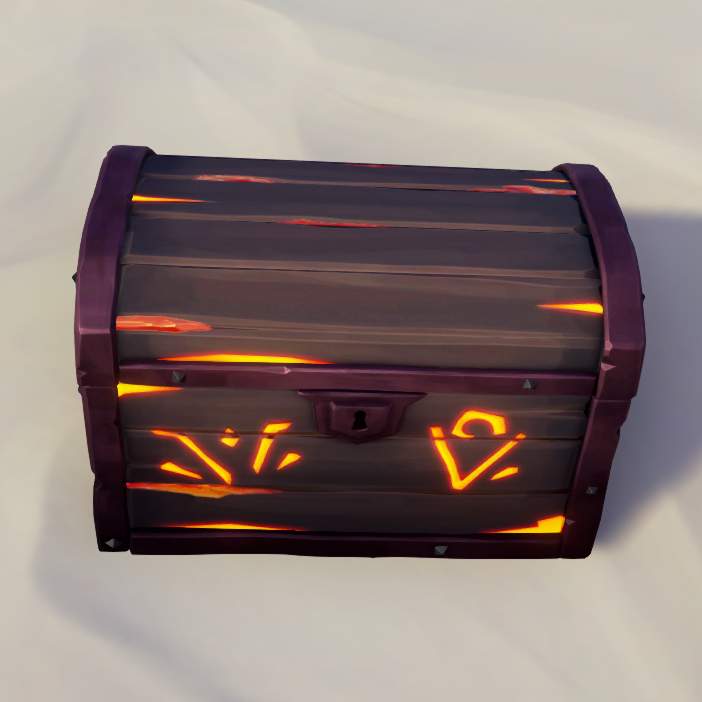
Ashen Chests
In case you see a skeleton on fire when passing through an island, it is likely an Ashen Guardian. It is worth stopping by to kill it and do the treasure map it gives you (it is usually fast to do because it’s always in the same island the skeleton was on) to unearth an Ashen Key or an Ashen Chest.
If you have the ashen key but not the chest, or have the chest but not the key, you can spend doubloons (the blue coins; not to be mistaken for Ancient Coins which are normally bought with real-world cash) with Duke (located in any Tavern) to buy a Voyage to dig the key or chest that you’re missing. After most of your crew votes on this voyage on your ship’s table, you will receive a treasure map for the same Outpost you bought the Duke’s voyage from. It takes less than one minute to do this “Voyage”, and selling the contents of the Ashen chest to Duke is much more worthwhile than selling the locked chest.
Ashen Chests are the specific type of chest like the picture below, and are not to be confused with Ashen versions of other chests (e.g. “Ashen Captain’s Chest”), which are simply more valuable versions of regular chests, are found in the Ashen Reaches area, and which cannot be opened.
Random Events
Recognizing events by the clouds in the sky
Ship-shaped cloud: A single Skeleton Sloop or a single Skeleton Galleon can appear anywhere and at any time to harass players, but there is a much more hardcore version of this event: The Skeleton Fleet. It is located where there is a cloud in the shape of a ship, and consists of several waves of Skeleton Sloops and Galleons. It is a lot more risky, but it has more rewards. Hint: try parking your ship next to an obstacle, such as a large rock. This will limit the amount of skeleton ships that will fight you at the same time, reducing risks.
Skull-shaped cloud with green glowing eyes: This is an active Fort. It consists of killing several waves of skeletons, culminating in a boss, who drops the key for the Fort’s treasure room, netting you between 12,000 and 40,000 coins in loot. If the skull changes to red glowing eyes, it means there are people doing the Fort: you can go there help them and propose an Alliance, wait for them to finish the Fort and sink them, hide yourself in their boat, etc. it’s up to you!
None of the two clouds above is in the sky: Believe it or not, but the absence of one of those two clouds above (Fort or Fleet) is a cloud by itself: it means that the Kraken will randomly attack one of the crews in the server! In other words, the Kraken only shows up when there is no Fort or Fleet active in the server. See below for more tips on the Kraken.
Skull-shaped cloud with red eyes the entire time (not blinking): This means there are people doing the Fort of the Damned, which is a special Fort located next to the Reaper’s Hideout. It is different from the other events because it can be voluntarily triggered at any time, as long as the players fulfill the prerequisites. This Fort is a lot more lucrative than the normal one, but it is harder to do, and tends to attract players that secretly wait for the Fort to end to sabotage the operation and steal the loot.
You can learn more about the Fort of the Damned in the ADVANCED THECHNIQUES section.
Note: the Fort of the Damned cloud has no influence on whether the Kraken shows up.
Megalodons (giant sharks) are totally random and do not have an associated cloud.
Events’ Difficulty
The difficulty of the Kraken or Megalodon is adjusted according to the ship’s size. For example, a Megalodon found by a sloop dies after around 10 cannonballs; a Meg that attacks a galleon takes over 20 cannonballs to be defeated. It is not clear whether the ship’s size affects the difficulty of the Skeleton Fleet or Forts.
Escaping from the Kraken
It is possible to escape from the Kraken’s black waters. In sloops and brigantines, turn 180 degrees and go back where you came from until you leave the black waters; this is the fastest way. For the galleon, it is usually best to sail in the direction that the wind is pointing to, and angle your sails accordingly.
Ensuring a Megalodon does not run away
Megs will go away if your ship is too close to an obstacle (e.g. rocks jutting out of the water) or an island. To fight a Meg, stop the ship in the open sea. Lowering the anchor is optional, but it stops the Meg’s attacks from potentially pushing your boat towards an obstacle.
Get the game’s rarest achievement
In case you find a Meg that is white in color with slightly pink fins, STOP EVERYTHING YOU’RE DOING NO MATTER HOW MUCH LOOT YOU HAVE ON THE SHIP, make sure the ship is far from any island or obstacle, lower your anchor, and murder the sunnaovagun, because you will most likely only have this single opportunity in all your in-game career! Finding it is like winning the lottery, and you will earn one of the game’s most exclusive titles when you defeat it: Hunter of the Shrouded Ghost.
Note: if the Megalodon has a yellow fin, it is not the Shrouded Ghost, but the second rarest Meg: the Ancient Terror. Even then, it is worth killing at least once in your life: you earn 40 doubloons and the title of Hunter of the Ancient Terror.
Sink a Skeleton Galleon more easily
Ask one of your crew members to invade the Skeleton Galleon, go to the lowest deck and keep killing the skeletons that are fixing the ship. This way, you will sink the galleon much faster and spend much fewer cannonballs.
Advanced Techniques
Ensure you know the techniques Digging much faster with the shovel and Moving a lost faster through water (sword lunge thrust) described previously in this guide.
Swimming faster while carrying an object
First of all, go to the Accessibility Options menu and turn on the option “Reduce hold to interact”. This will make it so you only have to press F once and wait a bit, instead of keep holding F, to grab objects.
To go faster while carrying an object in water, press X to release the object and quickly press Shift (to run) and then F (to grab). If done correctly, this will make your character swim a bit faster forward and grab the object again right after. Repeat the operation several times and you will get to your destination faster than usual!
180° turn with the anchor
If you turn the wheel all the way to the right or left and release the anchor, the ship will quickly turn almost 180 degrees. It is usually the fastest way to quickly change course if you’re sailing fast.
Not slowing down when charging the sword lunge
When holding the left mouse button to charge the lunge, you become slower for around 1 second. However, if you hold parry (right mouse button) before charging the lunge, you don’t move slower! Get used to always parrying first before charging the lunge, and this always helps with the sword lunge thrust technique.
“Bunny-hopping”
It is a specific technique that allows you to alternate between jumps and dodges, making you harder to hit with shots, or helping disorient your opponent in a duel.
To start, do a dodge by holding parrying then jumping (right mouse + space bar), and as soon as you land, do a normal jump. As soon as you land from the jump, do a dodge again, and so on. The sequence is: dodge, jump, dodge, jump, dodge, jump, etc. You can freely change the direction of each dodge or jump, as long as the next action you do when you fall is different than the previous action. It can take a while to get the muscle memory for this technique.
Video tutorial:
Invading enemies without using the ladder
The normal ladder climb to get on enemy ships is too loud and easy to spot. Good players will usually defeat you right when you reach the top. But there are better ways to board:
- If their ship is in open water with good waves, you can actually climb up using their own harpoon ropes or their rowboat
- You can get on your ship’s mast, use your sword’s special lunge move, and jump across to their ship
- You can also use your own cannon to shoot yourself over
These methods work much better than using the ladder since they’re harder to spot and defend against.
Acessing the Fort of the Damned more easily
The Fort of the Damned is one of the most lucrative activities in the game, but it requires a preparation process before it can be undertaken. It will be necessary to collect flames of 6 different colors from the dead man’s ferry by dying in 6 different ways. I will not explain in great detail how to do it, because there are plenty of tutorials on the internet.
What I will do is share some tips to make two of the hardest lamp colors easier to get:
- Pink flame: NORMALLY: Dying from PvP combat. EASIER WAY: Someone from your crew lights a gunpowder keg and leaves it beside you. When you die from it, it is like dying because of another player!
- White flame: NORMALLY: dying by taking a lightning strike to the face. Be careful not to die from the fire after taking the lightning bolt; in this case the flame you get will be red. EASIER WAY: keep your sword equipped, because it tremendously increases the chance of a lightning strike hitting you (I believe the developers’ idea was to make it act like a lightning rod).
Besides the 6 flame colors, and other ingredients necessary for the FotD is the Ritual Skull, which can be obtained in the following ways:
- Buying from Duke (in the Tavern) a Voyage to dig the skull up (only once a month)
- Sometimes as rewards from treasure maps left by Skeleton Captains, who randomly come out of the ground on islands
- Sometimes as loot from a Skeleton Ship
- inside a locked Ashen chest. See the ASHEN CHEST section of this guide for more information.
Be the first to comment