
Table of Contents
The Basics
Note: Credit goes to FunkyMoney
To start things off with the most basic of basic things, I’ll explain how the overall game functions.
Game modes
The game consists of two game modes: Classic Survival and Team Deathmatch (TDM)
Classic Survival- Spawn into a server, loot items, fight other players, get geared, get kills and survive as long as possible until the extraction zone appears, allowing you to leave safely with all your loot.
The point is, you gather loot and items and if you manually leave, you’ll loose your items hence you must get to the extraction zone (a small area on the map in which you have to stay in for 10 seconds in order to leave) and wait out the 10 second timer. Once you leave, you get to keep all your items in your inventory. The items can be sold and traded in main menu for in-game currency.
Team Deatchmatch (TDM)- 2 teams. Fighting each other. Fight the opposite team to acquire loot.
Main Menu
On the main menu you can see 4 things on the top of your screen.
Home- You could call it lobby, with your character showcased in the middle, friendslist on the right, lobby quadrant below it (shows how many players are in your lobby) and news about the game in the bottom left corner. To the top left you can see your Steam icon and the level (the levels don’t seem to work at the time of writing).
Servers tab- Shows the server list with most basic information like player count and gamemode.
Inventory- Here, you can see all the stuff that you collected and stored to the left and your character inventory in case you want to store something from a previous game. Items and guns can be dragged into the inventory quadrant and vice versa.
Trade- In this tab you can drag your items and weapons (prices written next to them) onto the trade tab if you want to sell them (put the items into the empty slots), if you want to buy anything make sure you have the money in your inventory otherwise it won’t work. Simply pull the item into your inventory and money will be taken from you. Don’t forget to store the rest of your money (if there’s any left) back into your inventory.
Lobby quadrant- Invite your Steam friends into the lobby, everyone needs to press ready and the lobby leader needs to press start, and you will all be spawned in the same spot on the map and will be able to see each other’s names when in close proximity (apx. 500 meters).

Survival
Here, I will explain the basic survival techniques.
Hunger- Hunger can be deadly. It’s slow but if you don’t eat anything for too long it surely won’t be beneficial for you. Try finding some food around, on the shelves, cupoboards and fridges. Most of the food you find will be canned, so you’ll be required to have a crowbar, hatcher or a can opener (simply drag the tool onto the can to open it), but you’ll come across various chocolates and other foods. Eating food restores hunger and gives you health and heals you.
Thirst- Thirst can be deadly too. You can find many sorts of drinks around, and it’s easy to find. Water, juices are very common and restore thirst aswell as give you more health. Keep in mind Wine, Vodka and Whisky make you more thirsty and make your temparature go up, preventing your body from freezing. So, if you’re thirsty, don’t drink those.
Temparature- Low temparatures are deadly in snow conditions. Almost immediately upon spawning you’ll start having frostbite. It starts fast and once you reach “Severe frostbite” you’ll start to die. The frostbite will start taking 5 hp every 30 seconds or so. Craft a campfire or find one in order to prevent this. As written above, alchocol helps but make sure you have drinks because you’ll be thirsty!

Crafting- Crafting is a part of the game, obviously. You can craft items by simply dragging the required items over each other. For example, campfire. Campfire can be crafted using wood, newspaper and a ligher/matches (there’s other alternative materials like oil), simply drag the wood over the newspapers and drag the ligher or matches over the item you just crafted, it will open up an interface that allows you to place the campfire, using left click. The campfire/matress has to be placed over a flat area.

Combat-Guns are simple to use. Right click to aim and left click to shoot. As long as you have the bullets, you should be good to go. Each gun takes its own bullets which you can check while holding a gun or while in inventory.
Backpacks- Backpacks can carry diffrent amounts of items depending on their size, a small backpack carries less than a big backpack. Each item has its own weight, and the capacity left in your in-game inventory can be seen below your inventory slots, expressed in procentage. If it says 64%, it means you’ve used 64% of your space, so find a bigger backpack, and if you have the biggest one, well, sorry.
Gear- From clothing to helmers, you can find all sorts of survival gear. Helmets protect you from taking damage but can be taken off, and diffrent sorts of clothing helps you with cold, Gear can be found spread everywhere on the map, and it is very common. Although, cupboards and torn down cabinets are almost certain to have some sort of clothing.

The Map
Here’s the map, and I’ll explain some things below it.
The marked spots on the map have been made by me and my friend.
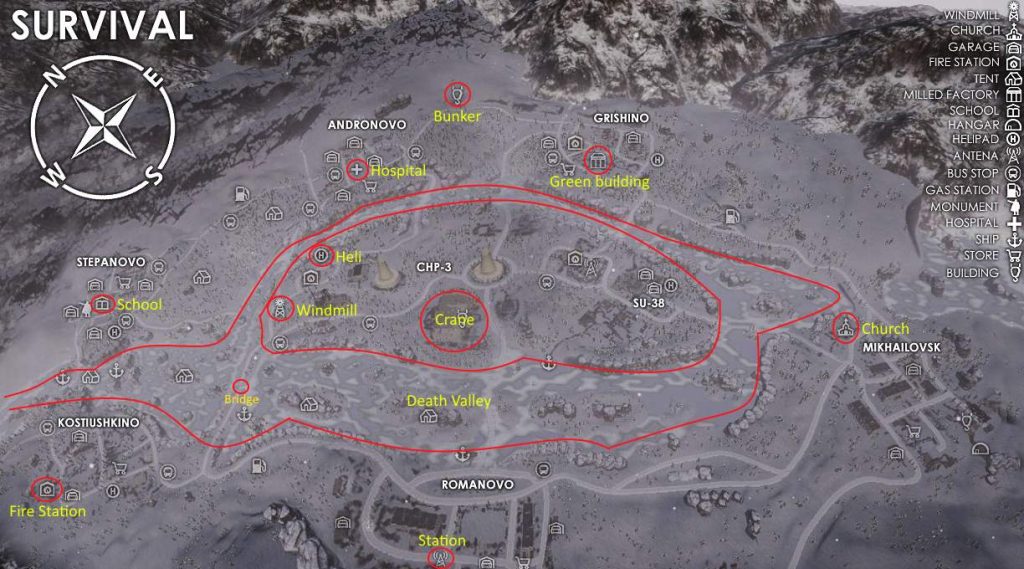
The map is really big and wide. It represents what is assumed is a Russian post-apocalyptic wasteland and it doesn’t seem to have a name. Although, many are calling it “Карта” which translates to “Map”.The map is set in the USSR. It consists of an island in the middle of the map, sorrounded by a frozen river and neighbouring villages and cities. I’ll describe some monumental buildings on the map below.
- The Crane– The crane is the industrial area located on the island, you can recognize it well, by a crane. You’ll also see 2 nuclear power plants nearby, and that usually works like a compass to find the crane. It’s hectic, it’s a spawn area and it has decent loot, but usually already looted.
- Heli pad– Where helicopter spawns, sometimes there’s people, so watch out.
- Windmill– Easily recognizable, a small windmill stationed on the island, used as compass to find other places.
- The bridge– A small, tiny bridge located on the Death Valley or the frozen river. It’s usually very hectic there, with lots of group fighting for loot and lot’s of dead bodies. No loot spawns there.
- Death Valley– A giant area on the map, rather than a town or a city. It’s one of the most busy, if not the bussiest part on the map. It’s a ravine that streches around the island, on parts its wide, and on the other parts it’s more narrow. If you stay too long, you’re almost guaranteed to die, as there will most likely be people shooting from both sides of cliffs. Make sure if you travel, travel alongside the cliffs or by taking cover on the small islands on the river. Loot-wise, not much loot except the stranded boats have some loot in the cabins.
- Church– Represents the icon of the town of “Mikhailovsk”. A medium town located in the south-east of the map.
- Green building– It’s a tall, big green building located in north-east of the map. It can be seen from miles away and it’s very distinctive. Used as compass to other places, but the building itself is used as a camping spot as it is very high up and it’s located in the town of “Grishino” which itself has a decent amount of loot.
- Bunker– A place to go. The most high loot spot on the map, located directly in the North. It can be found in an abandoned building, and in the building there’s ladders leading down to the basement. In there you’ll find a generator that you have to fill in gas, and find an elevator and press the button. Once you’re in, wait it out and you’re in the bunker with god-tier loot. Make sure you’ve put enough oil so you can get back. Also, look out for campers on the top and in the bottom.
- Hospital– One of the biggest buildings on the map, by area. It has a decent amount of loot and meds and it’s located in the town of “Andronovo” which also has a pretty good loot.
- School– A very monumental building located on the very west of the map in the town of “Stepanovo”. It has medium-tier loot.
- Fire Station– Well, a fire station in the south-west of the map, monumental and has good loot.
- Station– Used as compass to other things. That’s usually how you know you spawned in the very south, on the edge of the map.
Vehicles
Vehicles are an important part of the game, allowing you to travel fast through the towns, cities, forests and frozen rivers.
There’s many vehicles in Survival, and all of them require a battery and oil. You can fill the gas reservoir and place the battery at the car trunk, at it’s back. Also, it’s worth mentioning that vehicles have storage that might help you if you have too much loot!
Here are all the vehicles that are currently in-game:
1.) Jeep
Has no roof, very risky to drive but fast.
2.) Police Car
Spreading the law. Very speedy.
3.) Mini-van
Can hold lot’s of people, slower than Jeep.
4.) Truck
Can only hold 2 people, not so fast.
5.) Tractor
It’s a tractor. No description needed. Very, very slow.
6.) Car
Your regular car, can hold 4 people and is decently fast. (not actual representation)
7.) Helicopter
Considered the best vehicle in-game, requires oil, battery and a screwdriver to fix. Hard to control, but obviously can fly over anything. You can’t be killed inside of a helicopter and it can be used as an advantage. Spawns on heli pad.
Enemies/AI
In this game, you’ll encounter various enemies and AI throughout the map, all of them, except 1 are hostile. Differing from animals to vampires, there’s diffrent beings in Survival.
Here are all the enemies and AI, scaled from the least to the most strong.
1.) Scientist
Spawns in “The Crane” building, press E to interact, after you do this, the scientist will start following you and once you reach the extraction zone, and if the scientist is still with you and evacuated you will receive $2,500. You could also just kill him and get $500 straight away. He’s friendly and can’t fire back.
2.) Zombie
Spawns around cities and towns, it’s slow and easy to kill, usually has a hat and a hatchet.
3.) Vampire
Spawns in foresty areas, cities and towns. It’s really fast but also not so hard to kill. Makes loud noises when attacking and when it dies.
4.) Ghoul
Spawns around hangars and cities. It’s as fast as Vampire but deals more damage and is harder to kill. Looks like an alien.
5.) Wolf
Spawns in the forests and around city edges. It’s the easiest hostile AI to kill and it’s very fast, but gives up chasing quickly.
6.) Bear
Bears spawn in dense forests, usually in the very north and south, but sometimes spawn close to towns and cities. They aren’t too fast but don’t give up easy and are hardest to kill.
Survival Tips
This part of the guide includes all the things that I did not mention previously, and I think are useful to know.
1.) Cigarette– You can connect cigarette butts to newspaper and get the cigarette. Once your temparature goes to the lowest possible point and you’re dying from frostbite, you can use the cigarette to make your temparature go up to 36-37 Celcius degrees instantly.
2.) Screwdrivers– They are very useful, so don’t throw them away. They can be used to open cans and fix a helicopter.
3.) Injection and pencilin– Injection and pencilin can be crafted into one, an empty injection will be filled with pencilin and will boost your health.
4.) Listen to the AI– A very basic tip. Listen to the AI, if you hear them die or scream, it means there’s an enemy nearby revealing their position, or perhaps something else?
5.) Climb the rocks– If an AI is attacking you, find small rock formations and climb on them, the AI can’t hurt you and will most likely instantly loose interest.
6.) Helicopter safety– Entering a helicopter can save your life. While in helicopter cockpit, you can’t be shot or killed, use this to your advantage. If you’re in a helicopter, you’ll also be able to have a wider point of view, meaning you can see and ambush your enemies.
7.) Advanced campfire– This item looks like a furnace. People craft them and leave them around, they waste wood much slower. Use them to your advantage.
8.) Airdrops– Not much to say, look for airdrops as they give plenty of loot. But, be sure you’re careful as it attracts many players.
9.) Building roofs– Building roofs are loot rich, especially military crates and guns.
10.) Safes– You’ll find many keys around the map, and they have a use. They open safes that contain money, guns and other loot. So if you have spare space, save your keys, Sometimes keys will spawn in the same building as the appropriate safes.
11.) Hangar doors– Hangar doors can be blown up using dynamite that can be found or crafted. Place the dynamite on hangar doors and watch it blow, Inside you will find lots of loot.
12.) Window jump– You can jump on the window frames and crouch at the same time, allowing you to go through windows. This can be used to enter the buildings aswell as escape them.
Be the first to comment