
v1.6 Explanation of mechanics behind car design and research.
Table of Contents
Terminology
Please please please reference design and research correctly! I have seen much confusion from people using Research interchangeably with Design. They are VERY different in what they do and how they work, so please save people the headache and refer to the correct action if you are talking about one or the other.
Design-The process by which you send your engineers off to a room to figure out improvements for your CURRENT seasons parts, which will allow you to manufacture v2 and v3 of parts you put through design process.
Research-The process by which you send your engineers off to a room to figure out improvements for NEXT seasons parts. Gains in research do not apply in ANY way to the current season, only to the parts you start with next season. You gain these bonuses automatically at the start of the new season, you do not need to design or manufacture new parts.
What Goes Into Stats and Performance
Your cars overall performance is broken into the following listed stats:
- Top Speed
- Acceleration
- Cornering (low/medium/high speed)
- DRS (top speed/acceleration)
- Dirty Air Cornering (low/medium/high speed)
- Brake Cooling
- Engine Cooling
We also have 6 different parts (plus engine, but I will not cover that as you can do nothing about that but change suppliers)
- Chassis
- Front Wing
- Rear Wing
- Sidepods
- Underfloor
- Suspension
Each part has 3-6 stats that determine the cars performance, some of these stats are used across multiple parts
- Drag Reduction: Mainly raises Top Speed and Acceleration (normal+DRS), but also helps with Cornering (normal+dirty)
- Downforce(low/medium/high speed): Mainly raises cornering (normal+dirty), with slight harm to top speed
- Airflow Sensitivity: Mainly raises Dirty Air Cornering, slightly harms normal Cornering
- Airflow Front: Mainly raises Dirty Air Cornering, but also helps normal Cornering, slightly harms top speed
- Airflow Middle: Mainly raises Dirty Air cornering, but also helps normal Cornering
- DRS Delta: Mainly helps DRS Top Speed and Acceleration, slightly harms everything else
- Engine and Brake Cooling: Mainly helps the respective cooling, obviously
Breakdown of what parts have which stats:
| Stat | Chassis | Front Wing | Rear Wing | Sidepods | Underfloor | Suspension |
| Drag Reduction | x | x | x | x | x | |
| Downforce | x | x | x | x | ||
| Airflow Sensitivity | x | x | x | |||
| Airflow Front | x | x | x | |||
| Airflow Middle | x | x | ||||
| DRS Delta | x | |||||
| Brake Cooling | x | x | ||||
| Engine Cooling | x | x |
There is one final layer to this cake. Every single stat in every single part has a rating that is unique to it. IE: Your drag reduction for Rear Wing is separate from your drag reduction in Sidepods. So if you are trying to improve stats in one part, they will not transfer in any way to another part. The way the stats within parts are determined is additive from several factors listed below:
- Base Value: This only applies to the 3 Downforce stats, each has it’s own starting value
- Expertise: This is the primary value and will comprise the majority of your parts final stat rating
- Head of Aerodynamics/Technical Chief: Both of these staff members will add .05*relevant skill rating to the final rating, for a maximum of +10 if both are maxed out
- Wind Tunnel/CFD Simulator: If you use CFD or Wind Tunnel hours on a part Design, depending how upgraded your buildings are and how many you use, it will add an amount to the final rating. This does not appear in Research (more later)
- Suspension Simulator/Car Part Test Center: Brake and Engine cooling get a boost from these buildings depending how upgraded they are
- Design Focus: This is going to be the primary…well focus of this guide as it plays an enormous factor in a lot of mechanics. This value can be positive OR negative. This does not appear in Research (more later)
- Research Benefit: This only appears in research, as the name would imply.
Parts Are Not Equal
Different parts have very different degrees of influence over the final performance ratings of a car. This is reflected in the cost of designing/researching the different parts, and the costs line up approximately with which parts have the most impact. In order, Underfloor-Rear/Front Wing-Suspension-Sidepods-Chassis. Below is an example of the Performance gains from one design run of each part with roughly equal gains in each part stat.
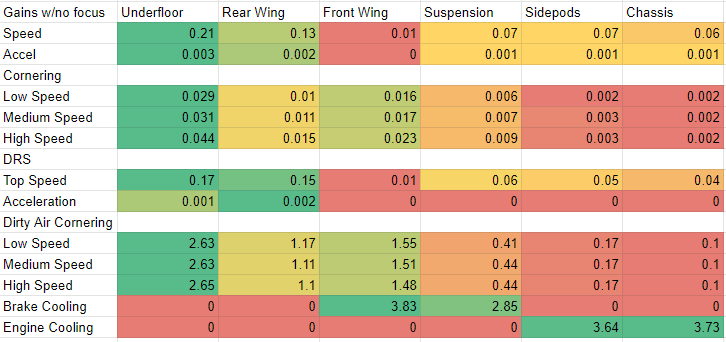
You can see Underfloor across the board gives the most increases in almost every single stat. Rear Wing and Front wing are about even, Rear Wing gives a lot of speed/acceleration gain, but Front Wing gives a bit more cornering gain. Suspension, sidepods, and Chassis give slight gains across the board but they are much cheaper and faster to design or research.
This is important to know because % improvements per part are nearly equal between all parts in this example, and CFD/Wind Tunnel hours would provide a similar % gain in relevant stats regardless of which part you invested them in. Essentially, you should never be investing those precious hours into anything except Underfloor, Rear Wing, and Front Wing. If you’re familiar with Formula 1, this is probably obvious because those are the primary components to a vehicle and where you really want to be putting the bulk of your attention.
Design Basic Process
Here’s the steps that we will be elaborating on the impact of in the remainder of this guide. I will not be explaining the full scope of the ramifications of choices here, so if you are familiar with the process you can skip over this.
- Step 1: Go to Cars tab, select Car Parts Development, select New Project, then click Design
- Step 2: Select the part you wish to create a new design for
- Step 3: This page is the initial part overview where you can see what gains you’re looking at to start off with. You can add and remove CFD and Wind Tunnel hours here as desired to give a blanket boost to how good the part will be. You can also press a button to see what rank on the grid the part is and will be at compared to current values. Once done here, you can continue to design focus
- Step 4: Here you can adjust which stats on the part you wish to put more or less focus into. There is a dropdown menu for several preset focus settings or you can move the sliders yourself. There is no limit to the sliders, you can move them all left, you can move them all right. Moving a single slider to the right will increase the time and cost for design up to 10% if you move it all the way. Moving a single slider all the way left will increase the time/cost 5%. You can see in the side menu the increase and decreases to a stat by adjusting focus. The sum total of these increases and decreases is what creates the Design Focus boost. Every slider you move left will add a slight bonus to all other stats, every slider you move right will add a slight negative modifier to them. You should always be using these sliders and moving them as needed to ensure focus is put into the areas you need improvement in. If you need improvement in all areas, you absolutely can move them all to the right, you will get a boost in all stats for doing so, but if you keep one or more to the left, you will get even more benefit to the sliders you keep to the right. Once happy with focus sliders, you can continue to Development Settings
- Step 5: Here you can assign more or less engineers to a project which will speed up the time it takes to finish a design at the cost of reduced overall expertise gain, 6 is the maximum, but remember you always need at least 1 engineer for any additional projects. You can also set the approach for your engineers to take. Normal will add no extra cost and take standard amount of time. Rushed will complete the design 33% faster by adding 50% cost and reducing the overall expertise gain. Intense will triple the cost, but will complete in the same amount of time as normal, while increasing expertise gain.
- Step 6: Once a design has completed, you will be able to start manufacture of it and fit it into your car. Also at completion, you will gain an amount of Car Parts Expertise in each stat which will help boost your next design of that same part.
Research Basic Process
I’ll just cover the slight differences between Design and Research process here
- Step 1: Go to Cars tab, select Car Parts Development, select New Project, then click Research
- Step 2: Select the part you wish to research
- Step 3: As before, this is the initial view of what gains research will give you. The primary difference here is when you use CFD or Wind Tunnel hours, the benefit from them will feed directly into the Research Benefit value for the stats, it is not an independent value added as with design. Now you can continue to Research Focus
- Step 4: This screen functions much like the design focus screen did, except just like the CFD/Wind Tunnel, when you shift the sliders here, you will directly effect the Research Benefit. Just as before, if you move a slider right, it will increase the value added to the boost to that stat and reduce it in all other stats, and vice versa. Same effect on time and cost in research applies to the sliders here. When done, move on to Development Settings.
- Step 5: Unlike Design, there is only one way to complete research and your only option is how many engineers to put onto the task. The more engineers you assign, the quicker it will complete, but the less research gain you receive on completion.
- Step 6: Upon completion, you will gain the research bonus the project said you would gain. You can research the part again to raise that value even further if you wish. The boost itself will not apply until Jan 1 of the following year and will be added directly to your expertise on that date, your new car part for the next year will have this new expertise value added automatically, you do not need to design anything to get the benefit of it. You do not gain any expertise in the current year for completing research.
Car Parts Expertise
This gets a section dedicated just to explaining Expertise, as it is THE core value that the majority of your part quality and how most of the mechanics within the car development system hinge around
As stated before, Car Part Expertise is a value that every single stat on every single part will have, and each one is separate. Front Wing Low Speed Expertise is a different value from Front Wing High Speed Expertise is a different value from Rear Wing Low Speed Expertise. These are three separate values that you can improve at different rates as you require or see fit.
Your Car Part Expertise ratings can be raised in only two ways. By completing a relevant part design you will gain an amount of expertise per day which will all be added into the value once the design is complete. The other method is if you completed research in the current year, the value of that research will be directly added to your expertise value at the beginning of the next year.
Car Part Expertise is the value impacted by yearly regulation changes. When you see the -10/20/30% numbers, that means at the end of the current year, you will lose that percentage of your expertise. If you have a -30% regulation change to Front Wing Drag Reduction and your expertise is 60%, you will lose 18% (30% of 60%) of your expertise when the new year rolls around. This is what research counteracts, so if you did enough research to gain 18% back in that stat, you won’t lose anything.
It’s good to keep this in mind as we start to dive deeper into how this all works, because you will have to figure out how to balance design for gaining expertise now with research to either offset losses from regulations or to boost expertise further.
Design / Research Expertise Gain Basics
I say basics, but from here on out, it’s going to be a lot of numbers. I will try to keep the explanations as simple as I can up front before dumping a lot of numbers for your eyes to glaze over.
Every design, regardless of focus settings, number of engineers, or mode of design will gain at least some amount of Expertise. The base rate of Expertise gain is determined by your current Expertise in the given stat. The more Expertise you have, the lower the base gain will be. Similar applies to researching parts. The more Expertise you have, the less benefit research will gain you.
Because Downforce is measured in kN and not %, when referencing %s that apply to that, the scale that Low and Medium speed downforce use is 2kN, ie: 45% in downforce=.9kN bonus, High Speed downforce is a scale of 1, so 45% there=.45kN
Here are some examples with Expertise before and after and how much gain per day each one had with just normal mode and single engineer(I will add more examples over time as I gather more data, but this is just to show the initial gain differences between different start points):
| Starting Expertise | Ending Expertise | Days | Average Gain/day |
| 52.74% | 54.50% | 40 | .0440 |
| 51.76% | 53.57% | 40 | .0453 |
| 44.20% | 46.37% | 40 | .0542 |
| 39.67% | 42.04% | 40 | .0592 |
Here are some examples of Research gains for different starting values of Expertise with single engineer:
| Starting Expertise | Research Gains | Days | Average Gain/day |
| 39.35% | 3.15% | 50 | .063 |
| 38.58% | 2.55% | 40 | .0638 |
| 37.97% | 1.94% | 30 | .0647 |
| 36.57% | 1.97% | 30 | .0657 |
| 34.71% | 4.93% | 75 | .0657 |
| 33.45% | 3.37% | 50 | .0674 |
Engineer Count and Design Modes
The next piece of the mechanics, to keep it “simple” still is the number of engineers and what mode you select before putting a part into the grinder to design or research
With Research, this is simple, the only thing we have is the number of engineers assigned. You don’t even need to actually start a research in order see the difference this makes as you can set a number and go back a page to look at the stats to see what difference it made to how much gain you will get.
| Starting Expertise | Research Gains | Engineers | Days | Average Gain/day |
| 33.45% | 3.37% | 1 | 50 | .0674 |
| 33.45% | 3.10% | 2 | 46 | .0674 |
| 33.45% | 2.84% | 3 | 42 | .0676 |
| 33.45% | 2.64% | 4 | 39 | .0677 |
| 33.45% | 2.44% | 5 | 36 | .0678 |
| 33.45% | 2.31% | 6 | 34 | .0679 |
With Design, we have the same option of number of engineers, but we also have the additional option of doing a design normal, rushed, or intense. As far as expertise growth, normal and rushed give equal amounts of expertise per day. But since rushed is quicker to complete it will spend less time in design and give less overall expertise, just like if the only difference was using more engineers. Intense, on the other hand, directly impacts your daily expertise gain by multiplying it by 1.5x. We can see the impacts of various settings below and how much they differ in resulting gains and rate of gains:
| Starting Expertise | Ending Expertise | Engineers | Mode | Days | Average Gain/day |
| 33.37% | 35.33% | 1 | Normal | 30 | .0653 |
| 33.37% | 34.68% | 6 | Normal | 20 | .0655 |
| 33.37% | 34.68% | 1 | Rushed | 20 | .0655 |
| 33.37% | 34.29% | 6 | Rushed | 14 | .0657 |
| 33.37% | 36.29% | 1 | Intense | 30 | .0973 |
| 33.37% | 35.33% | 6 | Intense | 20 | .103 |
And important note I feel I need to point out is that despite what it kind of looks like there, more engineers does not equal better gains, remember there are diminishing returns the more expertise you get, so if a part is in design for a longer period of time, every day your expertise is higher and higher and so the actual daily gain will decrease. Whether you do 30 days of intense design with 1 engineer twice, or 20 days of intense design with 6 engineers 3 times, the total expertise gain would be the same. The only difference is how soon the part is out of the oven.
CFD and Wind Tunnel
As said in other sections, you should be using these hours wisely and know how they effect your car development. There are valid applications of this within both design and research.
With design, what you’re doing is applying a temporary bonus to a specific part. If you put the same amount of hours into different parts, you will get the same additive bonus to the parts stat rating. So you could get for example +.70% gain on your rear wing Drag Reduction, or you could get +.70% gain to chassis Drag Reduction. Refer back to “Parts are not equal”, and you’ll see that that .70% bonus is better applied to the rear wing in this example as it will give you more performance gain.
Also remember you are getting the bonus for this particular part. So if you design a 2nd part later in the year, you will not get that bonus applied to it unless you apply the hours again. If you have high stats already, it may be worthwhile to use the first 3 ATR periods to hours boost your Underfloor and both wings to get that bit extra of performance out of them for the year.
With research, the approach is entirely different. Remember that CFD and WT hours go directly to your research gains. This means you can use an ATR period to feed all your hours into your underfloor research. Then when it completes, use the next ATR period to feed even more CFD and WT hours in, as in this case they will stack on top of each other and accumulate. The bonus applied from using them in research is vastly higher than what gets applied to a design, but is subject to diminishing returns, you get a larger flat bonus gain for lower stat parts than higher stats, but facility upgrades do not appear to give any extra bonus(need to verify).
But enough talking, let’s look at some numbers and part gains! We’ll use the Drag Reduction of an Underfloor and look at how much that stat gains when you use CFD and WT on it. This is different teams/different upgrades to facilities, but pairs are together.
| Type | Without CFD/WT | With 4.0 CFD | With 40 WT | With Both |
| Design Final Stat Research Benefit Value | 57.80% 55.20% | 58.75%(+.95%) 57.95%(+2.75%) | 58.50%(+.70%) 57.95%(+2.75% | 59.45%(+1.65%) 58.6%(+3.40%) |
| Design Final Stat Research Benefit Value | 45.55% 45.55% | 45.93%(+.38%) 47.97%(+2.42%) | 45.90%(+.35%) 47.97%(+2.42%) | 46.28%(+.73%) 50.30%(+4.75%) |


Be the first to comment