
The task was to describe the layout, strategies, and advice for a war map that was to take place in the Sa’id area of the industrial port city of the United Republic of Adal.
Table of Contents
Play / Map Intel / Sa’Id

The Mission
- Sa’id
- Day 97 13:58
- Location: United Republic of Adal
- Factions Deployed: SpecGru / KorTac
If Al Mazrah is the brain, Sa’id is the heart of Adal.
As the principal port of call and entertainment center, the second-most populous city in the nation—at least while the nation was populated—is the artery that pumps the lifeblood into the area and the world.
Sa’id is a crucial stop for commerce when doing international trade. One can spend a whole weekend having fun in the area of the port by attending a minor league football game at the Soccer Stadium, going on rides at the carnival with a medieval theme, or going to the sizable contemporary Mall.
Additionally, the Sa’id district, a mixed-use area in the center of the city, served as the residence for several generations of port workers. It fits dozens of residences and family-run businesses throughout its East and West Lots thanks to its assortment of low-rise buildings.
However, what was once a sign of happiness and success is now a lifeless shell of what it once was.
Both KorTac and SpecGru forces are airlifted into Sa’id’s west and east sides during Ground War. SpecGru teams are hauled in near the Mall while KorTac squads are dropped off around the Harbor Warehouses.
Sa’id features a full soccer stadium, a mall, a restaurant next to the carnival, and more in different game types. It also has the following connections to the rest of Adal:
- South of Sa’id’s Carnival across the main river are a few suburbs, the El Samman Cemetery, and the sunken Sawah Village.
- East is Sa’id’s Port, located at the tip of the river where it meets the greater sea.
- North of Sa’id’s Mall are the Caves, an intricate underground network build within a small village.
- West of the Mall across the river is the Observatory. Note the destroyed Dome peeking over the hills.
Map Views

Ground War Headquarters
These areas are only accessible to their designated team during Ground War.
KorTac Headquarters / Harbor Warehouses and Train Cars

These four Harbor Warehouses are great sniping locations. The two central ones look straight down the two central roads to the Mall, while the other two are great for catching flanking Operators.
This is typically the first stop when traveling north toward the larger Port. The headquarters for KorTac Operators in Ground War.
The main Harbor Warehouses cluster is of most interest, even though the toll building past the collection of silver oil drums can be useful in particular situations. The four structures closest to the train cars give exceptional views over the playable Ground War region for those who want to take some long shots (and beyond, in other modes).
Go here to confront those who are directly playing objectives or who are taking up position on rooftops because the two center buildings have a direct view of the central city.
The district’s two “outer” buildings, which have windows facing the streets there, have the best views of the common flank roads. They are also next to other structures that provide various views of their particular lanes, such as the toll booths on the Soccer Stadium side and the car shop close to the Carnival.
The entire district might be quickly taken over by SpecGru forces if everyone chooses to stand back and snipe. KorTac units must therefore push through the Trian Cars to seize objectives or seize better tactical positions.
The quickest method to get to the central district on foot is to run through the train cars and the central office. Moving through the auto store on the South side into the Carnival, however, may be your best option for slipping past the frontline if the enemy is simply too numerous on the roofs.
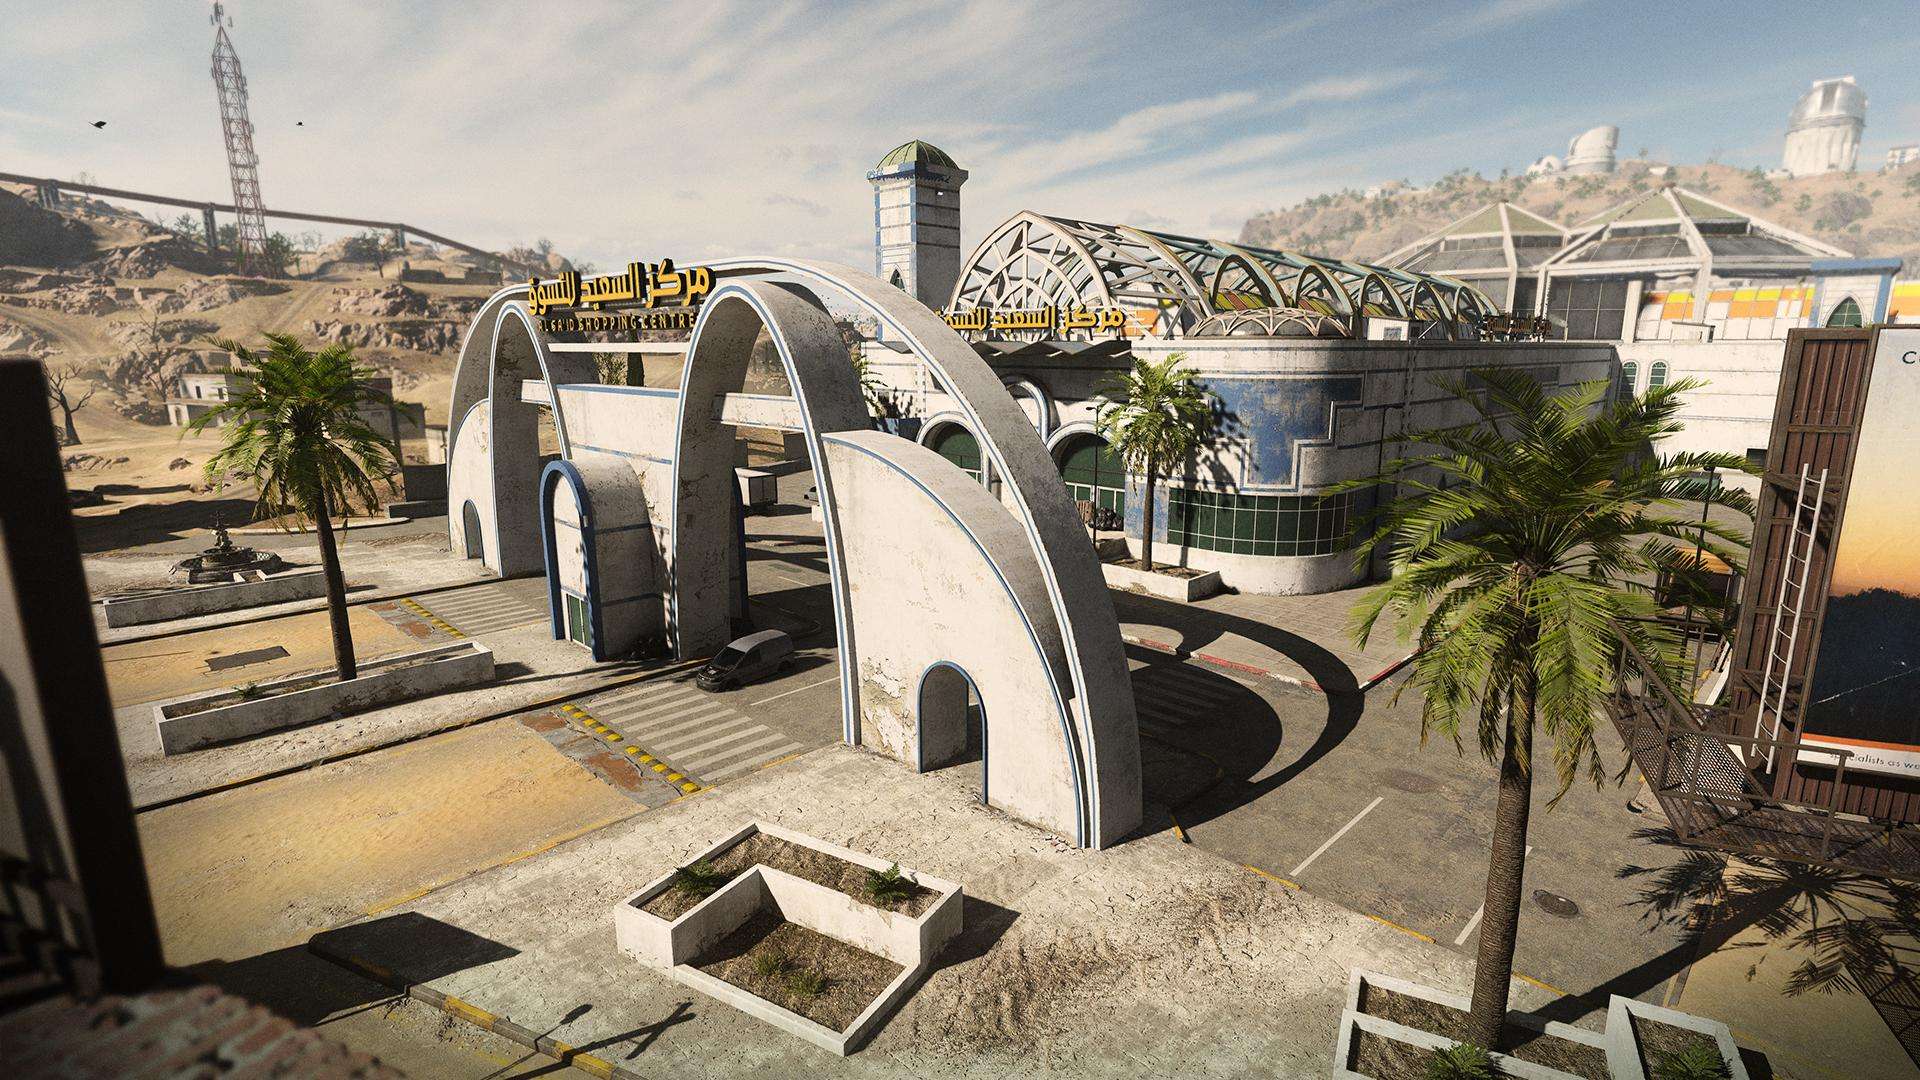
SpecGru Headquarters / Mall

If KorTac get the height advantage, SpecGru have speed in Ground War: use the Mall’s forward position two quickly control the Sa’id District’s East Lot, especially the building where the E Flag spawns.
This little portion of the larger Al Sa’id Shopping Center consists of its main entrance and its west wing’s two floors, with a challenging and time-consuming access route to the rooftop. This HQ includes two modest bungalows to the north and the Medical Center off the riverfront for Ground War.
Positioning near the end of Carnival street was made easier by the Medical Center. In order to go to the fire station and the important store/apartment complex at the end of Soccer Stadium Street, you must pass via the latter buildings.
The East Block, where a Ground War target will spawn directly at the long combination barber shop and electronics store, is only a short distance from the Mall. The distance between the SpecGru HQ and the target is merely a street, as opposed to needing to cross many railroad tracks.
SpecGru Operators on this side should therefore attempt to advance directly toward that structure.
Map Maneuvers: Zone Recon
Thanks to the availability of its zoning map, we know the following districts that turn into lanes on Sa’id:
- Far South is the Gas Station and Carnival.
- Far North is the Soccer Stadium.
- The Dirt Lot is directly below the Soccer Stadium
- Anything east of the Dirt Lot within the Rohan District, including buildings south of the empty ground, is the East Lot
- Anything west is the West Lot
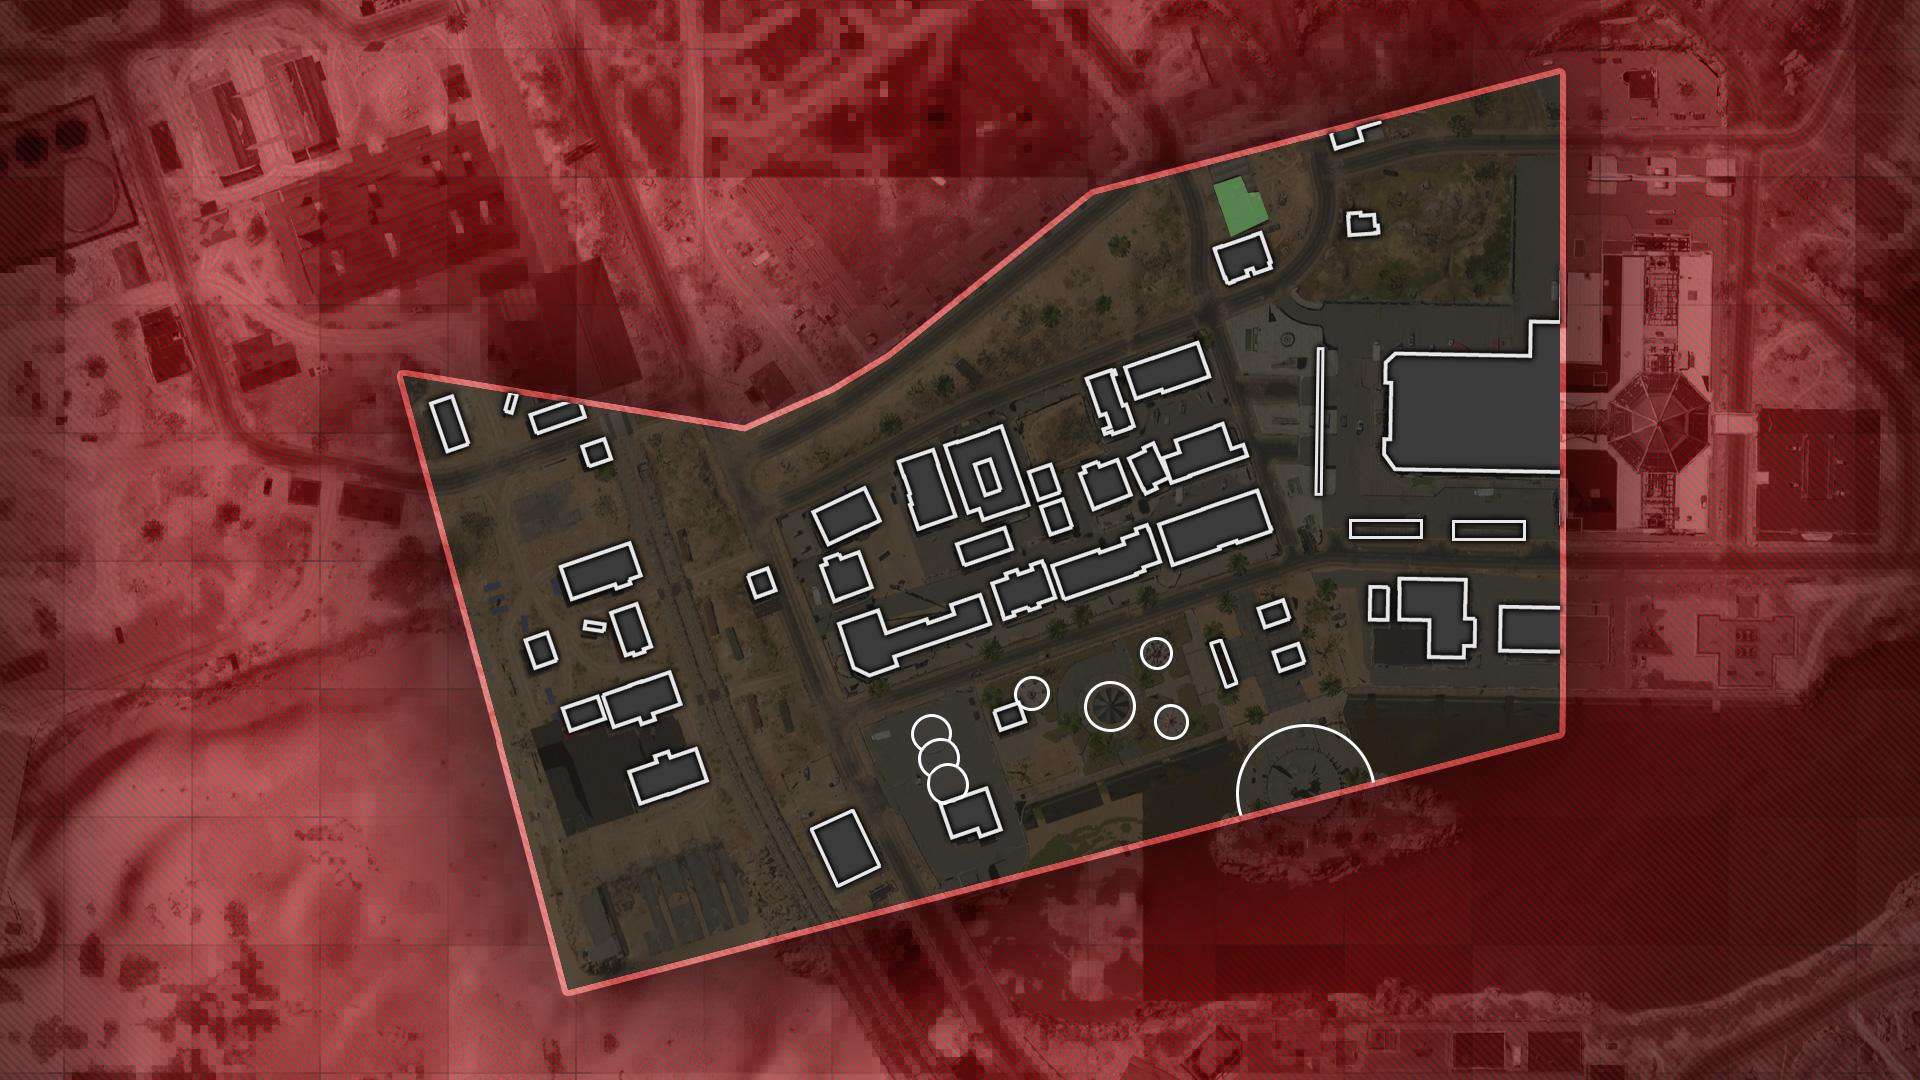
West Lot

The tallest building within the Sa’id District is the mixed used building. Its extension provides a clue to dealing with snipers atop it: try advancing through the main building from the bombed-out section, or take the perilous climb up the ladder.
The seven structures that make up the West Lot are, from west to east, as follows:
A low-rise housing complex in the middle, a branch of the National Bank of Adal, and a mixed-use structure that is partially bombed out with fresh construction spanning towards the center. As you move east, you’ll pass a beige duplex, a two-story factory with a central courtyard, a group of garages, and a dirt lot.
The A goal in Ground War resides in the Bank’s first floor whereas the B target is located in the mixed-use building that was attacked. The latter structure has the best sightlines throughout the entire map because it is the tallest one in Sa’id.
Use the extension to your advantage if there are snipers stationed above the structure; there is a bombed-out area on the second level that may be crossed. It immediately leads to the main stairs, from which you can survey the structure and its rooftop.
There is a ladder right next to that lengthy roof; use it to climb straight up to the top of the structure.
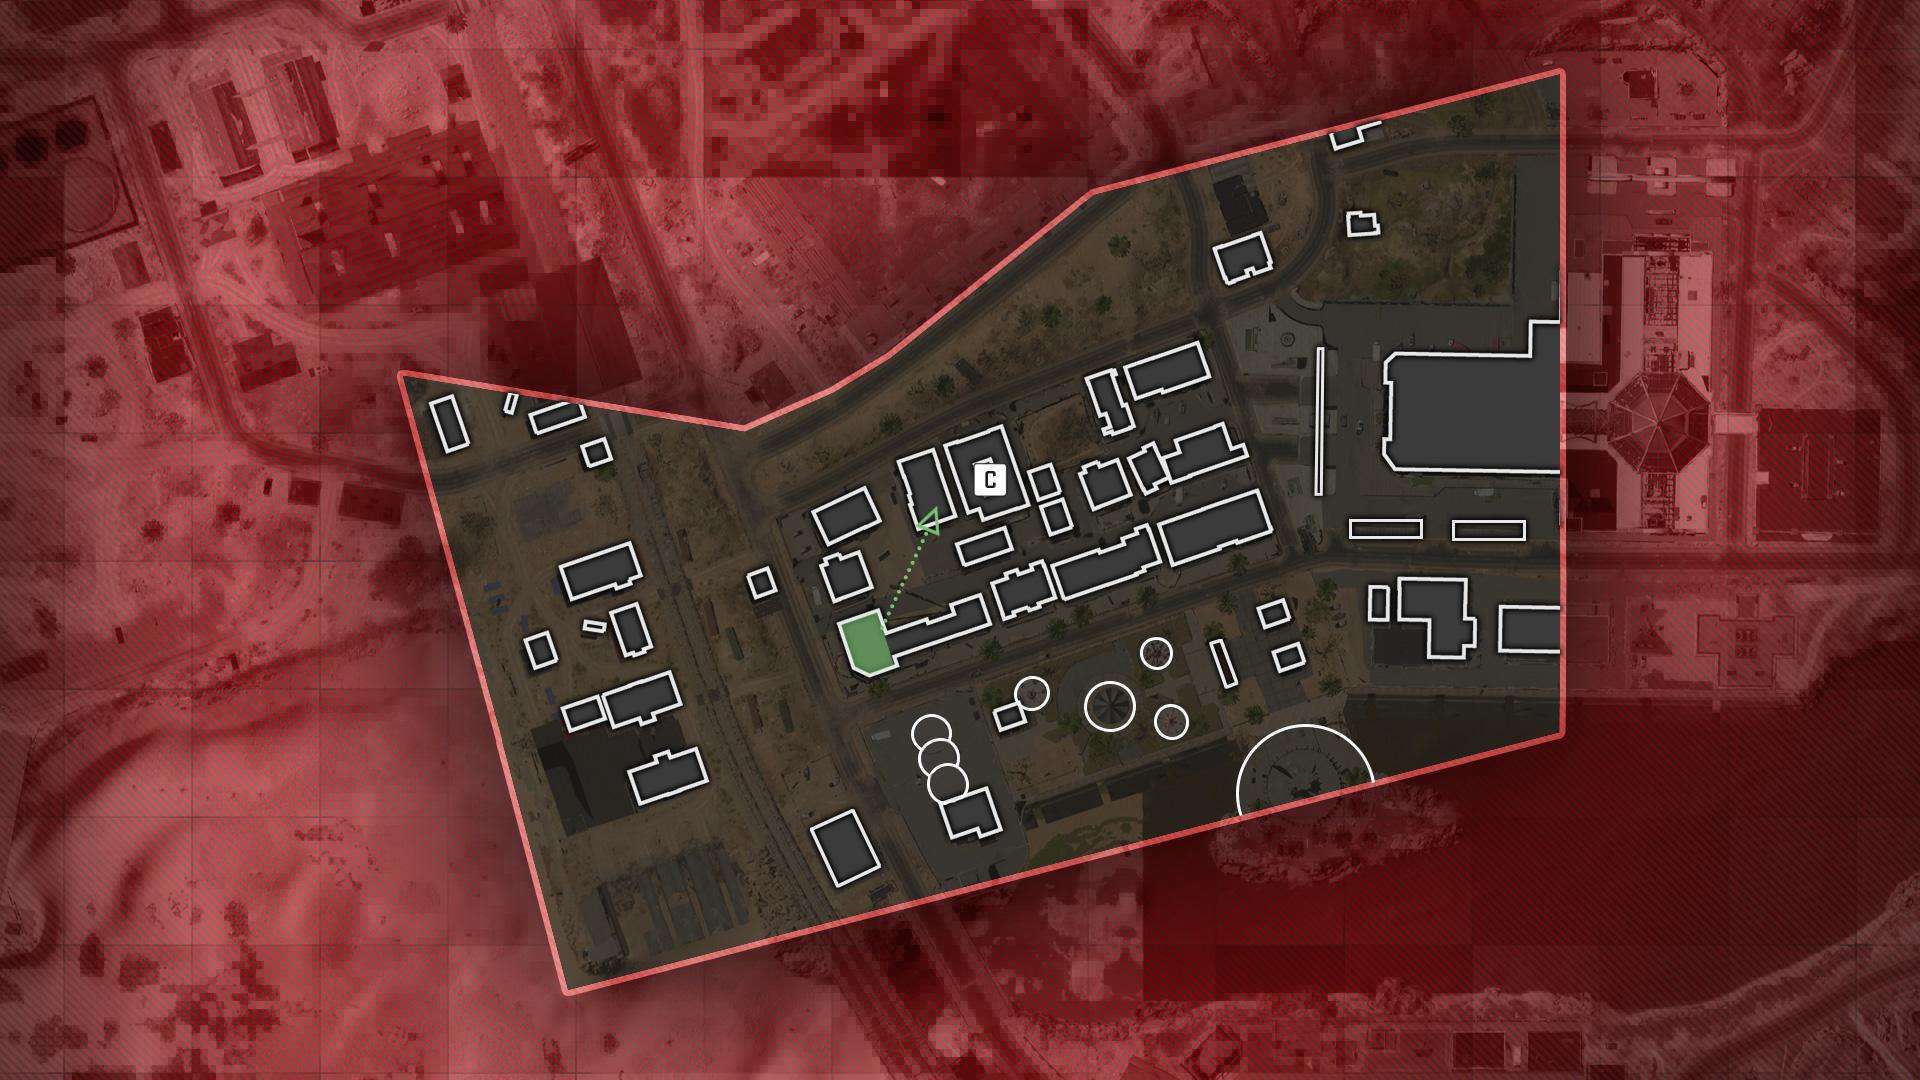
Then there is the C flag, which is in the courtyard of the yellow house. The fact that it is so isolated from anything but the residence makes it a potential CQB haven. The Operators who can move through it rapidly can easily assist their team in taking possession of the target by leaped-frogging through windows into and out of the house before going east to the dirt lot or west to the office building and bank.
Dirt Lot

This is every building that has a sight line down to the Dirt Lot. Yes, it is dangerous. And yes, it should only be moved through if the coast is clear.
The Dirt Lot stood here for decades as prime real estate that no one could profit from, serving as a symbol of bureaucratic inefficiency. It might generate a ton of business due to its proximity to the soccer stadium… and yet, not a single business obtained its land rights.
Thus, the Dirt Lot is a pointless mound of dirt that is off limits. The Ground War Operators may find it handy as a route between C and D, but it shouldn’t be used frequently. The Dirt Lot is perilous since multiple structures may keep watch over it in addition to having only four (broken) walls and a hill.
Eight of the Sa’id buildings in total, including the beige apartments right across from the lot, have at least 50% visibility over the entire area.
We very strongly advise avoiding the lot at all costs and moving through the buildings surrounding it if there are hostile personnel on the rooftops of these buildings.
East Lot

This East Lot apartment can be a strong power position but has two dangerous paths with westside exposure. The alternate way up here is a bit of parkour 101: use the adjacent building to hop across to its roof.
These structures make up the East Lot:
The Dirt Lot is surrounded by four structures: two compact square offices, a red apartment with an unlocked garage to the south, and a yellow apartment with a sloping roof to the east.
Three more buildings are across the street or close by; the one closest to the mall has a tiny patio, while the other has a series of tier-like balconies.
Other structures include the lengthy combined electronics and barber shop, where the E Flag in Ground War spawns, and two extensions of the beige-colored residences across from the Carnival. At the base of the yellow apartment building, the D flag appears.
Similar to the West Lot, close-quarters battles predominate within each structure. If a sniper emerges on a building’s roof, locate the entrances and storm inside brandishing a shotgun, SMG, or other quick-firing weapon. That includes the apartment directly south of the Dirt Lot, the tallest building in the area that is located in the center.
There are two straightforward ways to get to the roof of this building: either use the long ladder on the South side, or get around it by using an external stairs and a lower ladder. Both routes could result in the opponent easily killing you.
Instead, we advise hopping across the rooftops to go from the tan, tiered-balcony building over to this one. To get to the middle building, which is conveniently tucked behind the billboard for some cover, take off running from the edge of the roof of the tan building and jump over.
Soccer Stadium
This fire station on the Mall side provides great oversight of the Soccer Stadium’s streets, which are usually used as flank routes for stealth purposes or fast tracks for vehicles.
The “Soccer Stadium” is one of two routes around Sa’id’s core area and consists of just two main roads: one that runs near to the stadium and another that runs next to the district, divided by a dirt island.
The Harbor Warehouses and the Mall are located at the endpoints of this lengthy strip. The Fire Station next to the Mall has better visibility over this area than the Mall itself, which may not be the case.
Operators should use this building for a clear and safe view over this lane if they wish to try for some longshots or look out for car traffic below.
This area can be driven through in a matter of seconds. You must proceed with caution when walking.
The raised central island provides some protection from potential snipers; as an alternative, one can run right alongside the district’s buildings, which is useful for rapid flanks, particularly around the Dirt Lot.
The concrete barricades at the Soccer Stadium are an additional line of defense. Vehicles can and will utilize this route across the map, so take advantage of the little window of time to veer off the road, catch your breath, and slow down before tackling the oncoming rush-hour traffic.
Restaurant, Carnival, Waterside and Gas Station

Use the air conditioning unit atop the Gas Station to reach the tops of its pumps; this high ground rivals the apartment across the street from it.
Due to their distance from targets and availability of cover, these waterfront companies provide a considerably safer flanking opportunity than the other way around the neighborhood.
There is a beachfront restaurant close to the mall. The Gas Station is close to the Harbor Warehouses. Both can be utilized as a counter-sniping position against attackers on the south side of Sa’id or for coverage over this outside lane.
The Gas Station’s tallest structures—the circular overhangs to the pumps—can be reached by climbing the Restaurant, although getting to them from the Gas Station involves some parkour. To get here, locate an air conditioner at the top of the station and leap across it, hanging off the edge if necessary. For protection, you might want some portable cover, by the way.
Between the Gas Station and the Restaurant, there is a section of the Waterfront that consists of a stone path and a small portion of the river, as well as the medieval Carnival, which has won the Best Gentle Rides Award three years in a row. Both can be used as somewhat safe flank routes for traffic from moving vehicles.
If you don’t mind getting wet, jump into the water at Riverside and emerge close to the green tent in the middle (circled). From here, we advise moving behind all the amusements and vendor booths to finally arrive at your chosen district entryway.
Just be aware of the snipers on either end of this street, even though they might be laser-focused on the action in Sa’id in objective modes.
Recruit Tactics
Keep a Low Profile
Newer players, especially those from 6v6 game modes, should take advantage of Sa’id’s apartments and alleyways for CQB opportunities.
Their tight structure allows SMGs, Shotguns, and other small arms to thrive – feel free to move up and down floors, but mostly stay low to the ground for covered movement around the map.
Staying on the ground floor is also great for dealing with snipers on roofs. They will find it difficult to hit a target directly below them, so if you see one, figure out how to get closest to their building while staying off the roofs.
Ground-Based Tactics
Sa’id is going to be peppered with aerial streaks, especially with outdoor areas like the Dirt Lot and Carnival, as well as all the building rooftop.
You should see everyone else taking their typical air assault approaches and counter with a ground-based attack.
Traps, such as Claymore Equipment, the Suppression Mine Field Upgrade, and the Cluster Mine, can find paydirt in one of two ways: in doorways and stairwells of buildings, or for larger traps, the alleyways big enough to fit vehicles through.
Peppering the district with these tools can lead to plenty of eliminations and cause headaches for the other squad. Knowing this, you should also be ready to take the Spotter Perk, the DDOS Field Upgrade, or anything else that can help sweep mines for your squad.
Veteran Tactics
Total Aggression
Ready to fly?
Within the Sa’id district, it could be a good idea to play ultra-aggressively by hopping off buildings where your fellow snipers are taking post.
For example: from the West Lot’s mixed-use building or Bank, one can parachute down next to the courtyard house where the C flag spawns, either right at the foot of the entrance or atop the adjacent office.
East Lot players have the Carnival nearby to fly into; just take a quick dive off the buildings near the street, fly over it, and land right in the middle of this flank route.
Take a Sidearm
Most often in Ground War, players like to take a Launcher to deal with vehicles. If your squad already has a ton of anti-vehicle technology, then we recommend you bring a Sidearm.
Forget the whole “peashooter to a gunfight” trope at Sa’Id, because here, the number of ladders and hangable ledges across all the structures make it a gold mine for one-handed sidearm shots.
Fully-kit out that Secondary Weapon, then use it to get un-expected close-up shots on snipers on rooftops.
Prestige Tactics
Your Longshot Here

Outside of the main spawn zones and central buildings, there are several climbable billboards that overlook massive parts of Sa’id, which we highlighted above.
Two are towards the Harbor Warehouse Side, two are near the Mall, and one at the Soccer Stadium. That last one has incredibly sightlines over the entire south side of the map, and can easily be used to dunk equipment down into the house’s courtyard right across the street from it.
Of course, taking the climb has its risks: coordinate with your squad so they can provide protection, either with long-range weapon cover fire or vehicles, to protect your exposed Operator. It can also be hard to take this ladder climb often, so consider taking a Tactical Insertion and placing it right in between the billboards for an easy respawn point.
Parkour Pointers
Sa’id is a gold mine for parkour opportunities, and hopping across the rooftops are just the start of it. We expect the community to find some fun routes within the district, but we have a few ideas to get you started:

First is a neat, but risky, way to get from the Dirt lot to the yellow building: use the wall to hop to the small balcony facing the street or ont the slanted overhang. From this small patio, you can climb the ladder to the top or jump diagonally across to the adjacent building’s patio.

On the opposite side of the map, we can use a set of bastions surrounded by orange and white barricades to get from the street level to the top of some other East Lot buildings. Hop from the north-most one to a beige balcony, pull yourself up onto it, then either move through the building or jump straight across to the electronics store.

In this same lane, a blue dumpster can be used to get on top of the West Lot’s long mixed-use building. Jump from it onto the air conditioning unit to ultimately get on top of the bombed-out section. You can also jump onto the balconies overlooking the Train Cars from here, although it is a risky position to take.

Finally, the Mall can be climbed on top of for views of the district that rival the Harbor Warehouses, but it requires plenty of time and effort.
First, head all the way north to the parking lot where there is a truck and a box. Get on top of the truck from the box, then leap to the stacks of crates in front of you. From these crates, jump and mantle onto the roof, then take one more running leap at the wall for an additional mantle to the top.
Peer through the grand front entrance installation for longshots, and watch out for the section of glass skylights that can be fallen through for a quick escape.
TOP Tips
- KorTac HQ – High Harbors. This side of Sa’id has multiple buildings with great vistas over the middle district. Come here for solid sniping opportunities.
- SpecGru HQ – First Strike. In Ground War, the E Flag is right off the SpecGru spawn. Snatch it quickly before moving deeper into the district.
- Sidearm or Launcher? Ground War game modes make Launchers an awesome secondary to use against equipment, but Sidearms can do well given all the ladders in Sa’id. If you plan on sticking to the central area, consider using those small arms instead of rockets.
- Snipers: to your Rooftops… Every building in Sa’id has an accessible roof. Use them to get sightlines over massive section of the map close to objectives.
- …or Bolt Up to a Billboard. Looking for a unique counter to rooftop snipers? The free-standing billboards around the map have risky climbs, but great sightlines over numerous buildings.
- Heart of the Home. A central home with a courtyard is an important strategic position, especially in standard Ground War. It can also be a place of respite as it is closed off from nearly everything outside the home – use CQB weapons to get inside and use it as a respawn point for the squad.
- Stadium Streets. The long roads outside the Soccer Stadium are best for vehicle traffic – drive them across either of the two streets before ducking into the central district.
- “This (downtown) path is too crowded!” Then visit the Carnival or Waterfront. Use it as a flank route around the district, noting that snipers can appear on the roof of the Restaurant, Gas Station, or the apartments across the street.
- When they go low… Sa’id’s buildings are conducive to CQB combat. Feel free to use your shotgun, SMG, or other small arm of choice while sweeping through it, and try placing ground-based traps to break up the flow.
- …we fly high. Sa’id is also a parkourist’s dream map; with the help of all the buildings and object pieces, you can easily stay off the streets from the heavy vehicle traffic. And, if you’re feeling risky, drop off the roof and fly over to objectives.


Be the first to comment