
The objective is to describe the layout, strategies, and advice for a war map that takes place in the main port of call for the United Republic of Adal, where there is a lot of ground, air, and sea combat.
Table of Contents
Play / Map Intel / Sariff Bay
The Mission
- Sariff Bay
- Day 98, 13:01
- Location: United Republic of Adal
- Factions Deployed: SpecGru / KorTac
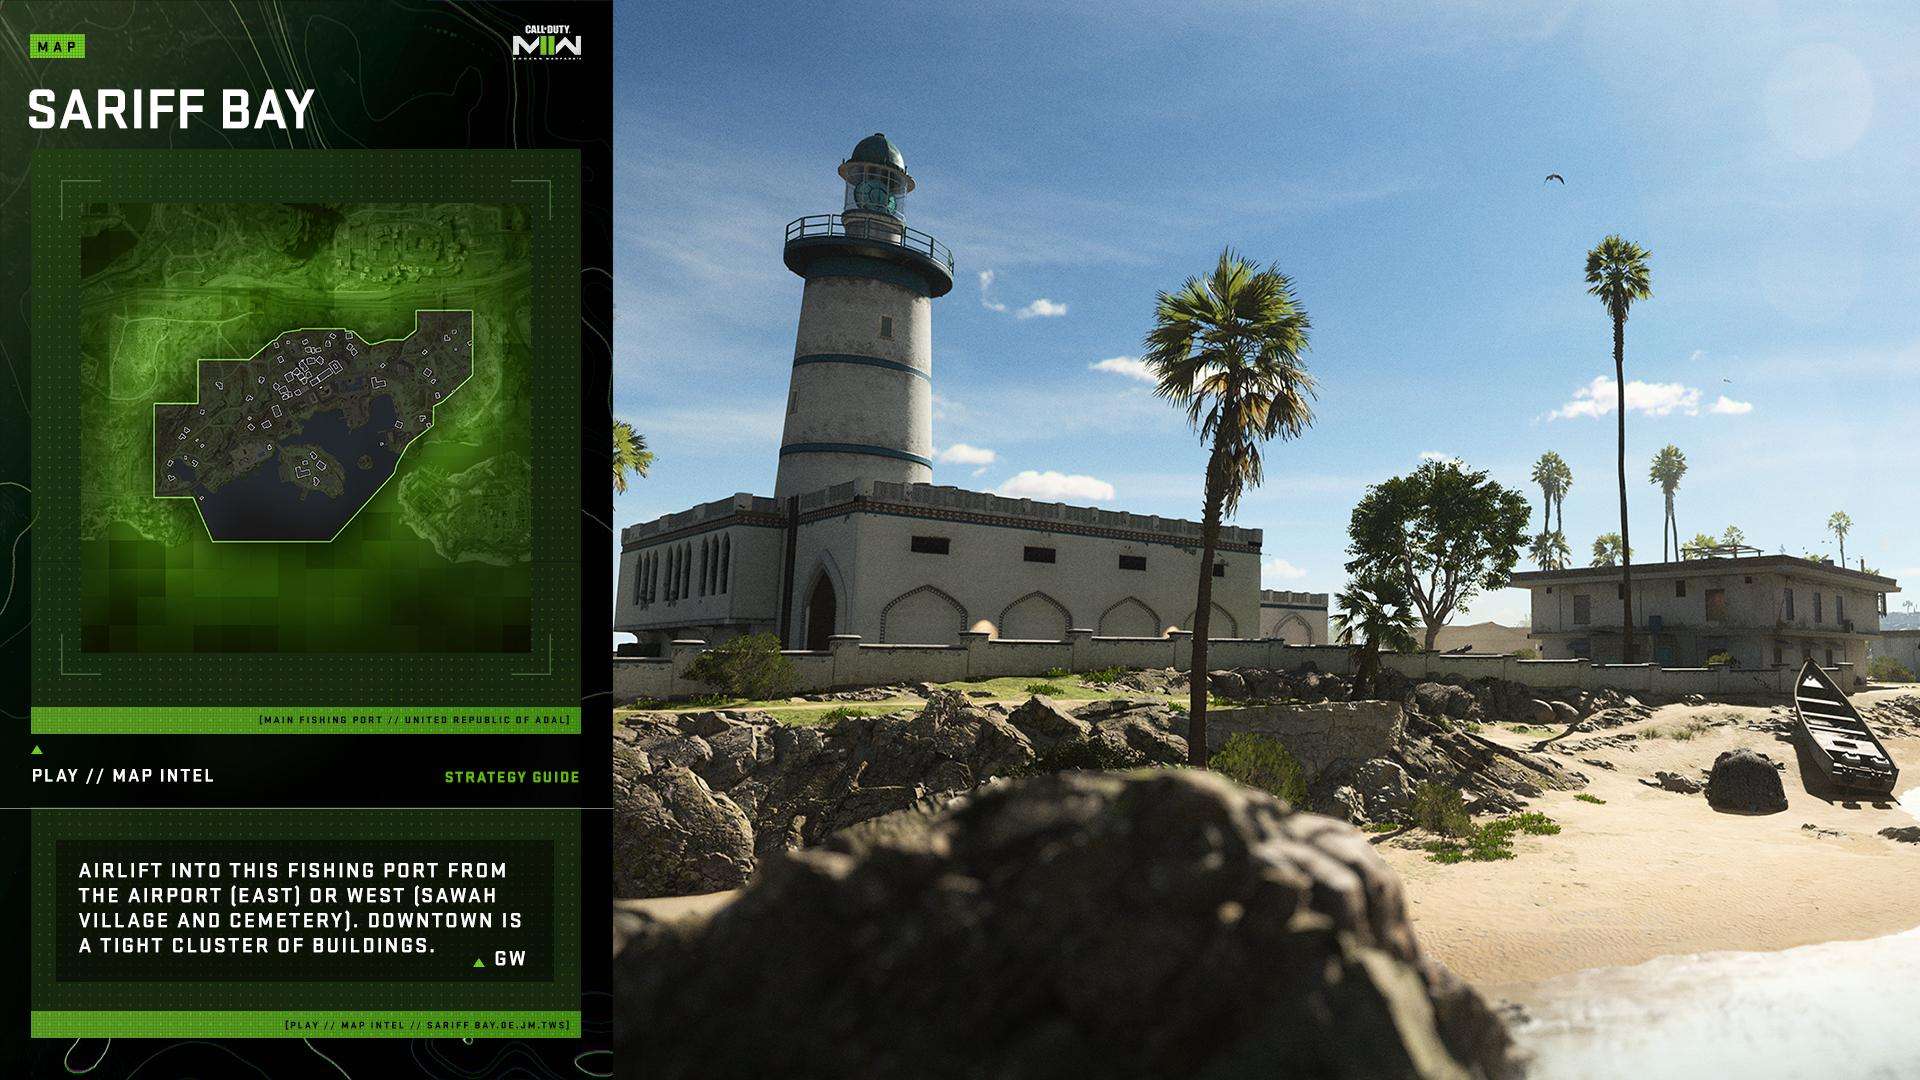
Welcome to Sariff Bay in the United Republic of Adal, your first look at the Call of Duty®: WarzoneTM 2.0 map.
The Republic’s significant fisheries are located at Sariff Bay, which is on the Republic’s southern coast. Sariff Bay preserves Adal’s heritage alongside the neighboring Al Barga Fortress, in contrast to the contemporary Hafid Port on the East Shore, which is primarily utilized for importing and exporting products.
Sariff Bay is to blame for the region’s abundant seafood consumption and leisure activities because, in a more tranquil era, Lighthouse Island served as a place to catch some huge waves or unwind on the quieter shores that faced the Fisheries.
The fishermen who had lived in houses that had been passed down through the centuries eventually discovered themselves next to brand-new apartment buildings and a small town that was just starting to grow.
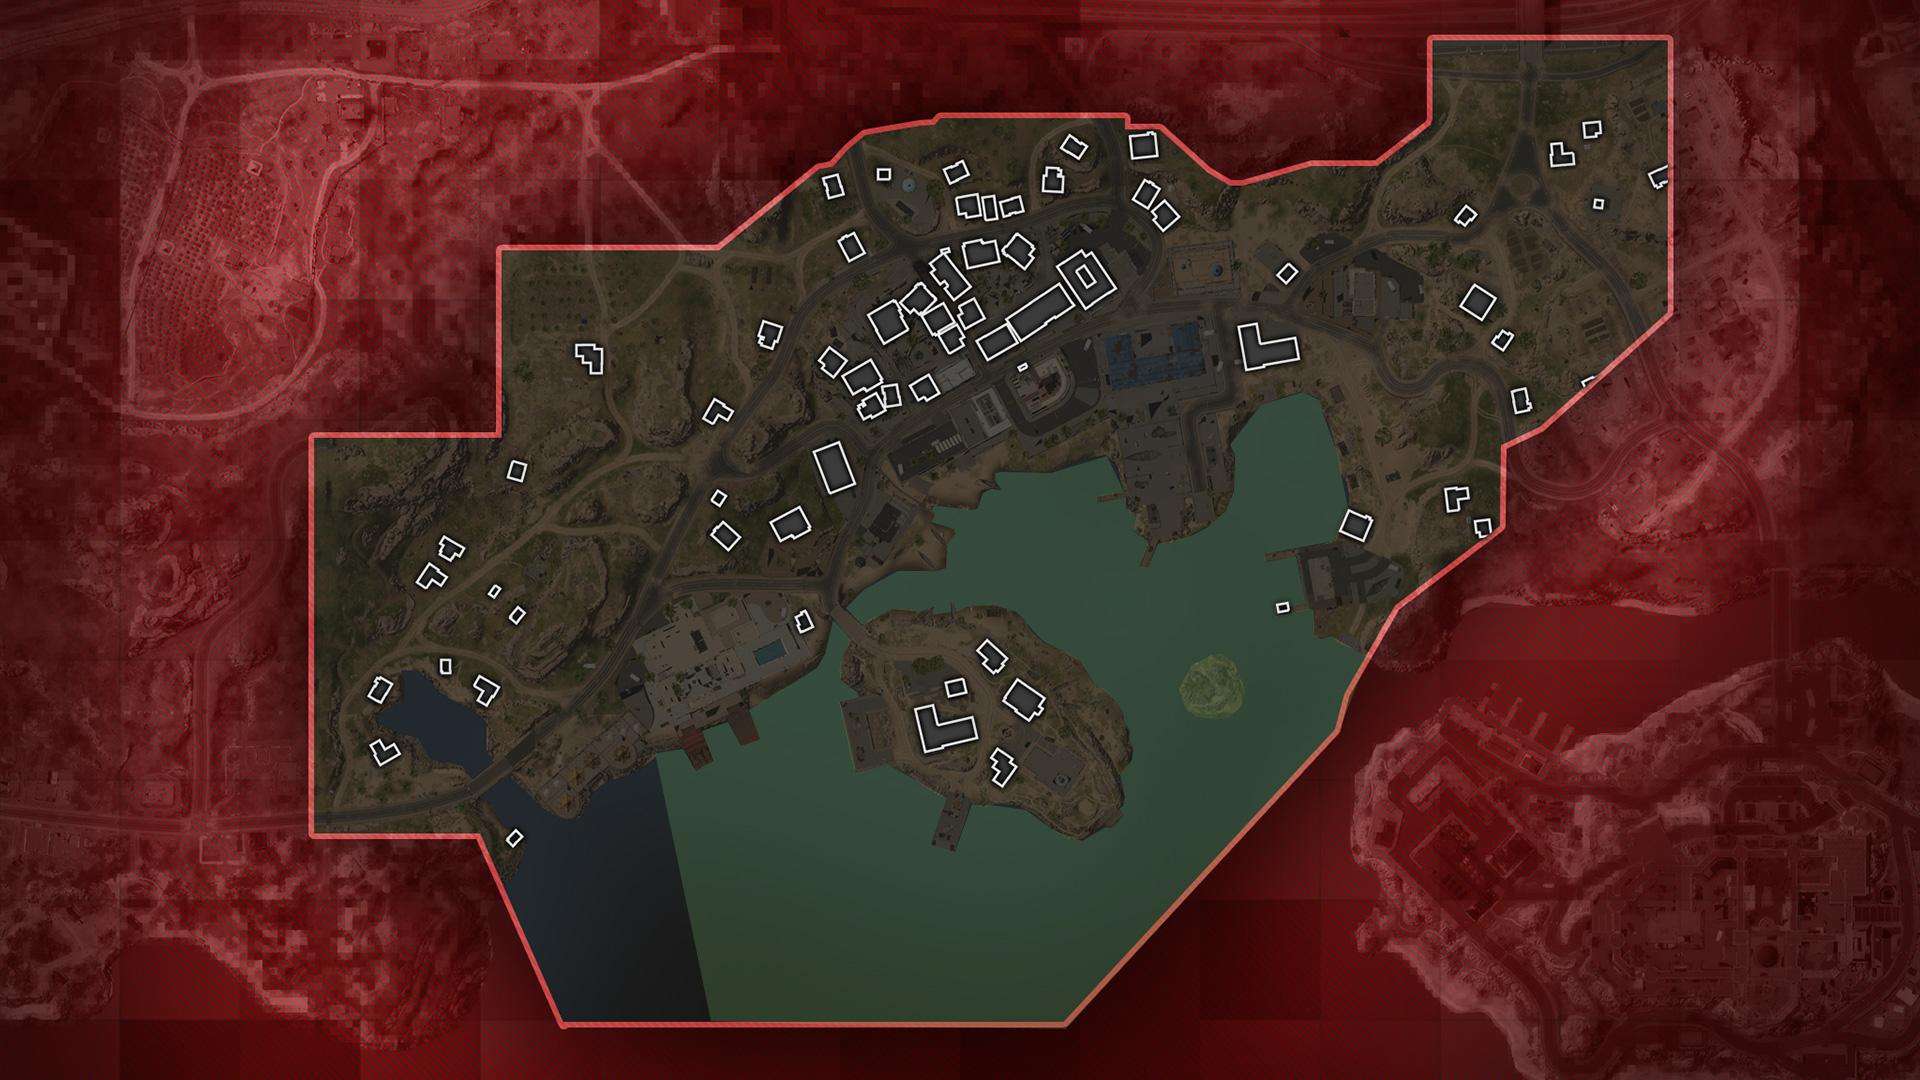
Map Views

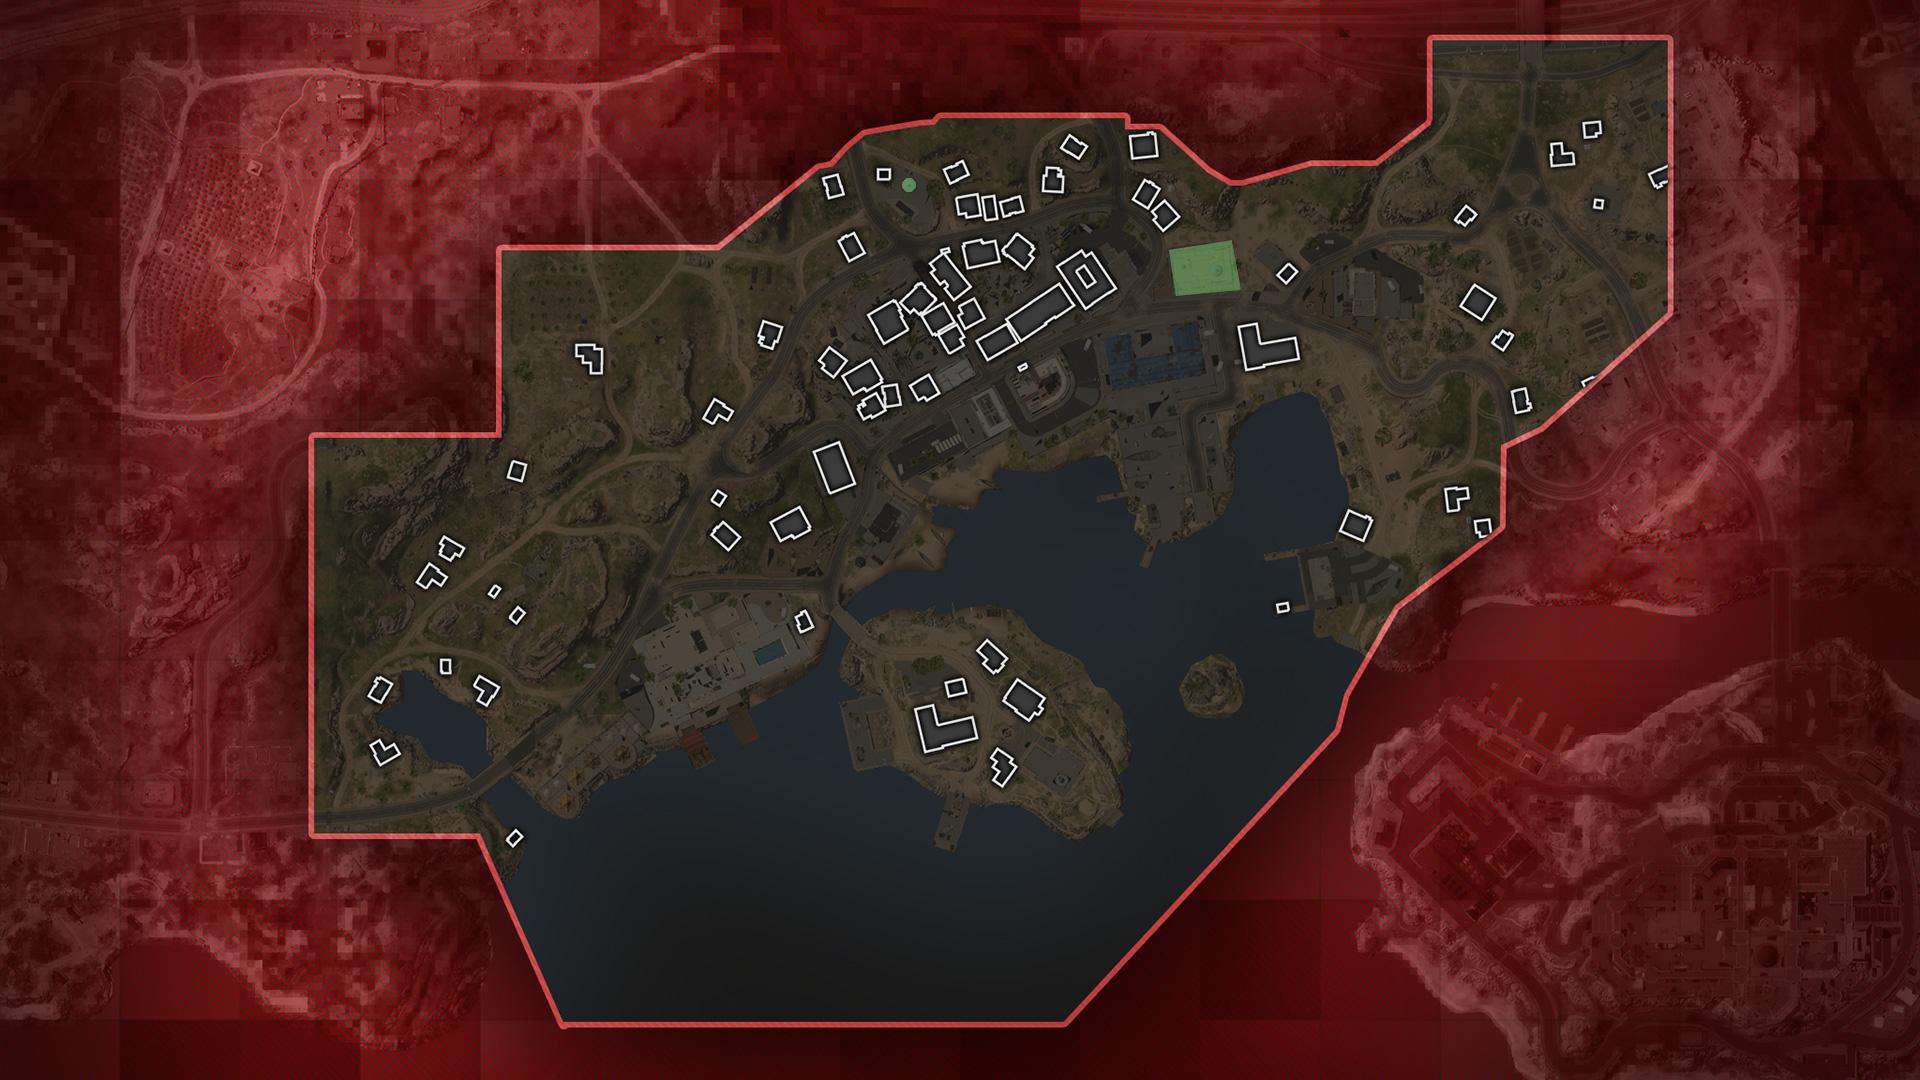
Sariff Bay doesn’t have any named regions, but this guide divides the entire region into 10 zones based on the locations of Ground War flag spawns.
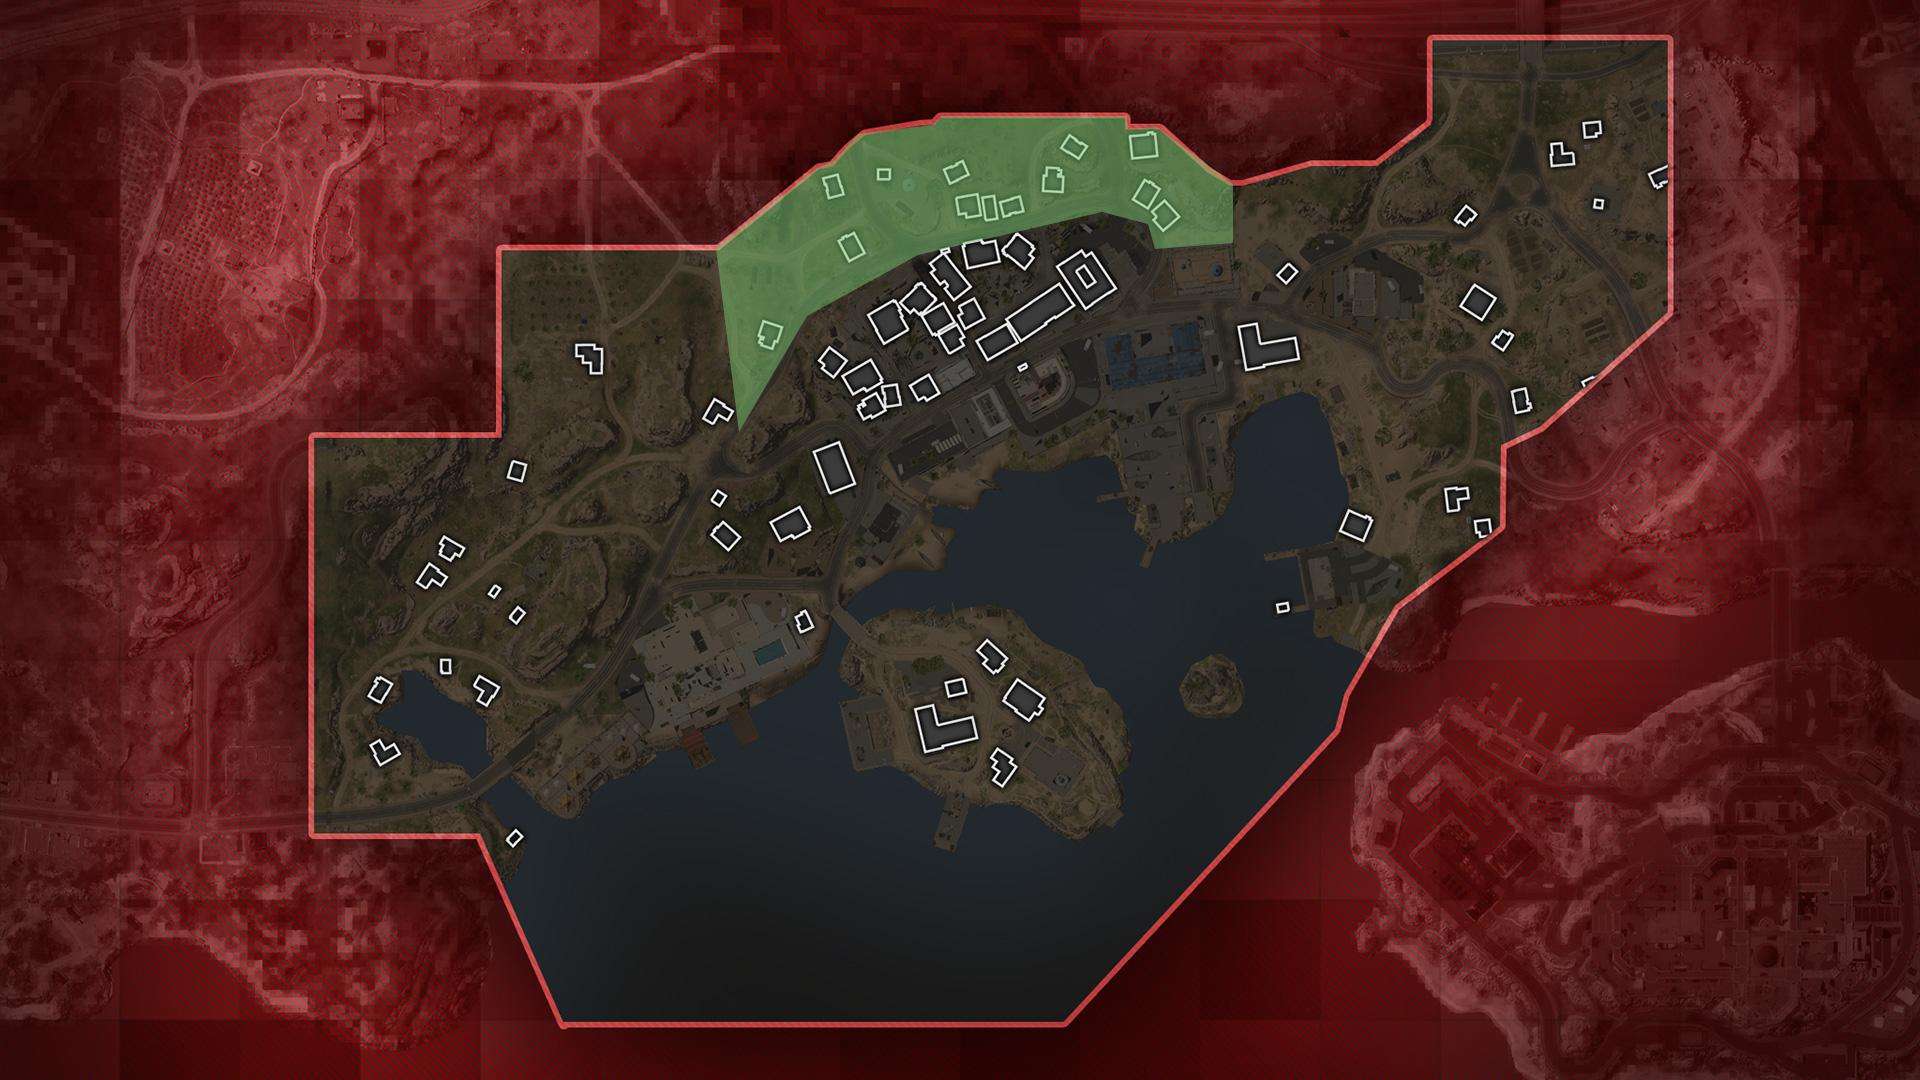
SpecGru Headquarters / Fort and Airport Suburb Eastern section
The bike store and higher fields circled above in Ground War offer excellent overwatch on the E Flag Apartment and D Flag Dock, respectively, if you choose not to travel out toward the broader Sariff Bay.
This area of Sariff Bay offers the following whether you rotate from the local Airport or Fortress or arrive by airlift as a SpecGru force:
A bridge connecting the remainder of the Suburbs and Ahkdar (which is unavailable during Ground War) is located toward the back of the zone. These two interesting locations below are seen from a walled estate that is perched on a hill.
A back set of stairs leads up to an orange communications tower in another walled house, this time a straightforward two-building construction.
A small roundabout and field for storing military equipment are located in front of it and directly off the Ground War SpecGru landing place. From this Roundabout, heading southeast will take you through some raised fields and houses on your way to the D-flag Dock.
Alternately, if you go via the roundabout in the direction of the E-Flag Apartment, you’ll arrive at a square-shaped bike shop with a spacious second-floor balcony and an accessible roof.
Due to their complexity and scale, the elevated fields and the cycle shop have excellent overwatch over the Ground War flags that are closest to them and are therefore likely to be more crowded regions of Sarriff Bay. Even though neither offers much cover—if at all possible, provide your own with Deployable Cover—the natural elevation is excellent for protecting those busy areas from a mid- to long-range distance.
KorTac Headquarters / West Suburbs and Inlet
Use the inlet to quickly reach the bayfront in Ground War so that you may get the first jump at B. Otherwise, if you’re coming from another area of Adal, it can be a wonderful escape route.
The KorTac platoons have their own suburban headquarters opposite the SpecGru HQ, with grassy cliffs behind them for good sightlines across the lowlands. If the enemy is starting to pick you off the cliffs, move to the guard tower below that offers a little more shelter.
However, in game settings where all Operators can access the location, the little network of residences on the road back near the Ground War spawn point may be more useful. They are set up in a way that makes cross-building sniping engagements more than a possibility, and they are also more intricate than you may initially think.
The houses “guarding” the inlet are undoubtedly the most fascinating group. Frequently, a boat is accessible in this contaminated pool. To gain a rapid jump on the B-Flag Island or elsewhere, whether it be for an early goal rotation in Ground War or an escape from adversaries in other modes, take it and head beneath the bridge to get into the genuine Sarriff Bay.
On the beach of that bay outflow are some party tents. When attempting to attack the A-Flag Resort or B-Flag Island, they can provide adequate cover.
Map Maneuvers: Zone Recon
For Ground War maps like Sariff Bay, we want to break down areas by their general location in the flag-based Ground War game mode to keep things organized. All these strategies will work for other modes based on this portion of the map.
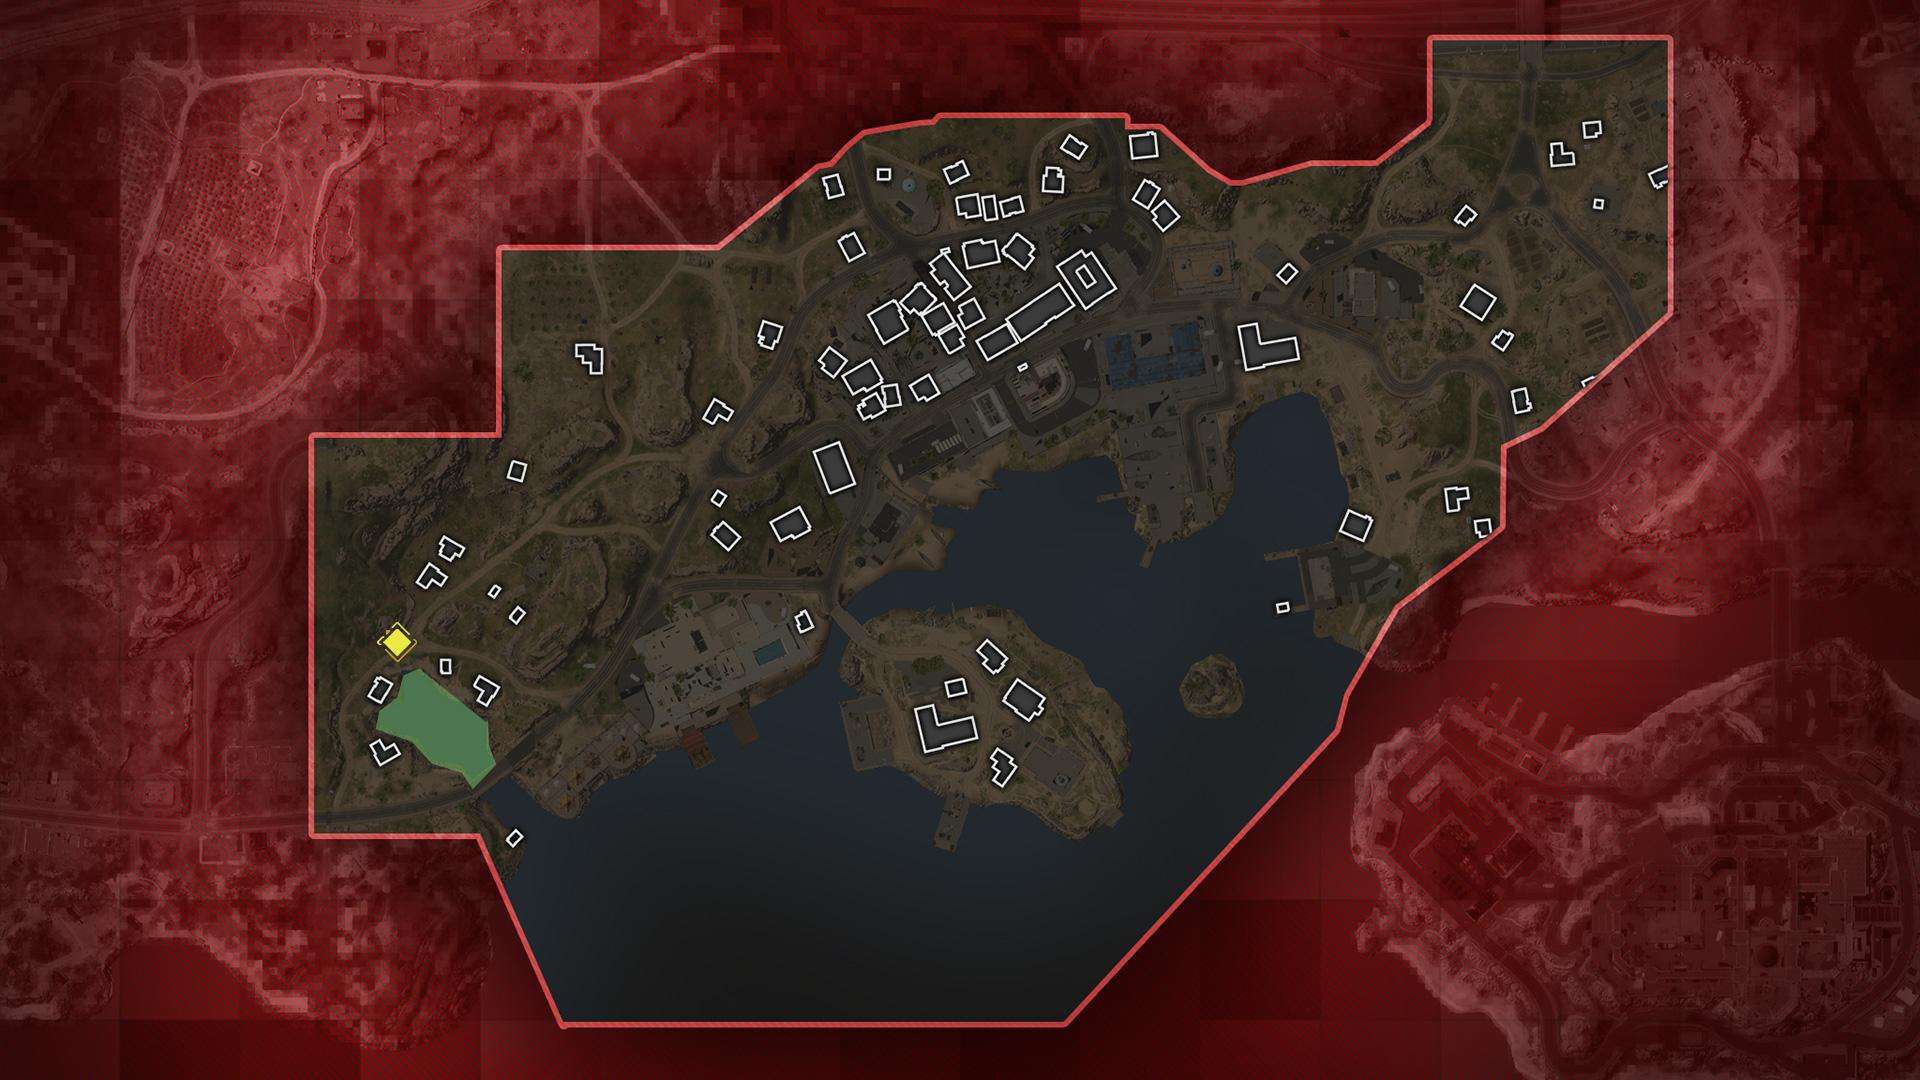
A-Flag Resort

Use the Bay to sneak past the pool hall or hookah lounge, or use a ladder to get to the top of the entire complex and fire down. These are just two (of many) sneaky ways to attack the inside Resort area, where the A flag spawns in Ground War.
There is no shortage of activities at Sariff Bay’s luxury resort, which features commercial laundry and cooking facilities in addition to a private dining room, hookah lounge, billiards hall, pool, and easy access to the nearby Island.
Its centerpiece is the central courtyard terrace, where Ground War’s A Flag spawns. Although it may be totally protected from long-range snipers, it may be difficult to take, especially alone, if you are not a KorTac Operator because of the numerous windows, doorways, and the entire complex’s roof from which to attack.
The bay might be the best option for conducting an invasion because the main highways are clearly seen from the KorTac HQ. To achieve the most CQB-focused path to the center, we advise using it and creeping through the hookah lounge or pool hall.
Alternatively, the resort’s outdoor walkways, one of which on the East side includes a ladder leading to its roof, can be perfect for mid-range play. Climb it, preferably with a squadmate keeping an eye on your six, to acquire a fantastic perspective of the rest of the Resort and perhaps catch the opposition off guard.
Any roof on a Resort building can be readily reached after that; just make sure to pull the parachute in case you miss your planned landing site.
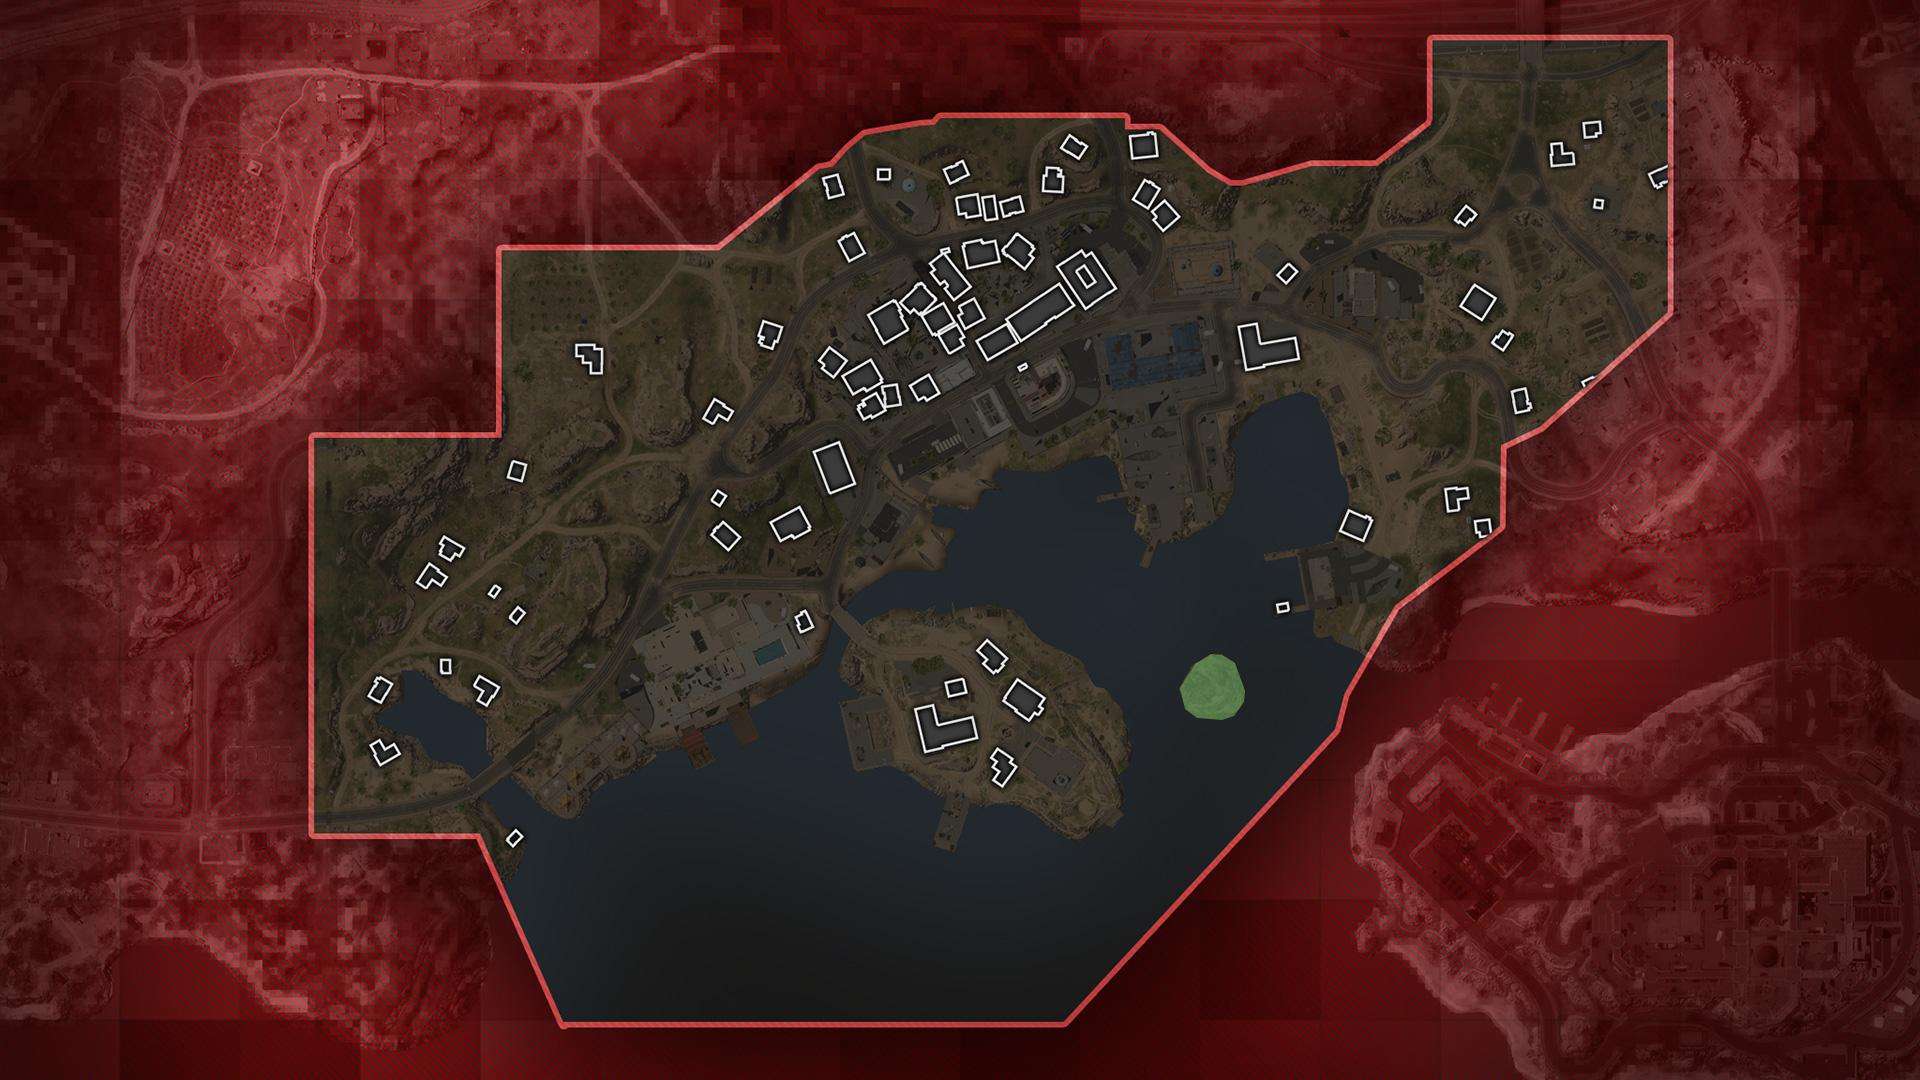
B-Flag Lighthouse Island

Use these three ladders to ascend the roof of the building, which includes a second door leading to the tower, if Operators are seizing control of the Lighthouse Museum.
The only land access to Lighthouse Island, where the B Flag spawns in Ground War, is a single bridge from the resort. A smaller island next to it has no land bridges, making it a no-land man’s for boatmen and Operators alike trying to navigate their way home in bad weather.
Tourists and local fishermen use Lighthouse Island, which has a pier, an administrative structure, and the lighthouse itself, which serves as an adjunct museum for the nearby Al Barga Fortress and has a sizable, inoperable medieval cannon in the middle. The B-Flag spawns in this landmark hidden within a semi-circular wall; in an otherwise open area, that wall is crucial for defense.
The namesake landmark on Lighthouse Island is the main attraction, but you should also check out the other structures to see how they fit into your concept. There are undoubtedly many traps to be set among the displays and on the spiral staircase leading up to the lighthouse in the ground floor museum, which is small enough for CQB action.
Two spiral staircases and a short set of metal rungs must be climbed up in an extremely precarious manner to reach the top of the lighthouse. The vistas, however, make the effort worthwhile: a clear view of the entire island, the Resort, the Central Dock, and even the edge of the Al Barga Fortress.
Those who are having problems moving up because there are adversaries on the first floor might wish to explore the outside of the building to locate some ladders. All of them ascend to a split-level roof, the upper level of which features a set of double doors leading to a landing sandwiched between the two spiral stairs of the lighthouse.
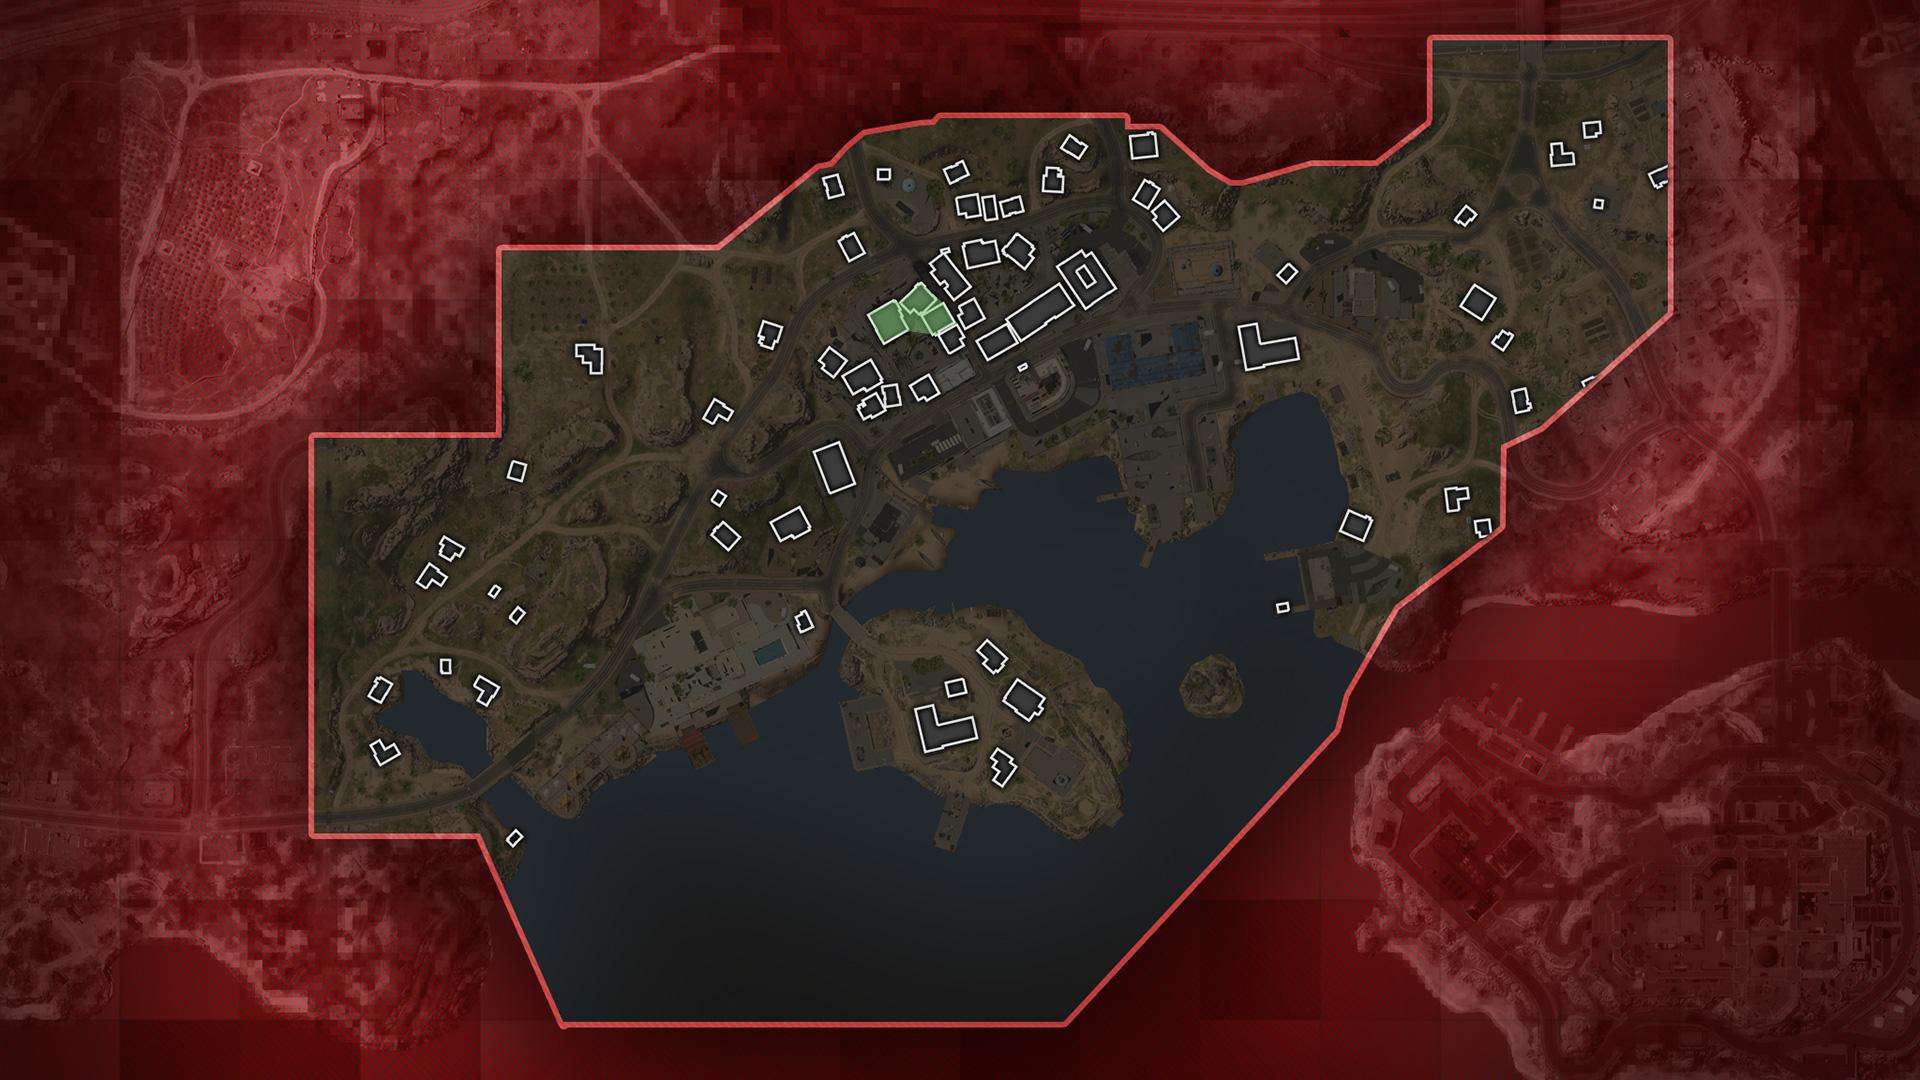
C-Flag Downtown Sariff Bay

These structures are thought to be the best sniping locations in the zone because Downtown slopes from North to South. For the ideal overwatch position on the main street, stack the two together. The other one is actually the highest structure and is the greatest for broad surveillance.
The Downtown area of Sariff Bay is a large cluster of residences and commercial buildings, divided in two nearly equal half by a street that leads to the Central Docks.
We’ll say it right now: these multi-story buildings make it simple to get lost. If you choose to go inside or between buildings, we advise employing shotguns, SMGs, and other CQB weapons to survive some of the cramped hallways and room constructions.
In contrast, the rooftops of the Downtown are very accessible and provide access to parkour routes that can circle the entire city. Due to the area’s downhill slope from North to South, those who can control the inland buildings are given preference.
On the roof, this region may be crowded with snipers and those using mid-range weapons. Be sure to look up just as much as you do around corners if you are on the streets below. And getting right below rooftop snipers, where they must attack from an awkward angle, is one of the finest methods to attack them.
The Central Docks to the south and the Downtown Outskirts to the north surround Downtown.
Central Docks
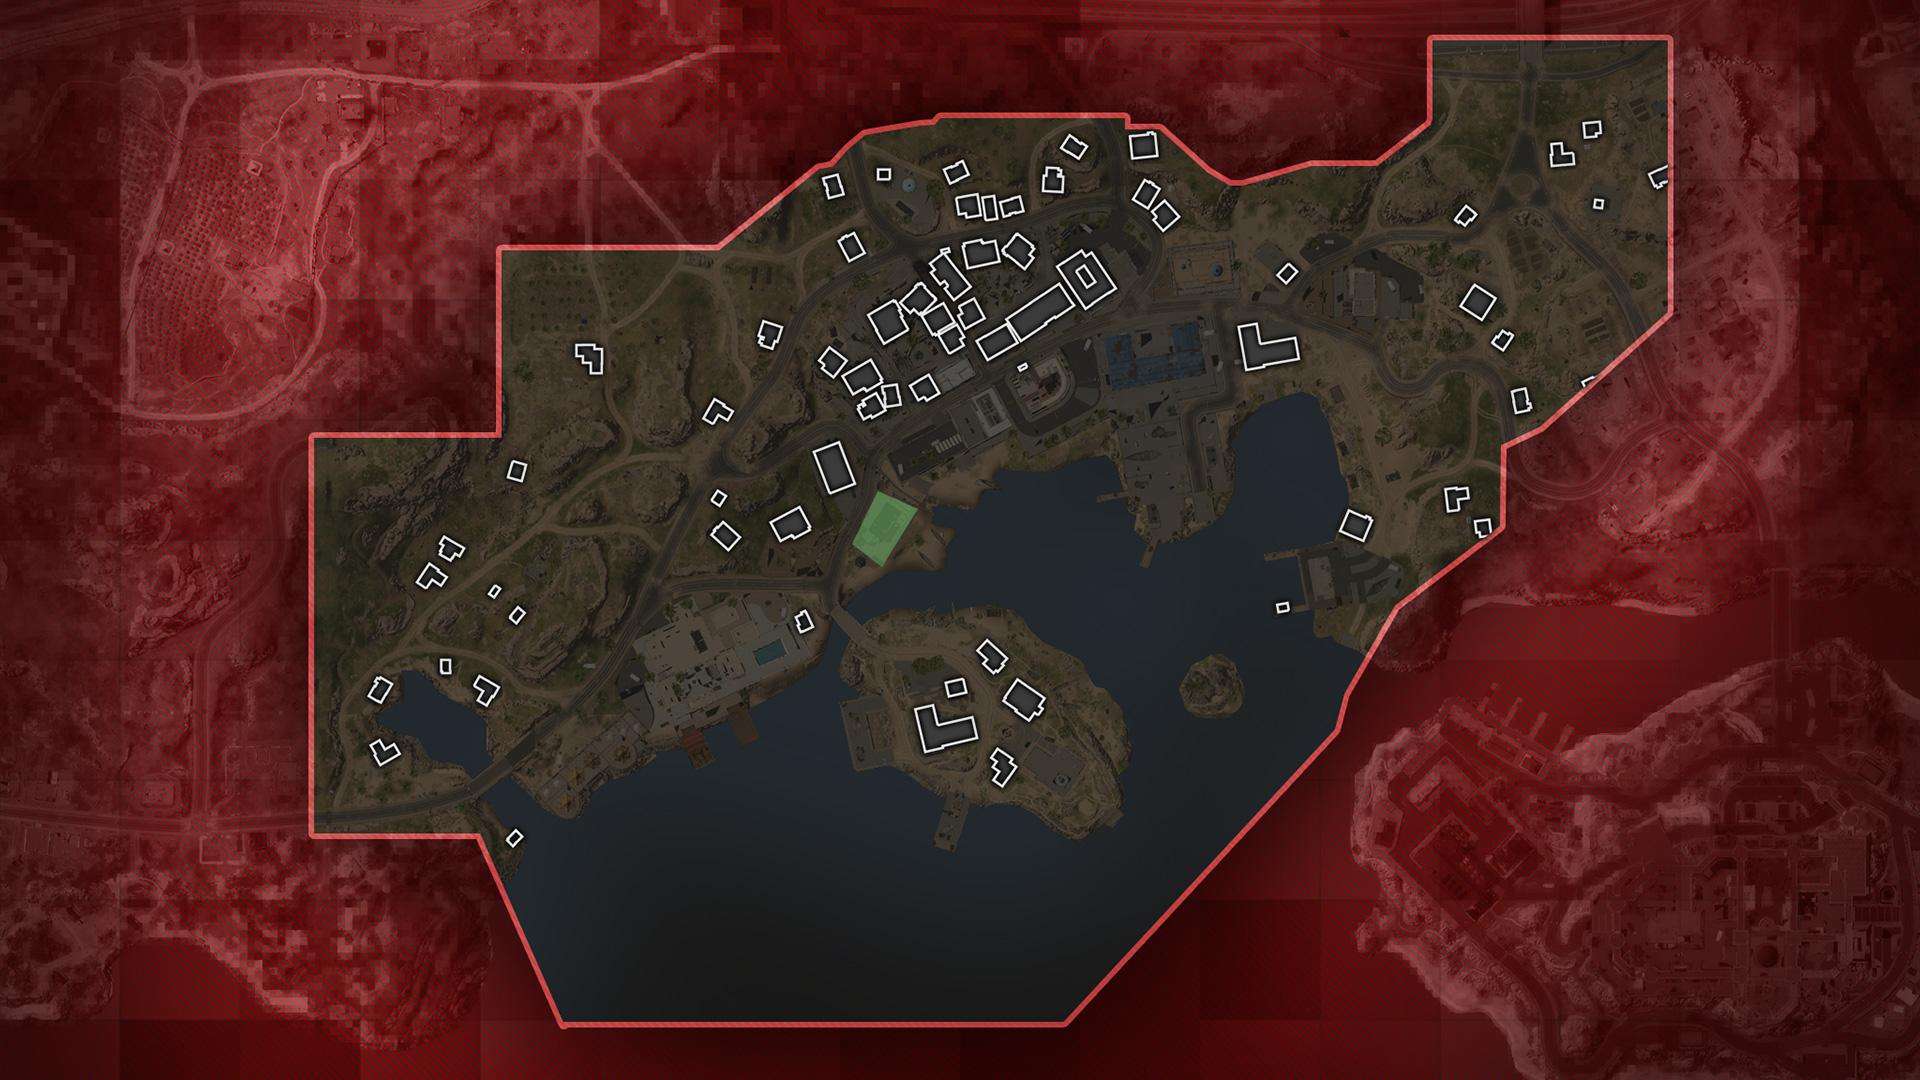
Those Downtown or over on B-Flag Island can be effectively counter-sniped from the Fire Station on the west side of the Docks. It is also simple to get there from other Docks or the Bay.
The entire south shore, which serves no purpose during Ground War, is crucial for controlling the Republic of Adal proper in the face of incoming seaborne invaders. This region offers many outlets to the Bay, including quick approaches to the B-Flag Lighthouse Island and D-Flag Dock, which are separated by two fish-adorned archways.
We begin at a group of three structures that includes the Sariff Bay Fire Station, a brand-new appliances store, and a blue residential complex. The final one features a tower with breathtaking views of B-Flag Island, Downtown, and other places. When traveling through this part of Adar, it ought to be a must-stop location because of how simple it is to get to from the Bay or the streets.
The Supermarket, which has a huge wraparound balcony and a stairway up to its ventilation apparatus, is located next to the Fire Station past the creek. Operators with sufficient parkour abilities can jump to a nearby balcony and start working their way Downtown without having to race through the streets, and it also offers a beautiful view of the Bay.
Despite not having a nice parkour path, the restaurant next to the supermarket offers excellent views of the area’s easternmost point. Inviting CQB play is possible at the Supermarket and Restaurant, which can then spread to the first Downtown residences thanks to both establishments’ robust construction.
The renowned Aamir Waterfront Fish Market is located to the east, near to the E-Flag Apartment and beneath the Downtown Outskirt’s administration. Its inside is exceptionally roomy for mid-range play, and its back dock, which has a fishing boat with a long history and is located close to the D-Flag Docks, is also very spacious.
Downtown Outskirts
The water tower and the government building’s tower both offer incredible long-distance, 360-degree sightlines.
This neighborhood, which encircles the majority of Downtown, may be identified by two tall buildings: its namesake directly up the main central route and the elaborate government building that faces the E-Flag apartment.
To reach the highest heights in any of these sites, a lengthy ladder must be climbed, with the water tower’s exposed location making it significantly more dangerous. But the payoff for taking a chance is a full 360-degree view of their surroundings.
The riskier option, with no real cover, is the water tower. It can, however, entirely offset the rooftop shooters’ Downtown advantage in height.
The safer option is the government building; although it doesn’t have a great view of Downtown, it can compete with views from the nearby E-Flag Apartment or extend out to command the Bay and its ports.
Take cover here when travelling through Downtown, using the roofs or upper floors to perhaps fend off rooftop snipers in the busy neighborhood. Other buildings nearby are a variety of one to two story houses.
D-Flag Docks
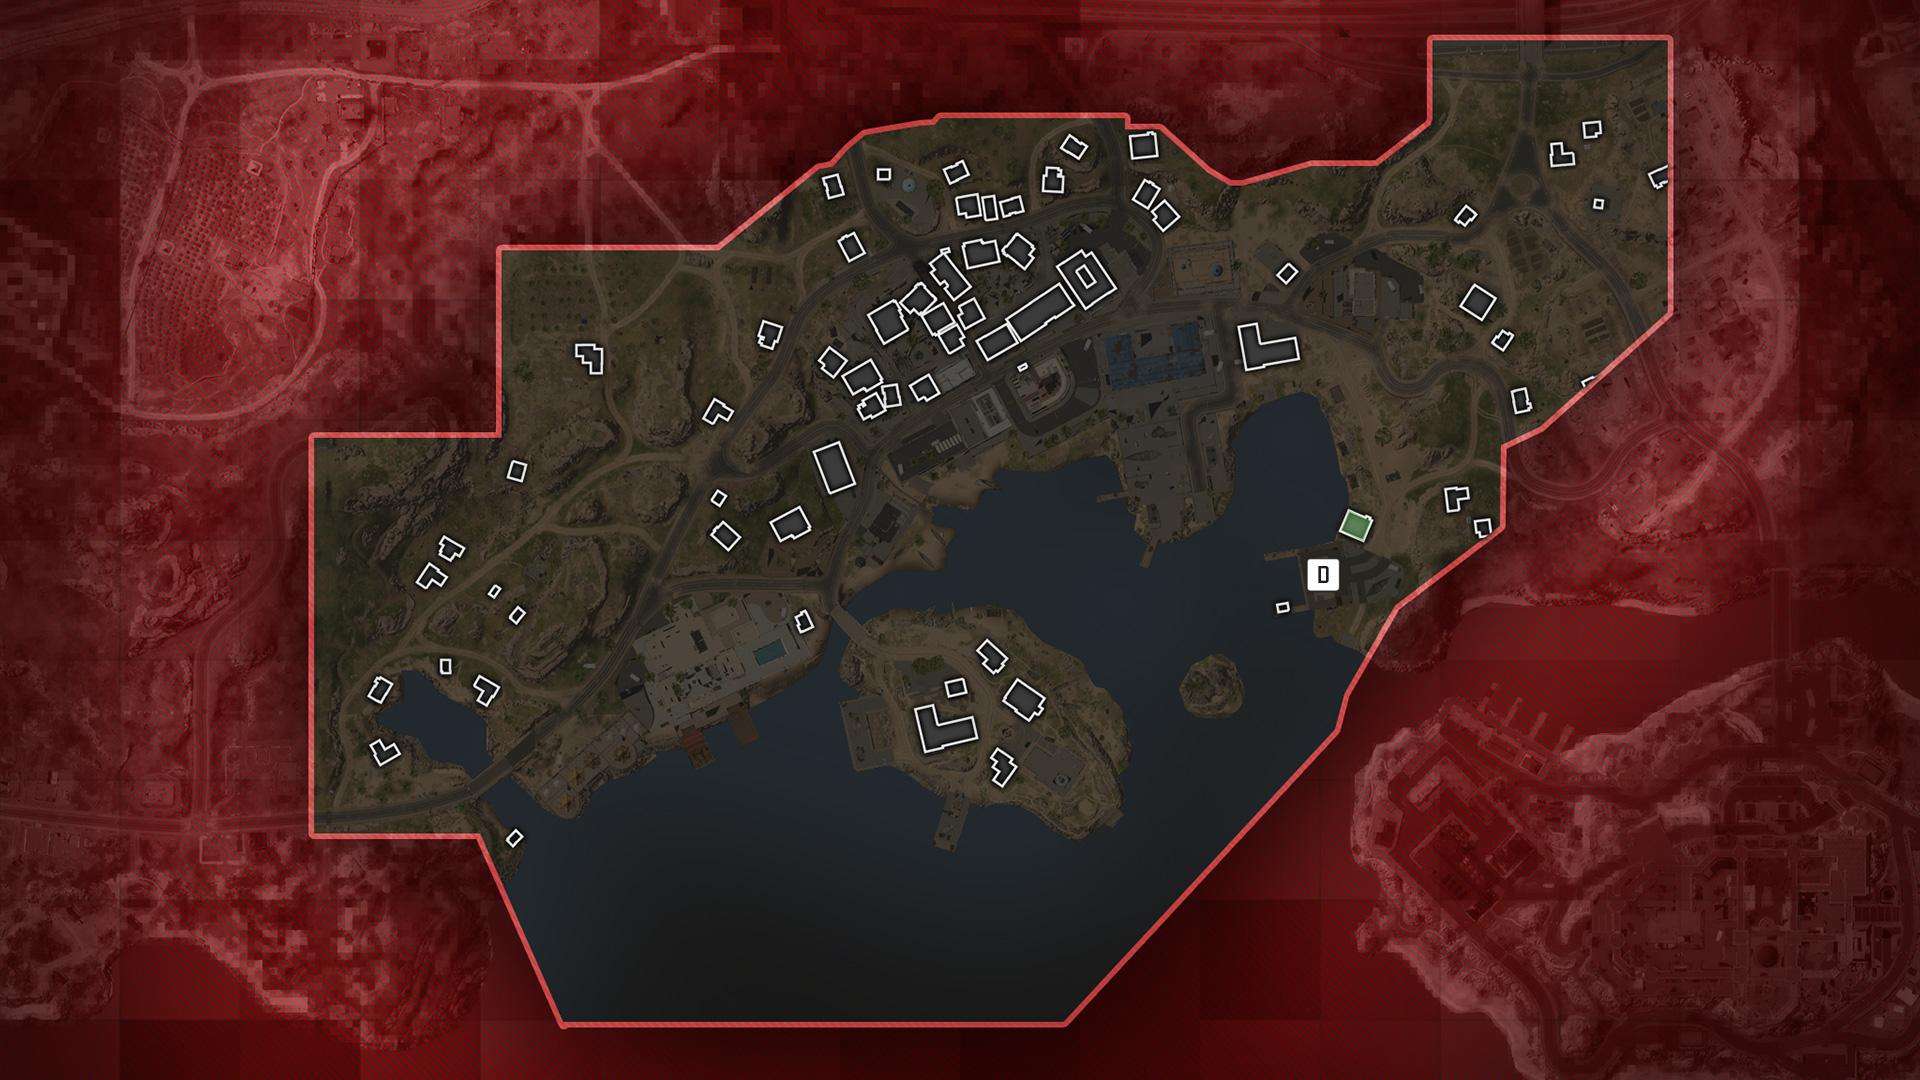
Mid-range weapons may command the Docks below from the red apartment building, shooting through its metal walls to deal with foes on the other side.
The Docks, which are owned by Kushaak Construction, are identified by a straightforward sheet metal construction; entering it during Ground War enables the acquisition of the D Flag.
Although the visual blockage it offers can be useful, the material is so thin that shots can pass through it. While hiding behind these metal barriers, keep moving to deflect enemy fire that will ricochet throughout the area.
The red multi-story apartment building closest to the shack offers commanding views over the adjacent apartments as well as the Docks below and the Center Docs. From this elevated position, mid-range weapons can easily defend the target, while snipers will want to aim north or west out onto the Bay to cope with potential enemy rushes from land or water.
The only other structure in the area is a walled estate complex with two compact dwellings. They can provide more interesting vantage points of the neighborhood or, if it’s possible, the neighboring Crab Factory.
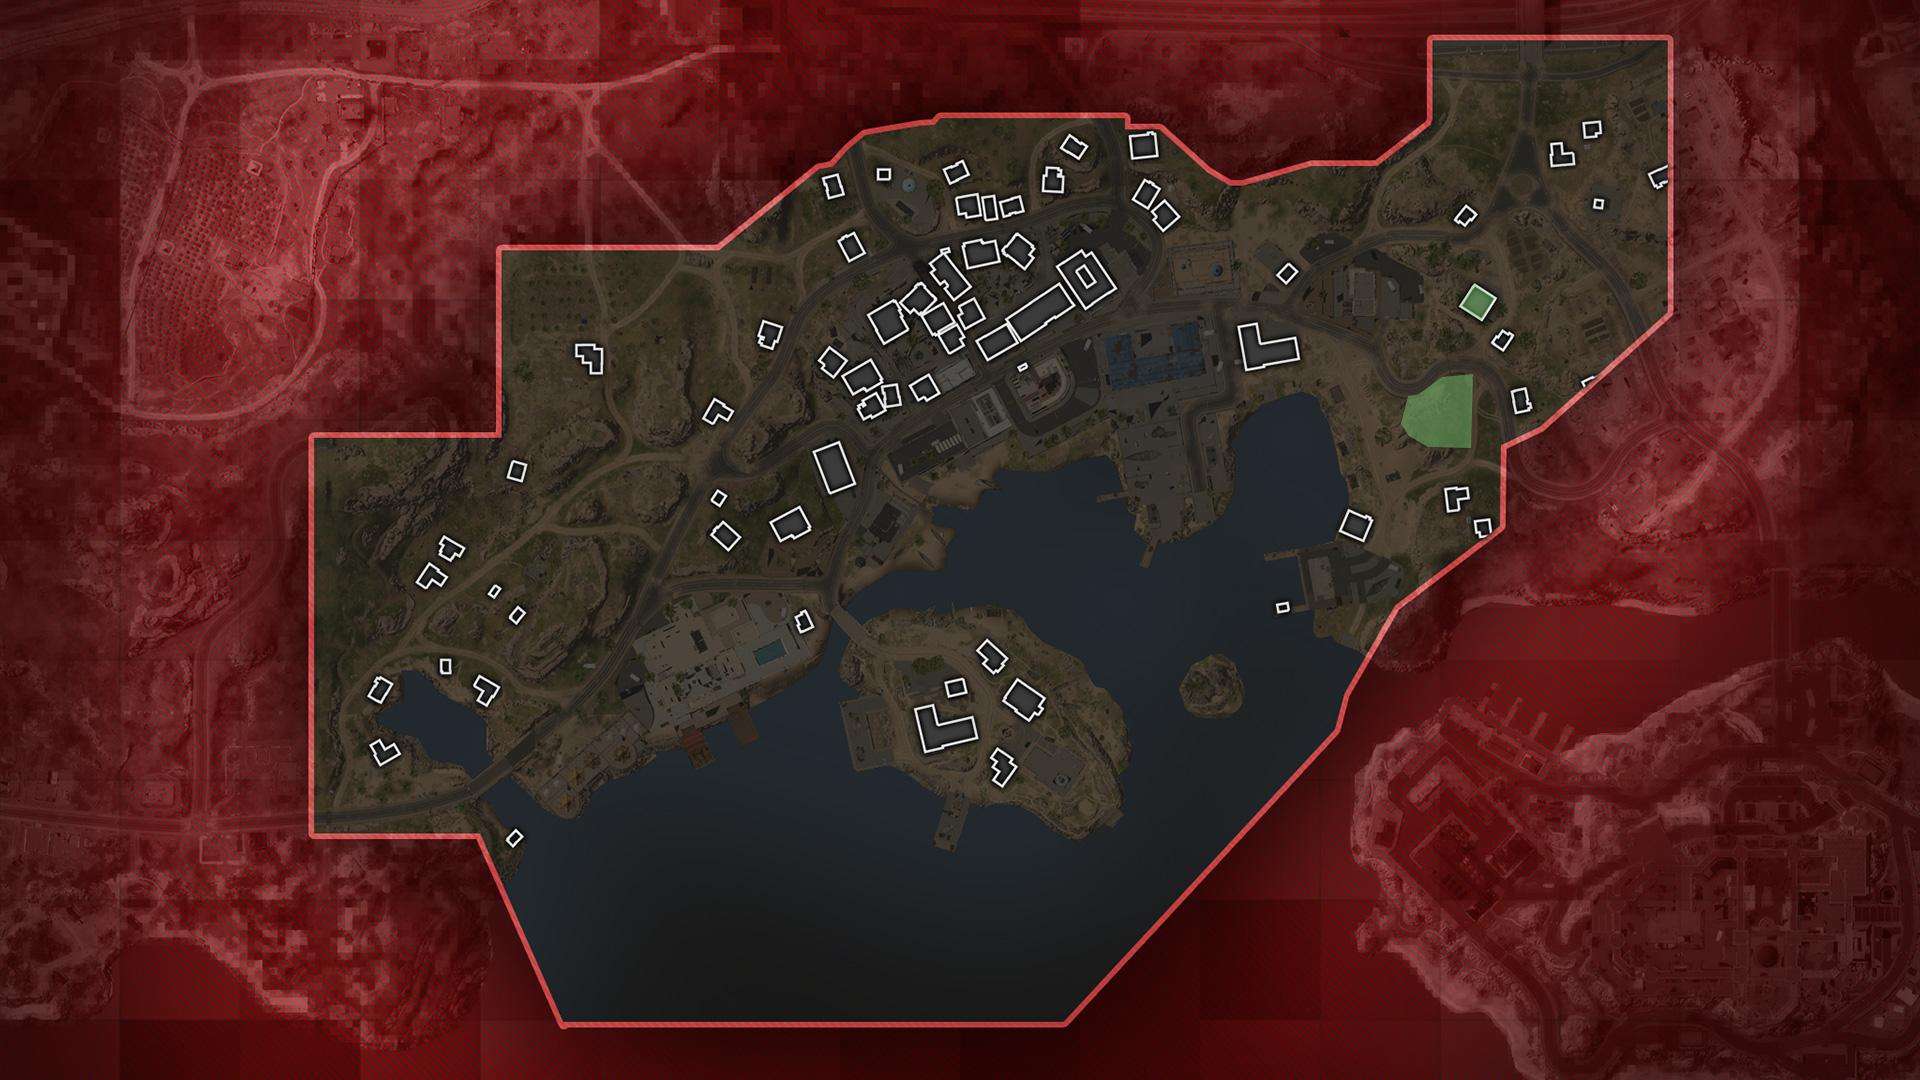
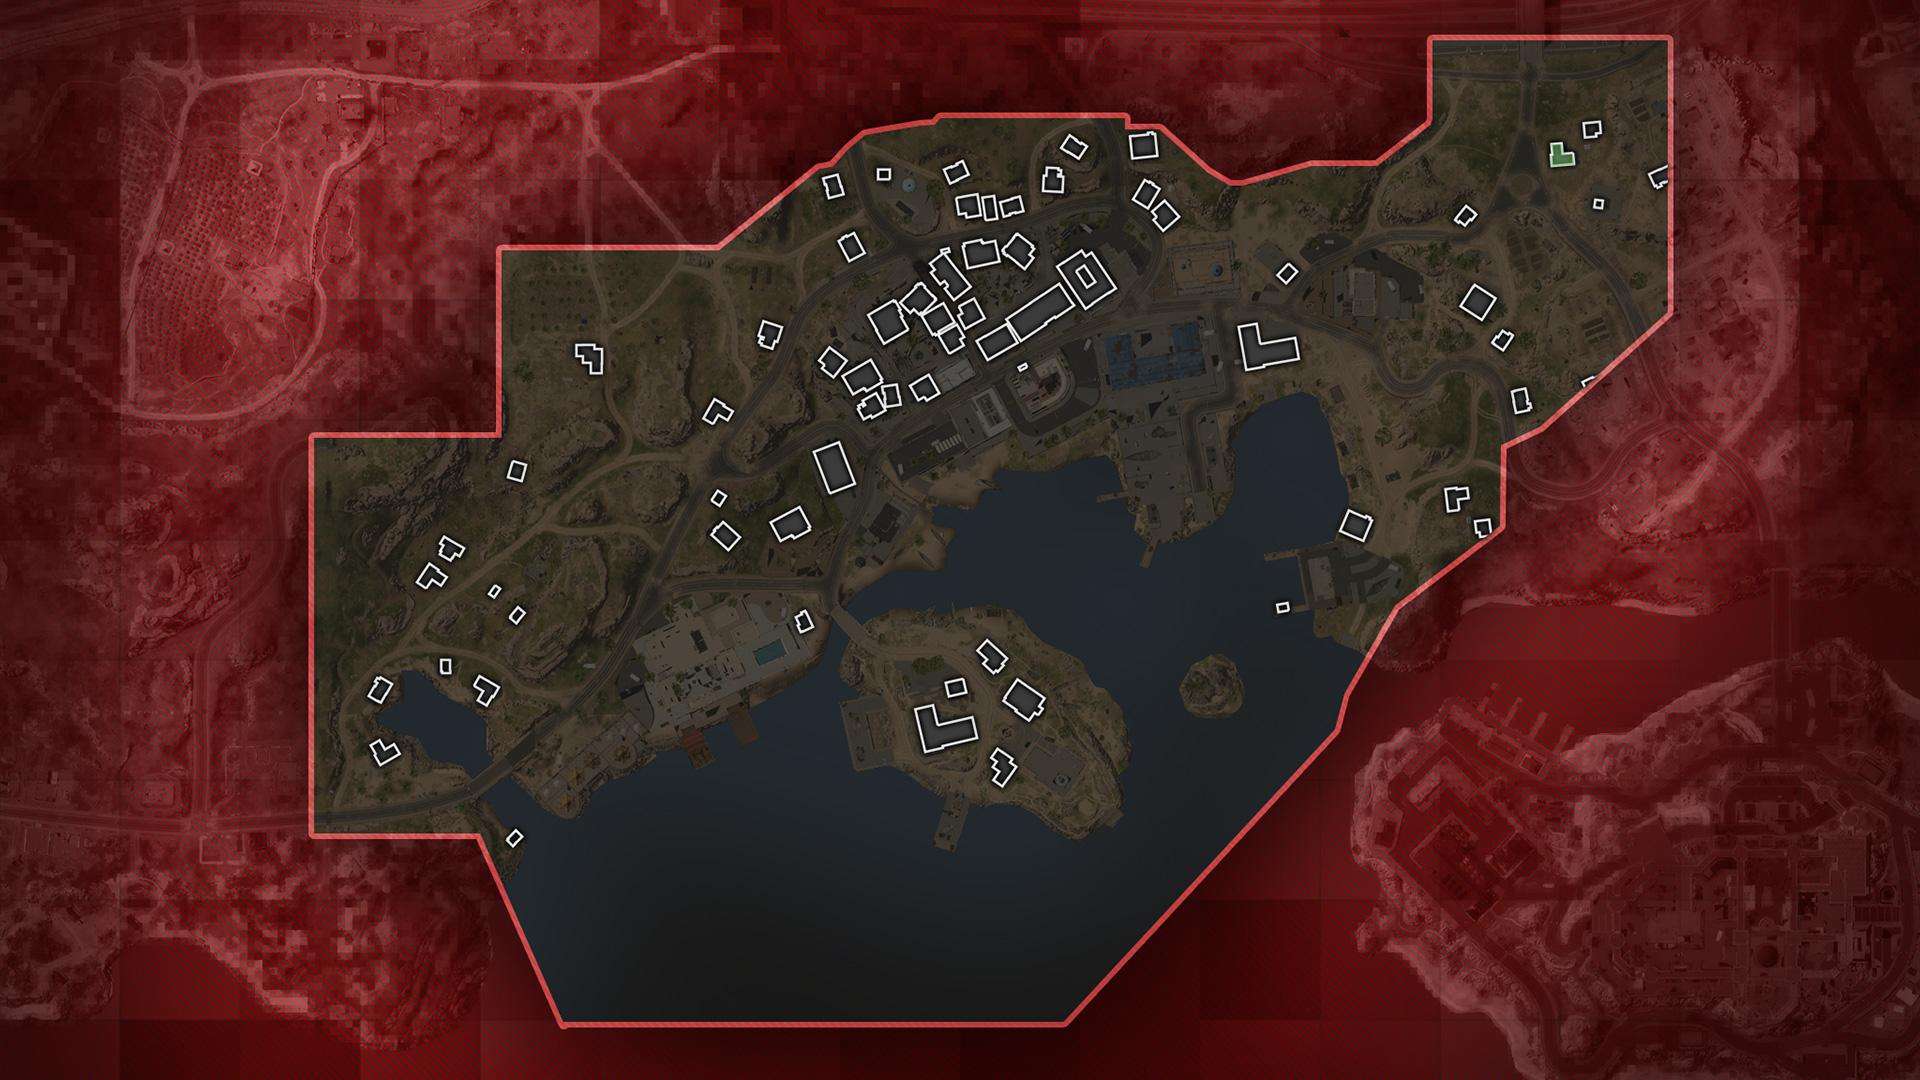
E-Flag Apartment
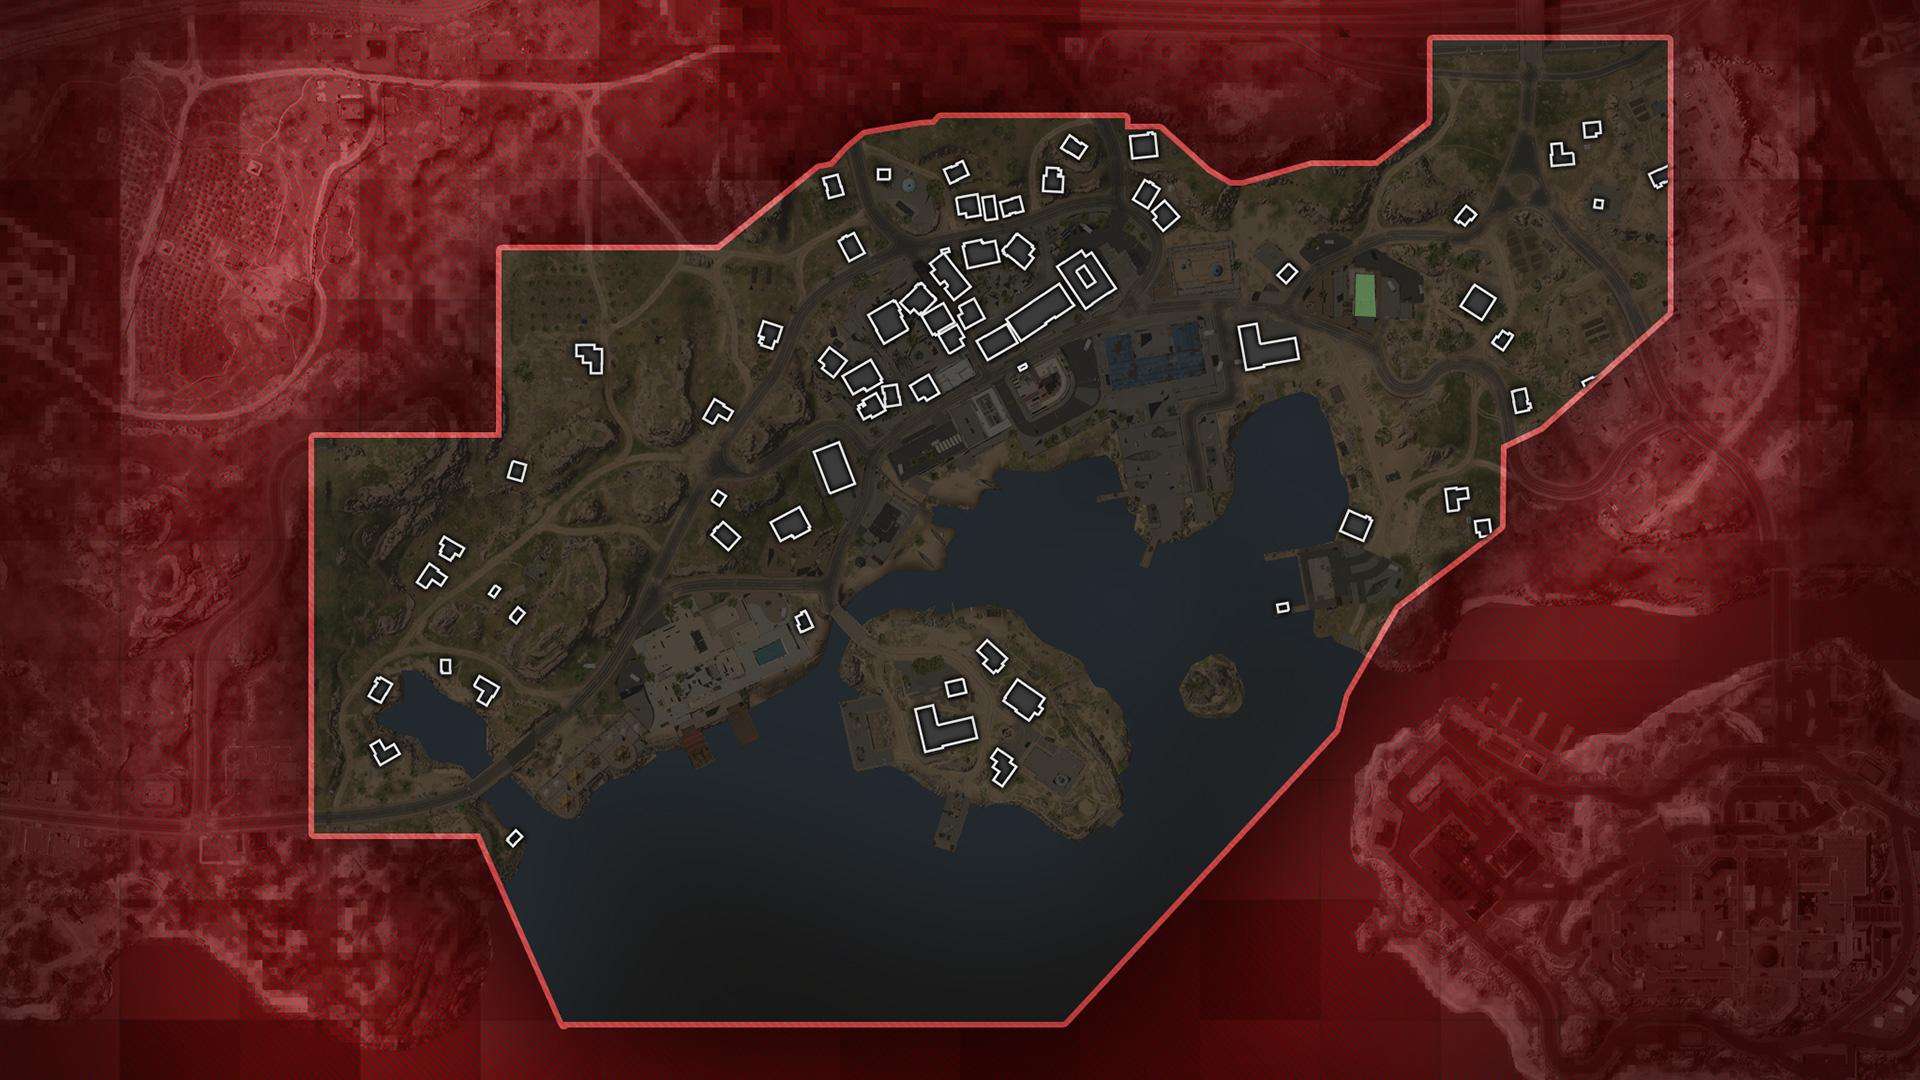
The upper floors of the Apartments provide one of the best vantage points on the east side of Sarriff Bay and can be utilized to keep an eye on the Docks or even portions of Downtown and Lighthouse Island.
The yellow apartment building is a four-story tower that serves as the E Flag in Ground War and has two other indoor sections that are accessible: a café and bistro on the second floor, and a penthouse apartment on the fourth.
Use the two sizable windows in the former, which overlooks the lobby, to see if attackers are seizing the flag below in Ground War or entering through the main entrance. It can be reached through two different staircases, or it can be smuggled into utilizing boxes stacked high and overhangs over the building’s back entrances.
Naturally, snipers flock to the rooftop of The Apartment to set up camp and keep watch over adversaries at The Docks. Additionally, there are clear sightlines from here to Lighthouse Island and Downtown; hence, it may be preferable to stay back and support more aggressive squadmates as they advance toward those locations in Ground War.
Other noteworthy locations close to the apartment include a deserted garage with an accessible roof and a view of the Lighthouse, as well as a metal station between the Central and D-Flag Docks that CQB players can utilize as a shortcut before going to the fish market and other locations West.
Recruit Tactics
I’m New in Town
Not familiar with Ground War from standard Multiplayer?
Sariff Bay’s Downtown, with its congested collection of structures, resembles a typical Multiplayer map the most. As you advance toward the main street goal, feel free to sweep them all.
You’ll quickly learn to inspect rooftops and balconies just as thoroughly as corners while walking about Downtown. Keep an eye out for adversaries from all sides by rotating your head.
Future missions will benefit from learning this area because of the concentrated amount of buildings and complexity that could make it a hot drop.
Landlocked
Newer players should consider going around Downtown’s Outskirts rather than dredging across the open Bay, which are closer to goals.
It offers adequate sightlines over most targets while serving as an introduction to traversing larger landscapes. It’s a nice place to escape to if it gets too hectic because of its close proximity to Downtown.
It is best to use a mid- to long-range weapon in this situation; if you are concerned about being killed, try sticking to one structure and going slowly across the surrounding area after the most of the threats have been taken out.
Veteran Tactics
Naval Warfare
Water combat is designed into Sarriff Bay.
If the enemy manages to seize Downtown in Ground War, attempt seizing the seas and capturing the B and D Flags as well as the flag that is the closest to your squad’s headquarters.
Utilize the nearby structures for defense against adversaries coming from the North and the naval vehicles to thwart amphibious threats.
Water is a fantastic stealth tool in any mode; utilize it to swim around every Dock and reemerge behind enemy defenses.
Radio Silence

The largest structure in Sariff Bay, this orange communication tower at the SpecGru spawn offers amazing views of the entire area as well as out to larger Adal.
Having your finest sniper take up a position up here can be a huge benefit, albeit it may need some cooperation with the rest of the squad. When sniping from this position, pay attention to the bullet drop, especially when facing people past the East End of Downtown.
While up here, be aware that you might become well-known. Additionally, there is no protection, making it simple for a counter-sniper to kill you. Feel free to jump off the tower and to another location, such the Apartment, if you are discovered.
Prestige Tactics
No Man’s (Is)Land
Although we do not advise any Operator to use the small island close to Lighthouse Island, it can be a fantastic counter-play location for someone who understands how to employ natural cover.
Get fantastic views of the Lighthouse Island, the neighboring Docks, or even portions of Downtown by using the rocks.
It can also be used as a staging area for a counterattack on nearby naval vehicles. Grab a launcher and get ready to shoot at any boat that passes through the Bay from this location.
Parkour Pointers
Sariff Bay contains some unique parkour areas as well as some others that could be replicated with similar-looking buildings around Adal.
Here are three examples:
Try practicing your leaping skills at the two-story structure in the SpecGru spawn by using the walls, the dumpster, or the windowsill. You can also use the little pipes that protrude from the building in between these second-story spaces as a means of efficient and covert mobility with a little expertise.

Jumping from the wall to the balcony and then from the balcony to the short roof is a cool way to climb this cluster in Downtown. You have two options: go from the lip of this small roof onto the overhang of the balcony, or use the overhang with the couch beneath it to move south. To access one of the area’s tallest portions, mantle up onto this and then go to the little overhang over the door.
One of numerous fire stations in the Adal region is the Central Docks Fire Station, which has a protective wall that is simple to mantle. Try jumping over the main gate to the roof rather than taking the obvious hop onto its South side. Also keep in mind that you may reach the Fire Station tower in half the time by climbing from the roof to the ladder.
TOP Tips
- SpecGru HQ. This spawn side gets an incredibly early jump at the Apartment and Docks flags in Ground War, and otherwise is a strong break point before venturing towards Sariff Bay proper or elsewhere in Adal.
- KorTac HQ. Travelling through this suburb? Know that there is an outlet to the greater bay here, great for an escape or a head start at controlling the seas of Sariff Bay.
- All-Inclusive Resort. Sariff Bay’s Resort central courtyard is like on its own island compared to the rest of the map. Try dropping in – yourself or Killstreaks – a from above for the quickest way in, or sleuth around using nearby ladders and the Bay itself.
- This Exhibit Looks Familiar… As for the actual island, Lighthouse Island’s main museum building is strong for CQB play at the bottom, making it hard for snipers to move up from there to the roof. Try taking the ladders outside to ascend halfway up without dealing with enemy museum patrons below.
- Downtown – Core to Sariff Bay. The Downtown area is a perfect place to be introduced to Ground War given its compact nature – it should remind you of a Multiplayer map. CQB weapons are encouraged, as well as looking up at the rooftops for snipers.
- Tower Snipers. The SpecGru Communications Tower and Water Tower towards Downtown are the two tallest structures in this region. Use them for longshots or to scout ahead – just don’t stay up for too long, lest you get sniped yourself.
- Take the High Road. Going to the North end of Sariff Bay means working with the natural elevation down to the sea. If you want to best catch enemies on rotations, whether it’s from Dock to Dock or into Downtown, head north of the main street and look for vantage points looking South.
- Unwelcome Lobby. The Apartment where the E-Flag spawns in has a café with a double-window overlooking its lobby. Use it to defend the objective in Ground War or get a look at incoming enemies who decide to walk right it the front door.
- Something Lurks in the Water. Sariff Bay is a prime example of using swimming for stealth Operators – try navigating off the south shore to the various docks, avoiding potential passing enemy ships to pull off a long, yet rewarding, flanking manuever.
- Parkour Bay. From Downtown to the islands and more, Operators with strong movement skills can carve up Sariff Bay with cool parkour routes around the map. Don’t be afraid to mantle up to overhangs, balconies, and rooftops – it just may create a new and effective way to tackle an enemy in a power position.


Be the first to comment