
“Outbreak” is one of the longest and most complex side-quest in JA3, which sees your mercs trying to stop an actual zombie outbreak! There are many ways this adventure can go and it will even change the ending depending on your choices and actions. Wanna know how to complete this side-quest? Find all the info you need within!
Table of Contents
Guide to Cure the Red Rabies
Spoilers!
It’s kind of obvious, but this guide contains spoilers for the story of Jagged Alliance 3!
This guide will walk you through exactly how to solve the Outbreak questline and will explain all the possible outcomes!
If you want to solve this quest and find the cure yourself, stop reading and go play it!
You have been warned!
What You’ll Need
To fully complete the questline and get the best possible outcome, you’ll need a few things before you start:
- A full squad of very capable mercs with good weapons and armor. Preferably snipers and/or shotguns and explosives! You’ll often be dealing with a lot of enemies at once (really spongy ones) and you’ll often have civilians mixed in with the bad guys, so some very tactical and precise fighting will be needed. (That is if you care about civilian casualties. If you don’t, bring the biggest boomsticks you can find!)
- Already having multiple squads of mercs can make this quest significantly easier. Especially if your choices result in a time limit being added to the mission, while you’ll have to scour many diffrent parts of the map.
- A merc with at least 80 Medical skill. Since it’s a zombie outbreak, you’ll have a lot of medical investigation to do, and to pass all the skill checks you’ll need a very capable doctor in your team. M.D. is the cheapest doctor, but if you have the stacks, hire Dr. Q who is also a really competent melee fighter.
- While not strictly necessary, having a merc with at least 80 Mechanic skill will be of great help during this mission.
- Having a merc with the Loner perk can bypass one of the bloodiest and most time consuming parts of the quest.
The Sanatorium – Part 1
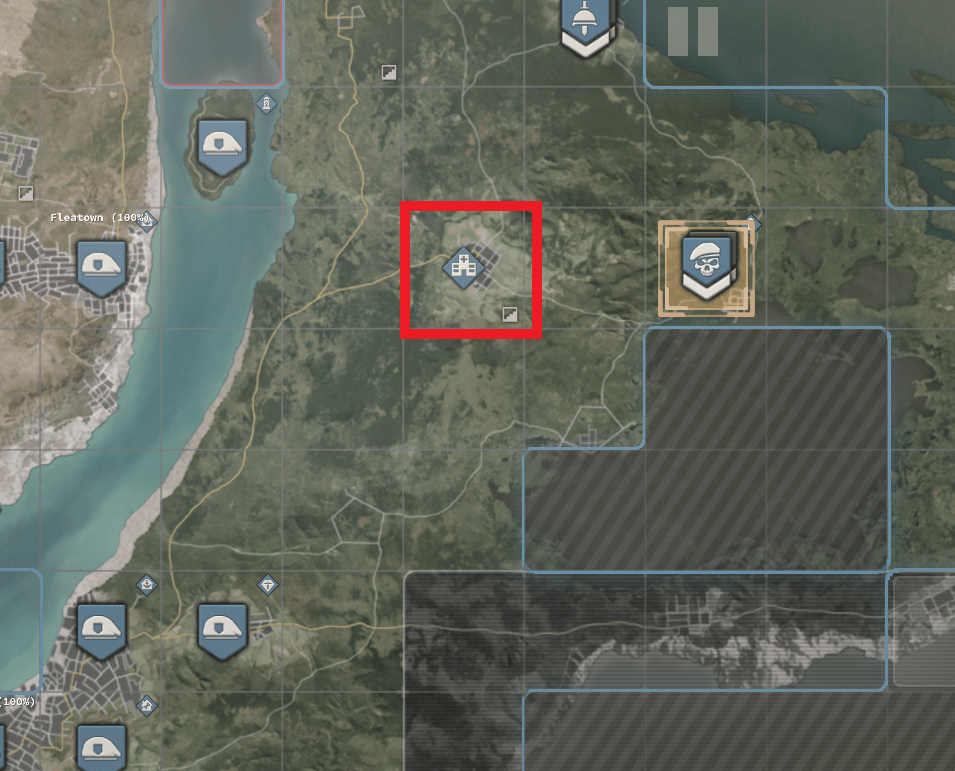
The questline starts smack in the middle of the map at The Sanatorium (H12).
By the time you get here you most likely already heard rumors about the Outbreak or even seen some zombies or their handywork. Especially if you passed through Pantagruel Outskirts (D6), where the inn owner complains about a rowdy guest locked in a room…
At the Sanatorium – depending on where you arrive – a couple of things can happen. If you go by the front gate, you’ll see a cutscene where a couple of sick people waiting in line turn into zombies and start attacking people. In return, the Sanatorium Guards simply mow down everyone, even the still healthy ones. Not exactly a warm welcome.
Watch out! If you haven’t yet encountered zombies before coming here, well, these are not the puny shambler kind! Unlike the Legion goons you’ve been fighting so far the zeds can’t shoot, but they are extremely fast and while they don’t have armor per se, they are very tanky! Single shot, high-damage weapons are the best to deal with them, like sniper rifles and shotguns, preferably with hollow point ammo. Shooting them in the leg can slow them down significantly and keeping your distance can avoid their high melee damage potential. Their pathing is predictable and they tend to bunch up, so explosives can also be a great choice (especially Barry’s shaped charges), but you’ll have to watch out for collateral damage.
Sidenote: no, you will not get infected if they hit you.
You can either help kill the zombies, or just back off and let the guards deal with them. Regardless what you do, once the dust settles they will warn you that you are not allowed to enter the Sanatorium without express permission from Dr. Kronenberg (If you were already inside, you get a 30 second timer to leave the premises or they’ll start shooting.).
Now, there is no way to just waltz into the Sanatorium unmolested, so you have two choices:
- You can murder all the Sanatorium Guards. This way you’ll have free reign to walk around the place, however you’ll get a hefty reputation hit and there will be no one to keep the infected at bay anymore, and also, murdering civilians and people just doing their job is not exactly a good thing. If you don’t care about any of that, just go in guns blazing.
- You can go sneak in. It’s easiest if you go around to the back of the compound where the truck is.
Once you’re inside you’ll need to start looking for clues to confront the “good” doctor downstairs:
- Witness the events at the front gate.
- Hack the radio near the tents
- Inspect the corpse-filled truck at the back of the compound.
- Inspect the corpses next to the furnace
You’re going to need a merc with very high Medical skill for the latter ones. Once you’re done, head for the basement either through the stairs behind the front desk, or if you are sneaking use the door at the back of the building near the corpse truck.
Confronting Dr. Kronenberg
Arriving in the basement you’ll be immediately attacked by zombies! They are fast, aggressive and there’s not much room to maneuver, so dispatch them the best you can.
You’ll find Dr. Kronenberg in her office next to the stairs. Confronting her with the clues you’ve gathered reveals that she’s been doing horrific experiments, not just on animals but on humans as well! She claims she is trying to cure the Red Rabies, the disease turning people into zombies outside. She also reveals she is infected, and in order to survive she needs the blood of the recently infected to stave off turning into a zombie, hence she needs to actively infect people to drain their blood and kill them right before they turn. In her eyes the ends justify the means, and killing hundreds to save millions is A-okay for her.
You can wrestle with the morality of the situation, but in any case, she doesn’t have much time left. You have a choice to make here, the most important one in the questline:
- You can simply kill her. If you do, you might feel morally superior for a minute, before you realize you just doomed millions to their deaths and probably created a bona-fide zombie apocalypse. Without the doctor there is no cure, the questline ends here, however you’ll meet the consequences of your actions later.
- Tell her to stop the experiments immediately. This way you’ll save a lot of lives, but will also put a strict time limit on the entire mission, since she can no longer prolong her own life.
- You can let her continue with the experiments. She will continue to kill countless innocents in the name of science, but at least you’ll have no time limit this way and will have to live with the thought that you basically condoned mass murder. For science, of course.
The Cure
In order for Dr. Kronenberg to create a cure, she needs a number of blood samples from different parts of the map. This is where the fun really starts!
If you have chosen to stop the experiments, you’ll have less than 10 days to gather the samples or you’ll fail the questline! If you have chosen to let her continue the experiments, there will be no time limit.
There are six possible locations to gather blood samples from.
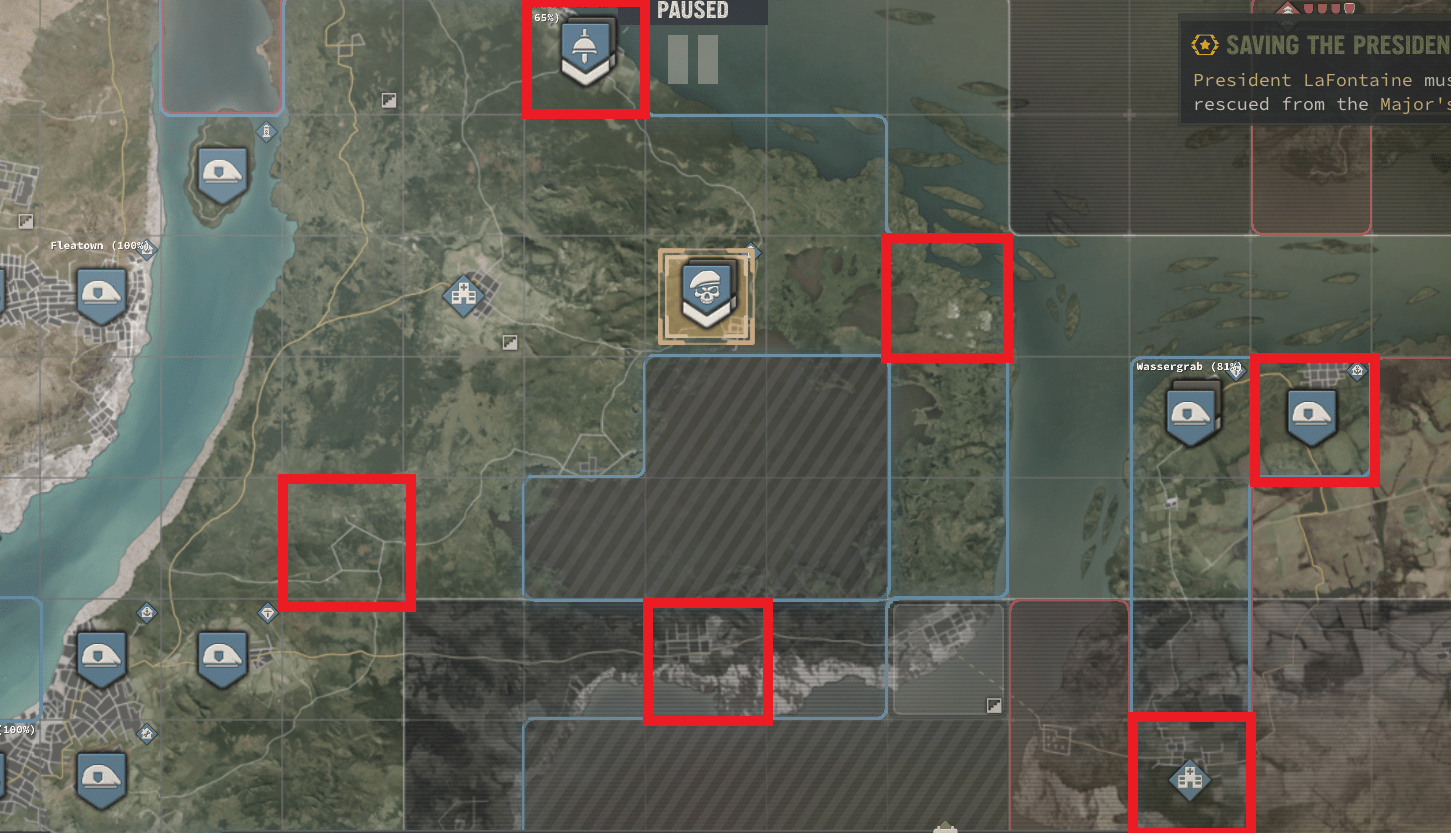
- Chalet de la Paix (F13)
- The Burial Grounds (J11)
- Factory Ruins (K14)
- The Twin Manors (L18)
- Grimmer Hamlet (I19)
- Wetlands (H16)
You will need do deliver at least 4 out of the 6 possible blood samples to complete the cure!
Three out of the six locations have some complex tasks you need to accomplish before you can get the blood sample, so make sure you are prepared! (See the “What you’ll need” section for more info!)
You can visit these locations in any order, however if you visit them before talking to Dr. Kronenberg, the blood sample interactables and the relevant conversation options won’t be visible! This still presents a good tactical opportunity:
If you have chosen to have the time limit, you’ll need to move very quickly! You can preemptively visit all the locations, clear them of enemies and complete all the tasks needed to get the eventual blood samples before you visit the Sanatorium. So when you do start the timer, all you’ll have to do is pick up the samples and rush them to the doctor to finish the cure. You can station multiple squads around the locations in preparation, so when you start the mission they can each pick up a sample and deliver it to the Sanatorium quickly.
As for the locations, let’s go from simple to complicated…
The Burial Grounds (J11)
Head to the altar in the middle and inspect the buckets with high Medical skill to get the blood sample.
Yes, that’s it.
Wetlands (H16)
Prepare for a lot of animal cruelty.
The area is completely infested with hyenas and crocodiles. Hyenas are fast and crocs have high armor, so prepare accordingly. There are no civilians around, so explosives might be the easiest way to go.
Once you’ve dispatched the zoo, find the suitcase near the plane wreckage. You’ll need at least 80 Mechanic to open it. The blood sample is inside.
Minor spoiler for later: there’s a tunnel entrance in this area, which leads inside the Fortress at K16.
Factory Ruins (K14)
When you arrive in the zone, you’ll find looters already fighting some zombies.
My advice: Hide. Let them sort it out, and you can deal with the survivors.
Once the dust settles, explore the area. Watch out, the place is absolutely full of traps and mines. A merc with high Explosives skill is essential if you don’t want your team to end up as red stains on the ground. There’s some reasonably good loot here, and you can get quite a few Parts and Explosives XP by defusing all the traps.
The blood sample is on the upper floor in the small building with the collapsed walkway. Inspect the body with a merc with high Medical skill.
Grimmer Hamlet (I19)
When you enter the zone, prepare for a horde of incoming zombies! They are hard to deal with anyway, this time, however, there are a lot of civilians around, so watch where you’re shooting! (Or not, it’s really up to you.)
Once you’ve dealt with the initial wave, you’ll have to go door-to-door and clear out the rest of the settlement. You’ll need a strong merc with a crowbar (no need waste lockpicks), and open each house one by one.
When you open a door two things can happen:
- A bunch of zombies will bust out and you’ll have to deal with them.
- A bunch of civilians will run out and a number of zombies will spawn somewhere near.
Position your mercs accordingly and try to avoid collateral damage.
Once you’ve cleared out the houses, talk to the drunk guy at the campfire, and he’ll ask you to deal with Bella and her lovers. Head up to the manor and prepare for a fight, since Bella and her harem are all zombies now (and really tough as well)!
You also need to fix the still near where the drunk guy is in the village.
Once you’re done with everything, he’ll give you the blood sample.
The Twin Manors (L18)
Enter the village and talk to Dr. L’enfer at his clinic near the gate. He is quite cynical, doesn’t like to be disturbed and even the mere mention of Dr. Kronenberg will make him send you away. (They have more than a few professional disagreements, to put it mildly.) He will, however, mention a murder mystery in the village, and solving it might sway the doctor to your side…
If you have a merc with the Loner perk, you can convince Dr. L’enfer to just hand you the sample, no need to bother with the rest of this side-quest.
It’s time to start gathering evidence! Go outside and talk to some of the locals. They will mention the murders that have been going on: some of the victims have been shot, some of them poisoned, but never both at the same time. Interesting. They’ll also tell you the two families – the Le Domas and the Van Tassels – living in the manors opposite sides of the compound have been locked in a feud for a very long time. They’ve been performing a rendition of Romeo and Juliet (how ironic) when the two actors died in strange circumstances. Some theorize it might be vengeful spirits that did it, but ultimately they will point you to the crime scene.
Head to the stage in the back of the compound and inspect the two dead bodies. You’ll find that the prop gun near one of the corpses has been loaded with real 9mm Hollow Point bullets, while the other one apparently drank from a prop “poison” bottle containing strychnine (a real poison). The plot thickens!
Investigate Dr. L’enfer’s clinic, where you’ll find a cabinet with cyanide inside and boxes of 9mm bullets. Questioning the doctor also reveals he has no alibi for the time of the murders and he doesn’t exactly speak very highly of the locals, to put it mildly. At this point you might assume the good doctor is the culprit, but if you’ve been paying attention you’ll notice these are just red herrings. (It’s the wrong kind of poison and these boxes of bullets are regular and are unopened!)
Go and toss both of the manors. After some investigation you’ll find boxes of 9mm HP bullets in the Van Tassel manor and you’ll find strychnine in the La Domas manor. Well, well, well, looks like we have solved this little mystery after all.
Sidenote: If you haven’t already, you can also visit The Old Graveyard (L17) just west of Twin Manors. You’ll find more corpses here who’ve been shot and poisoned respectively to gain more evidence, however this is not necessary to solve the case.
Tell Dr. L’enfer to gather everyone for the announcement and head to the stage yourself. At this point, you might want to position your mercs strategically around the stage and most assuredly in cover! Tell one of your mercs to talk to the doc, and announce the verdict, that in fact both families are guilty! This will, of course, result in all out war between the families who will start shooting at each other (and you) immediately! There are a lot of enemies and while they will mostly be occupied shooting each other, if you draw their ire they will end you, so I suggest you don’t do that.
My tip: hide! You can just hunker down in cover, let the families sort each other out, and then you can deal with the survivors. (Try to prevent civilian deaths if possible! There are quite a few of them mixed in with the combatants. You’ll get a reputation hit for each dead civie regardless if you killed them or not!)
Once the dust has settled go talk to Dr. L’enfer who will praise your sleuthing skills (and solving problems with mass murder), and will hand you the blood sample.
Chalet de la Paix (F13)
After clearing out the Legion goons, go talk to some of the locals and “Painless” Doc Robert. It turns out a lot of people have been dying from a mysterious plague. Doc Robert blames the voodoo cult operating in the village and a guy named Roger Wilcox who might’ve brought the plague upon the Chalet.
If you want to question Roger Wilcox, unfortunately you just missed him. Because he is dead. You can find his body on the table inside. Inspecting him with a high enough Medical skill will show signs that he wasn’t exactly dead during the autopsy. Ouch!
Looking around Wilcox’s room you’ll find a letter addressed to Xavier, in which he hints at the location of his diary. Talking to Xavier you’ll get locations Roger frequented in the village where you can find more clues. Also talk to the Hog Lady and Wanda, the voodoo priestess.
After gathering all the clues, you can surmise that the diary is somewhere to the west with three eyes looking at it. Head out to neighboring sector to the west (F12) and look for a formation of three statues under a tree towards the south-east corner of the area. Investigate the rock in the center to find the diary!
But wait! There’s more!
Head up to the disheveled camp (watch out for traps!) and snoop around. You’ll notice the campfire is still warm, someone has been here recently! Investigate the cave to find a whole secret operation and a wealth of new information. It looks like someone has been working together with Sigfried from Landsbach to take over the Chalet for some nefarious purposes!
Go back to Chalet de la Paix and realize the diary has nothing significant in it. Talk to Wanda and she’ll tell you that a page is missing! Talk to Hog Lady and investigate the hog statue to find the last page.
Well, well, well, looks like the good “painless” Doc Robert is not so painless after all! It turns out Roger Wilcox was silenced after he discovered, that Doc Roberts is actually working for Dr. Kronenberg and he was deliberately spreading a new strain of the Red Rabies virus in town!
Before you confront Doc Roberts with all the evidence, make sure to position your mercs strategically around the area, and definitely in cover (or what stands for it in a village made of sticks)! When you talk to Doc Roberts he will readily admit to working for Dr. Kronenberg and he will not deny any of the accusations leveled against him. And that’s when a large group of heavily armed enemies rush in from all directions. Looks like Doc Roberts had help! There is no time to waste, dispatch the enemies however you can and give Doc Roberts what’s coming to him! (Try to minimize collateral damage! You’ll get a reputation hit for every dead civilian, even if you weren’t ones who killed them!)
After the dust clears, head inside and inspect Roger Wilcox’s corpse with 80+ Medical skill to finally get your blood sample.
The Sanatorium – Part 2 (The End)
With at least 4 blood samples in hand, leg it back to the Sanatorium. You’ll find Dr. Kronenberg in her office as usual.
Before handing in the samples, make sure to strategically place your mercs around the area, with good visibility in the corridors and equip some hard hitting weapons. If you have them, place some remote or proximity charges towards the back entrance and the animal kennels.
Talk to Dr. Kronenberg one last time. You can confront her about the events in Chalet de la Paix and Doc Robert, but she will basically deny everything. Hand her the samples and she will successfully synthesize the cure for the Red Rabies! Unfortunately, it’s too late for her, she doesn’t have enough healthy tissue left for the cure to work. (No, you cannot change this, no matter how fast you were!) She’ll succumb to the disease and turn into a zombie herself. Great loss or poetic justice? You decide.
In any case, aside from what’s left of the doctor, you’ll have a bunch of zombies, hyenas and crocodiles to fight in the basement. Just like the first fight here, there is not much room to maneuver so make your shots count! You can make good use of the planted charges or any other explosives if you have some. Otherwise, dispatch the enemies any way you can.
Once the fighting is over, the quest is finished. You have helped cure the Red Plague, prevent an apocalyptic zombie outbreak and saved countless lives. Good job!
This marks the end of the Outbreak questline.
Epilogue
Once Dr. Kronenberg is dead, the quest is over, and you actions and choices will affect the ending.
Good Ending
If you’ve managed to collect the samples in time and cure the plague, Dr. Kronenberg will be posthumously awarded the Grand Chien Medallion of Merit for creating the cure and saving countless lives. A vaccine for the disease will be produced and many of her peers vow to continue her work and find ways to combat the disease in her honor (I guess, for better or worse, what actually happened at the Sanatorium and the surrounding area will mercifully remain a mystery.).
Bad Ending
If you do not deliver the samples in time or Dr. Kronenberg dies before creating the cure, the questline will fail and the ending will change accordingly: Thanks to your efforts the plague will be partially contained, and there is talk about a possible vaccine, but since Dr. Kronenberg’s work remains unfinished, it will still take time. Meanwhile, the disease is still spreading at an alarming rate…


Just awesome guide, really! Cover not only Zombie Cure, but also give full walkthrough to pair more complex quests. Great thanks!
You can get a sample from a corpse at Camp Hope(I12).