Table of Contents
Ecology
| Species | Locations |
|---|---|
| Brute Wyvern | Hoarfrost Reach, Ancient Forest, Wildspire Waste, Coral Highlands, Rotten Vale, Elder’s Recess |
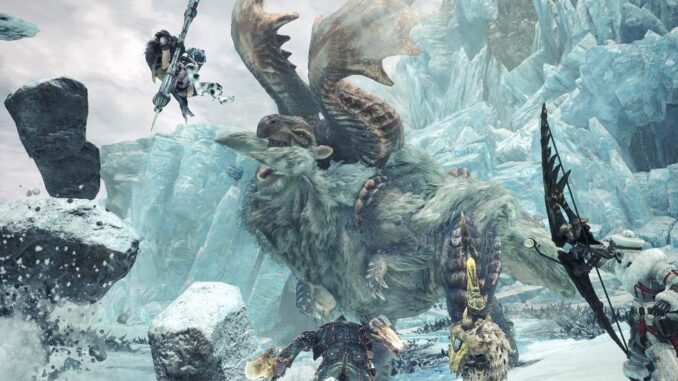
A brute wyvern you first meet in the Hoarfrost Reach, Banbaro is a large bipedal monster with massive curved antlers. A herbivore, it won’t attack unless provoked, but once It has been, it uses its antlers to pick up large trees and other surrounding objects to use as weapons against its attacker, with furious charges and massive slams.
MR1 Assigned Quest: Banbaro Blockade
| Rank | Title | Region | Monsters | Unlocks |
|---|---|---|---|---|
| MR1 | Banbaro Blockade | HoarfrostReach | Banbaro | Ready to Strike (Viper Tobi-Kadachi) |
Banbaro Blockade will be the second Assigned quest you are given in Iceborne. Like the previous quest Baptism by Ice, you’ll have to first venture out on an expedition with your Handler to encounter Banbaro in a cutscene, after which the Assignment will be issued and the fight will begin.Before leaving Seliana, make sure you stock up on Hot Drink, as well as scatternuts if you have them in your inventory. You may also want to consider crafting a Master Rank Armor set if you didn’t play the later DLC’s of the base Monster Hunter World
After defeating Banbaro in this quest, you’ll unlock the Melder, Argosy, and Botanical research in Seliana.
Banbaro Strategy
If you find yourself struggling with this monster, consider crafting or equipping some of the armor, weaponsand jewels found below.Note: These weapons and armor pieces are the ideal options for the FIRST time you fight this monster. Later in the game, there are undoubtedly better options.
| Ideal Armor Pieces | Ideal Weapons | Ideal Decorations |
|---|---|---|
| Beotodus a or B+ Helmet (Polar Mobility) | Best: Master Rank Dodogama Weapons | Ice Res Jewel, Evasion Jewel, Jumping Jewel, Vitality Jewels, Defense Jewels, |
| Jyura a + Gloves and Pants/Jyura B + Pants (Ice Resistance) | Second: Master Rank Great Girros, Pukei-Pukei, or Great Jagras(with hidden element unlocked) Weapons | |
Most of Banbaro’s attacks are naturally centered around it’s massive curved horns. It will use them to create large balls of dirt, rock, and snow and charge quickly at you, usually in three consecutive charges. Snow, dirt, or rocks become compacted into a ball it will roll, or slam down on a hunter if it can. Trees on the other hand are a much wider option for Banbaro, taking up about three times the width of its body in a charge.
Blows to Banbaro’s legs are an effective counter to use against its charge. Firing scatter nuts or crystal burst mid-charge can also halt the beast. If you run out of either of these items, your best bet is your emergency dive. Banbaro turns on a dime, making dodging it as it barrels down on you extremely difficult.
If you are up close and hitting it, also watch out for an attack where it will back up swinging its head back and forth in three consecutive motions. We were hit with this many times as a counter when fighting at the side of the beast. It will also utilize the tail ship and hip check you’ve most likely seen in other monsters like Barroth.
In general, you’re going to want to focus on the head and legs, ideally breaking both horns of the Banbaro. You’ll get more rewards while also focusing on weaker parts of the monster.
Banbaro Weakness
This section contains weakness information on Banbaro
| Effective Element(s) (strongest to weakest) | Dragon(3), Fire(2), Thunder(1) |
| Effective Ailment(s) (strongest to weakest) | Stun(3), Blast(3), Poison(2), Sleep(2), Paralysis(2) |
| Resistance(s) | Water, Ice |
| Weak Points | Horns (Cut-1, Blunt-2, Ammo-1)Head (Cut-3, Blunt-3, Ammo-3)Legs (Cut-2, Blunt-2, Ammo 2) |
| Breaks and Severs | Horns, Feet, Tail |
You May Also Like
- Nightshade Paolumu Strategy & Weakness.
- Beotodus Strategy & Weakness.
- Viper Tobi-Kadachi Strategy & Weakness.
- Coral Pukei-Pukei Strategy & Weakness.
- Barioth Strategy & Weakness.
- Nargacuga Strategy & Weakness.
- Glavenus Strategy & Weakness.
- Tigrex Strategy & Weakness.
- Brachydios Strategy & Weakness.
- ALL GUIDES →


Be the first to comment